| Hardware components: | ||||||
 |
| × | 1 | |||
 |
| × | 1 | |||
| Software apps and online services: | ||||||
| ||||||
| ||||||
| ||||||
 |
| |||||
Story
In this write-up I'll tell you everything I learned about the Particle integration with Google Maps.
Wait a minute, location without GPS?
Yes! We can now find the location of our Particles without needing extra hardware (eg: a GPS module). This is possible because the Google Maps Geolocation API is able to return a location and an accuracy radius from visible Wi-Fi access points or cells towers. Pretty cool, huh?
The four common types of geolocation
Some theory, from the Particle site:
GPS (GLOBAL POSITIONING SYSTEM): The Global Positioning System (GPS) is generally the most accurate and it can provide device location continuously. Under normal conditions, GPS can locate a device with an accuracy of ~4 meters.
CELLULAR TOWER LOCATION: Every cell tower has an identifier, and this can be looked up using the Google Geolocation API to find its location. This process is fast and provides a general location, usually within 4000 meters or a couple miles.
WI-FI LOCATION: The Google Maps integration also supports this method of geolocation. Particle Photon and P1 (Wi-Fi) devices can collect visible Wi-Fi access points, and send these to the geolocation API in exchange for its location. Often times, Wi-Fi geolocation is more precise than cellular geolocation, often with an accuracy radius of 50 meters or less.
IP ADDRESS LOCATION: Particle Wi-Fi devices report their last IP address to the cloud, which could be used for this geolocation method. This is most often the least accurate of the 4 methods described in this section. This technique is not used by the Particle-Google Maps integration.
Recap: this integration uses WI-FI and cellular tower location.
How to do this
Let's start setting things up.
STEP 1: get an API key. Go to this Google Maps Geolocation API link and hit on the GET A KEY button -> create a new project -> enter the name and hit CREATE AND ENABLE API.
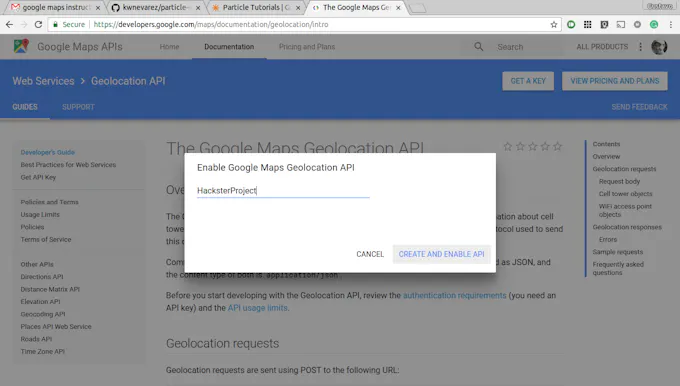
1 / 2 • You'll need that key
To check your API keys, hit the Google Developer Credentials Console at any time.
If you get lost follow the Particle docs here.
Step 2: create the Particle-Google Maps integration on this link. You'll need the api key you got on step 1.
To ensure things are OK so far, hit the TEST button. You should get a Success popup at the bottom right.
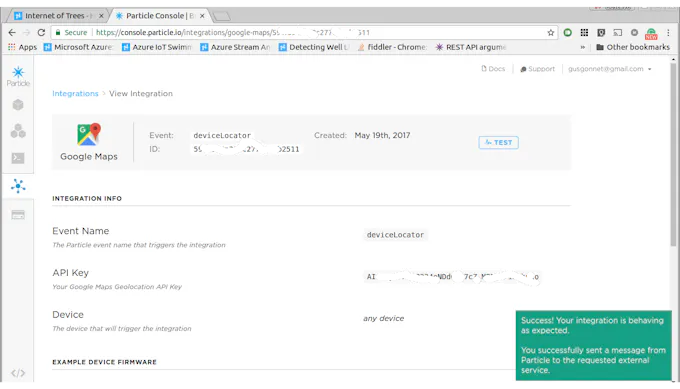
Again, in case of trouble check the Particle docs.
Step 3: flash your particle with the code on this repo.
Now let's map it! There are many options to do this. In the following sections we'll explore a couple of them.
Map it on particle device locator
In this section we'll use the particle device locator.
Step a: Install the Google Cloud SDK.
Step b: once you installed the SDK, set it up by running in a console:
gcloud init
Step c: authenticate your SDK with the Google Cloud Platform:
gcloud beta auth application-default login
Step d: clone the repo:
git clone https://github.com/kwnevarez/particle-device-locator
Note: If the previous command fails, it may mean that you don't have git installed on your computer. Please use this link to install it. Once finished, run the command again.
Step e: install the dependencies:
cd particle-device-locator
npm install
Note: If the previous command fails, it may mean that you don't have npm or nodeJS installed on your computer. Please use this link and this link to install them. Once finished, run the command again.
Step f: configure it, by entering in config.json the api key you got in step 1:
cd particle-device-locator
vi config.json
Note: vi is a command line editor. If you don't have ti around you can use notepad, nano, or anything you like to edit the config.json file.
It should end up looking like this:
{
   "map_api_key": "AIzaSyDcuB2m-y7XxvFpIcNeeLP2MJCGLpm4lxs",
   "event_name": "deviceLocator"
}
HINT: use your api key, not mine (mine won't work - it's deactivated already...)
Step g: on the Google Developer Credentials Console, enable the google maps javascript API . It looks like this:

1 / 2 • Just hit that ENABLE button on top
Step h: run it:
npm install
Step i: open it at http://localhost:8080. After logging it with your Particle credentials, you should be facing a map. Hitting All devices on the top right maps your particles with a red arrow like this:
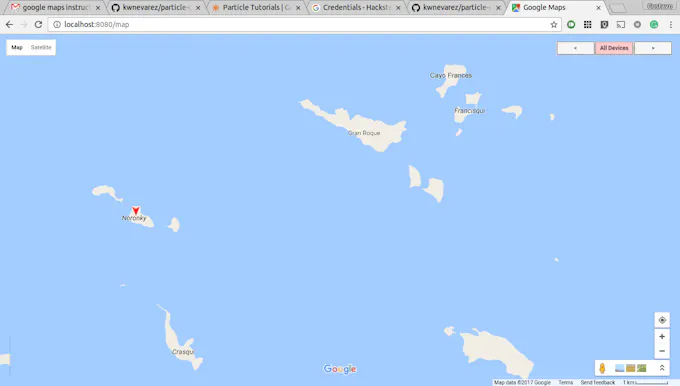
1 / 2 • You should visit this place (yes my photon is in that green bag)
Map it on Ubidots
In this section we'll use Ubidots.
Step a: flash the attached code (maps.ino) in your Particle or add a publish like this in your locationCallback() function:
Particle.publish("ubidotsLatLong", "{\"ubi-dsl-vl\":\"" + Particle.deviceID() + "/" + name + "\", \"ubi-token\":\"" + ubidotsToken + "\", \"ubi-value\":\"" + value + "\" , \"google-lat\":\"" + lat + "\" , \"google-lng\":\"" + lon + "\"}", 60, PRIVATE);
Step b: setup a webhook hitting the Ubidots HTTPS API. Go to the particle integrations and hit NEW INTEGRATION. This is the webhook information:
- Event name: ubidotsLatLong
- Request type: POST
- Device: Any
- Advanced settings:
- Send custom data: JSON
And then enter:
   {
      "value": "{{ubi-value}}",
      "context": {
        "lat": " {{google-lat}}",
        "lng": "{{google-lng}}"
      }
    }
- include default data: no
- enforce ssl: yes
This is what the webhook is doing for us:

The webhook is sending lat/long coordinates to Ubidots
Step c: Get an account on Ubidots. You can start using it for free.
Step d: Create a dashboard by hitting the Dashboard tab on top and then hitting the yellow + to add a dashboard.
Step e: Add a new map widget (note the button on the top right corner):
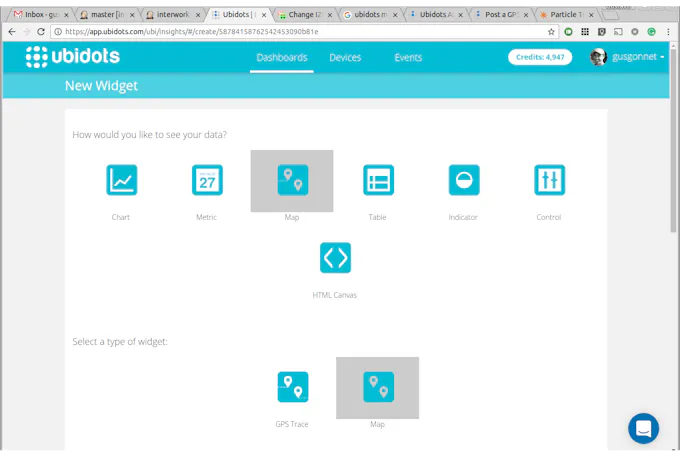
Adding a map widget
Step f: select the geo variable on the device that is sending this data and hit on Add variable then Finish

Select the variable with lat/long coordinates info
Step g: Enjoy looking at the location of your Particle:
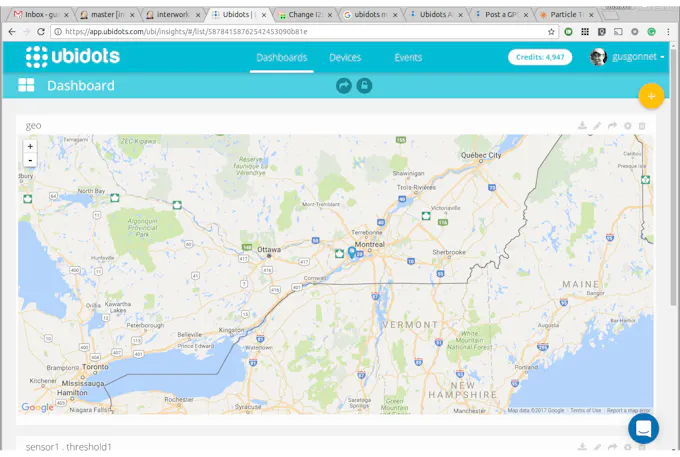
It's right there!
References
These links help me get started on Ubidots:
Conclusion
Particle, Google Maps and Ubidots made it really easy to put our projects on a map, without needing to add a GPS to our hardware. Impressive!
Need help?
If you require professional help with your projects, don't hesitate to write me a line about your needs at gusgonnet@gmail.com. Thank you!