<html> <ul id=„markdown-toc“><li>
  <ul><li/>
    <li><a href="https://ivadim.github.io/2017-08-21-fruitnanny/#disclaimer" id="markdown-toc-disclaimer">Disclaimer</a></li>
    <li><a href="https://ivadim.github.io/2017-08-21-fruitnanny/#history" id="markdown-toc-history">History</a></li>
  </ul></li>
<li>
<a href=„https://ivadim.github.io/2017-08-21-fruitnanny/#build-guide“ id=„markdown-toc-build-guide“>Build guide</a> <ul><li> <a href=„https://ivadim.github.io/2017-08-21-fruitnanny/#hardware“ id=„markdown-toc-hardware“>Hardware</a> <ul><li><a href=„https://ivadim.github.io/2017-08-21-fruitnanny/#dht22-connection“ id=„markdown-toc-dht22-connection“>DHT22 connection</a></li>
        <li><a href="https://ivadim.github.io/2017-08-21-fruitnanny/#leds-connection" id="markdown-toc-leds-connection">LEDs connection</a></li>
        <li><a href="https://ivadim.github.io/2017-08-21-fruitnanny/#camera-and-mic-connections" id="markdown-toc-camera-and-mic-connections">Camera and Mic connections</a></li>
      </ul></li>
    <li>
<a href=„https://ivadim.github.io/2017-08-21-fruitnanny/#software“ id=„markdown-toc-software“>Software</a> <ul><li><a href=„https://ivadim.github.io/2017-08-21-fruitnanny/#1-raspbian-setup“ id=„markdown-toc-1-raspbian-setup“>1. Raspbian setup</a></li>
        <li><a href="https://ivadim.github.io/2017-08-21-fruitnanny/#2-basic-configuration" id="markdown-toc-2-basic-configuration">2. Basic configuration</a></li>
        <li/>
        <li><a href="https://ivadim.github.io/2017-08-21-fruitnanny/#4-audio-and-video-pipeline-setup" id="markdown-toc-4-audio-and-video-pipeline-setup">4. Audio and Video pipeline setup</a></li>
        <li>
<a href=„https://ivadim.github.io/2017-08-21-fruitnanny/#5-janus-webrtc-gateway“ id=„markdown-toc-5-janus-webrtc-gateway“>5. Janus WebRTC Gateway</a> <ul><li><a href=„https://ivadim.github.io/2017-08-21-fruitnanny/#installation“ id=„markdown-toc-installation“>Installation</a></li>
          </ul></li>
        <li>
<a href=„https://ivadim.github.io/2017-08-21-fruitnanny/#sensors-and-leds-access“ id=„markdown-toc-sensors-and-leds-access“>Sensors and LEDs access</a> <ul><li><a href=„https://ivadim.github.io/2017-08-21-fruitnanny/#leds“ id=„markdown-toc-leds“>LEDs</a></li>
<li><a href="https://ivadim.github.io/2017-08-21-fruitnanny/#dht22" id="markdown-toc-dht22">DHT22</a></li>
</ul></li>
<li><a href="https://ivadim.github.io/2017-08-21-fruitnanny/#autostart-audio-video-nodejs-and-janus" id="markdown-toc-autostart-audio-video-nodejs-and-janus">Autostart Audio, Video, NodeJS and Janus</a></li>
<li><a href="https://ivadim.github.io/2017-08-21-fruitnanny/#nginx" id="markdown-toc-nginx">Nginx</a></li>
</ul></li>
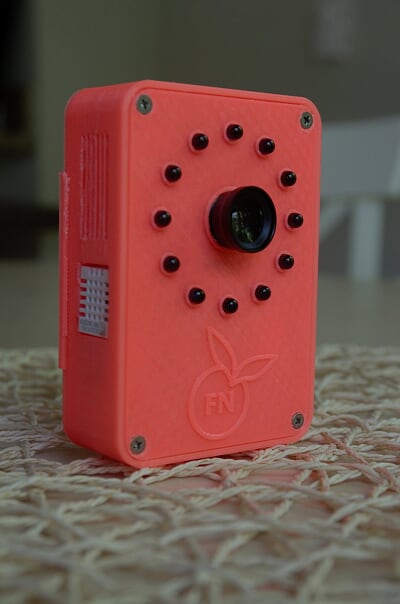
<li><a href="https://ivadim.github.io/2017-08-21-fruitnanny/#case" id="markdown-toc-case">Case</a></li>
</ul></li>
<li><a href="https://ivadim.github.io/2017-08-21-fruitnanny/#bottom-line" id="markdown-toc-bottom-line">Bottom line</a></li>
</ul><p>Fruitnanny is a code name for a DIY <em>geek</em> baby monitor. It uses RaspberryPi, a NoIR camera module, infrared lights, temperature and humidity sensors, and a custom Web UI. Chrome and Firefox with native WebRTC are used as clients. Right now it means all major platforms like Windows, Linux, Android, MacOS, and <a href=„https://tokbox.com/blog/why-were-excited-about-webrtc-support-in-ios-11-and-safari/“>iOS soon</a> are supported.</p><p class=„center“><img src=„https://ivadim.github.io/img/fruitnanny/fn3.jpg“ alt=„fruitnanny“/></p> <p class=„center“><img src=„https://ivadim.github.io/img/fruitnanny/video-mobile.gif“ alt=„fruitnanny-gif“/></p> <h2 id=„disclaimer“>Disclaimer</h2> <p>I assume that a reader worked with RaspberryPI system before and understand Linux systems. Feel free to contact me using Disqus or my email <a href=„mailto:iva9im@gmail.com“>iva9im@gmail.com</a>.</p> <h2 id=„history“>History</h2> <p>When my son was born in March 2016 I got a holly mission to find a video baby monitor. After some research, I didn’t find good candidates(too expensive or didn’t have some features) and, being a geek person, decided to build my own device. That time I had RaspberryPi v1 Model B which had been used for media center. My wife wasn’t happy with the idea but she didn’t have a choice.</p> <p>At the beginning I thought it would be an easy task, probably someone already had built something similar. Google found dozens of projects but none of them had real-time audio and video capabilities which I wanted to have in my project. Some projects were trying to use VLC streaming, MJpeg or others technics. I was trying to use all of them but wasn’t satisfied. Then I stumbled upon <a href=„https://www.linux-projects.org/uv4l/“>UV4L</a> project and it was promising, especially WeRTC part. I chose this project as a main software part of the project.</p> <p>Another big part of the project was an additional hardware. Connect a camera to Raspberry is not a big deal, but because baby monitor works mostly during the night, it must have some infrared lights to allow night vision. Plus, it’s good to have sensors data like temperature and humidity.<br/>I didn’t design electronics from the college and I had to refresh a knowledge.</p> <p>Due to all of these initial problems I managed to build Alpha version only after two months. I called it “lunch box” version:</p> <p class=„center“><img src=„https://blptta-db3pap001.files.1drv.com/y4msCor0Inl6v0RHCRv8gCZjLARfAwv8qqxbCuCPdsHleJi-H9Gv3TDZtDtN893LzDIu8GjgOqx46100zNERQQc6W2bXvLNv9HZADk6p8YfAlfxg4ytWWmEi24aBFKZltU7xGQoPdPhPeDuRH2Quy9ErbCzAVc4WX_qSn_Haw0MpKCWUwqpLSSn-3QzrC2tU5GHRK0LQE5MMDbLQ_N8YMI_ow?width=554&height=612&cropmode=none“ alt=„alpha“/></p> <p>This version worked good but had several problems:</p> <ul><li>Audio quality was horrible. There was a loud noise(like a helicopter)and it was almost impossible to hear a baby’s cry.</li>
<li>Power problems. After 20-30 minutes system rebooted itself.</li> <li>Ugly “lunch box” case :)</li> <li>UV4L is distributed only through binaries what prevented any modifications. The biggest concern for me was a fact that I couldn’t modify a WebUI.</li>
</ul><p>Some of the issues were related to low CPU power and some circuits problems in RaspberryPi v1. I didn’t find other way but upgrade to RaspberryPi v3. It’s much more powerful and suites better for video and audio processing and as a bonus contains built-in wifi.</p> <p>I couldn’t spend a lot of time on the project next several months because of the baby. Progress was very slow but at the end, project was finished and contained completely changed architecture, a new WebUI and, as a bonus, a new case.</p> <h2 id=„hardware“>Hardware</h2> <p>The final version of my device contains next parts. Some parts are mandatory(like RaspberryPi) and some are optional (infrared lights, DHT sensor, case). Parts can be bought in different places. I used AliExpress and Amazon. It’s possible to replace some parts with different compatible models (like Camera module, microphone, and all electronics).</p> <table><thead><tr><th>Picture</th>
<th>Name</th>
<th>Links</th>
<th>Description</th>
</tr></thead><tbody readability="8"><tr readability="1"><td><img src="https://pe8klw-db3pap001.files.1drv.com/y4mbl2fHipnK_BzJwA0PnhYP5C817YiP_YqOBKMVLPXRXGJOXB_6ILbSM2NBaVrpP4V_MZ-QbAXhd5lARJi5_Yaal8HImnTb_oZn2oz5_r5YiIkjzDYSD6zgwlxtwD4b6uQ78Ki5Gt_ZbAAe8oxUVmDtZzIi5eXn8Po5Gg_Sv7rajaF3n-epTsmEAi-GbX33QChDKbwQeIUqHLkUR7hWPpslg?width=330&height=80&cropmode=none" alt="rp"/></td>
<td>RaspberryPI 3</td>
<td><a href="https://www.adafruit.com/product/3055">Adafruit</a></td>
<td>A main part of the device</td>
</tr><tr readability="1"><td>
<img src=„https://mtzcdw-db3pap001.files.1drv.com/y4m-iDCUq0TbPv453xptkQNtgx0gGO2VOakVrYMaOUZlMW53l-ezS9ugZSK1kiO9rTYHy-nXNYKqYjYKt0bs5yQLURejazjqeTomwvWvPvxrqmUBlGw9YzfkdysUQlVhN2RBuKhYMsLZJUU8jw3khJ6RSk_d-jFtUXZVhZXnnfRpUy0apFMp3K2pVF3-JvZJuITXSVZfgi9ecOgyNu7wt2mwQ?width=330&height=80&cropmode=none“ alt=„noir“/><br/><img src=„https://zurqgq-db3pap001.files.1drv.com/y4m0arDUWwUVxTBck_oe-VjZe-o4-jiJS1r9AEJlSEW1l2FiSsuFXybjp6Cc9RMeTBZbwG06b8fCBT6vKnbzBxbjjqiiR-bOfWq7NkmS6VL5kNCN-00fUmG_YF-mjPkXqZ7mA-EgVkPjbojOjHCba3YAcLXlbz4H8yPvyWVZsHz3yTZy49h6lXSn-IIbjdhr8Tlmo6Q_hFzQoZDWUPYd7GWPw?width=330&height=80&cropmode=none“ alt=„noir-led“/></td>
    <td>NoIR Camera</td>
    <td>
<a href=„https://www.adafruit.com/product/3100“>Adafruit</a> <br/><a href=„https://www.amazon.com/Raspberry-Pi-Camera-Filter-Vision/dp/B00KX3HS4K/ref=sr_1_6?ie=UTF8&qid=1500357433&sr=8-6&keywords=raspberry+pi+noir“>Amazon</a> </td>
<td>A camera module for better night video capture. Can be replaced with v2 module</td>
</tr><tr readability="1"><td><img src="https://z0rpeq-db3pap001.files.1drv.com/y4m24V6-WZ3Px-aVaF7drtz6GFI_UX8WaW1KHaTDMXs1oEjYbeYB5JUtNsi70Fe0x3kisfhH9YXoG6IB093GAfbOtjHUoYX-JXucBd__w7dX6CtZQNLFcWz_F8kkq5pQIQSDtdUqwBzKHcZf34YN4G7T9ZGSUC0E9hWqp6RyrKEN5TWD7gzq-7isTkVHMbtiCrj0rWW4SoCp7TveZFFrUEsTw?width=256&height=80&cropmode=none" alt="lens"/></td>
<td>Cheap iPhone lens</td>
<td><a href="https://www.amazon.com/iPhone-GFKing-Universal-Samsung-Blackberry/dp/B01FFPHPNE/ref=sr_1_10?ie=UTF8&qid=1501565064&sr=8-10&keywords=iphone+lens">Amazon</a></td>
<td>Lens are used only to increase a view angle</td>
</tr><tr readability="3"><td><img src="https://eht9ha-db3pap001.files.1drv.com/y4m7qDBfwVwZTvuCO5728omRoq19-Ct4hPTSky5C6K4SpzeGNID0PweQnaJpOaViR6LIq7FvhUmTWwoKsBiJRYcEKS7VziNz2fKQxBJtG16iYaaCA-TCwmibpp2V6bW2ILxI-wj_0dYDkZW8sX-DupgUZbw_pfM5cmYZoDUWeWdEkWR1l_0rgJsII6dAiDJ3fZhZrLomgPsTnc7zskEWgHWtA?width=256&height=80&cropmode=none" alt="power"/></td>
<td>Power Adapter 2A</td>
<td><a href="https://www.amazon.com/NeeGo-Raspberry-Supply-Adapter-Charger/dp/B01DTDDDMQ/ref=sr_1_4?ie=UTF8&qid=1500357624&sr=8-4&keywords=raspberry+pi+Power+Adapter+2A">Amazon</a></td>
<td>Because device has external lights, sensors and intensively uses WiFi it’s recommended to use 2A power adapter</td>
</tr><tr readability="2"><td><img src="https://odzbbw-db3pap001.files.1drv.com/y4mYHXGgNkkbDzhp7cZdMwtJ_ZLAMBFtf6YTGhL5AlWbUBt_Yq_YszKUSSvVwvX5L20MEbe3hWON2MBwinrRF1RaXjmEzB34KWYwinuVu755mmdjA59fPs-nfupq-864AP8lT06pzXozmahgRNOh25zeyTX-r5_jbl-kPkROe_8mrNo4mBNWHFJ9u1_kyZC2Wc3-u9KkcuT6rKw0G3MCnM3Zw?width=330&height=80&cropmode=none" alt="mic"/></td>
<td>Microphone</td>
<td><a href="https://www.amazon.com/gp/product/B00XU1GHO4/ref=oh_aui_detailpage_o00_s00?ie=UTF8&psc=1">Amazon</a></td>
<td>The cheapest and smallest(important!) mic. Not all are good. I replaced several before find working one</td>
</tr><tr readability="1"><td><img src="https://1erpeq-db3pap001.files.1drv.com/y4mypD4AU7fHtklek81HRcINxzxir6nTkwP3j1YZ76n4eP-ifarB_MivEpb1cU6O17l050ERQgenRC6Nj1mu3MxnDC4d5uraytfKEL_wpkG7A-w9QOzlMyiPcjrk80aLauO7m9ICTQibgp51fd7uKPX-ofy-BHu-b3LRiw4m-W7gk2YajnRHrHdFnGp-HBYabn68e1vfIvl26HpaOwIk_H3tw?width=330&height=80&cropmode=none" alt="dht22"/></td>
<td>DHT22 sensor</td>
<td><a href="https://www.amazon.com/SODIAL-AM2302-Digital-Temperature-Humidity/dp/B016DC84R4/ref=sr_1_10?s=musical-instruments&ie=UTF8&qid=1500357576&sr=8-10&keywords=DHT22">Amazon</a></td>
<td>A sensor to gather temperature and humidity of environment</td>
</tr><tr readability="2"><td><img src="https://cnt9ja-db3pap001.files.1drv.com/y4m7kYV8u2irY0wozdgbdPPvFMSLKs7rBRgHWjjZ31iX-e5c394ThpSyWx1s-GqoioEjtssRydVmb4HC_pQFadDDPm4GZn13aYSFwrGnsLfyeoP5Tcl-k5wUzx4R5HTA1Ab0foBpaO5Pgks_9hdksTb5D0PayPhPwTPO2k2K6CfOFMwwDaMlSiv1vBi5DIZbzOo33WhioCxcENA54-hWXbXOQ?width=330&height=80&cropmode=none" alt="irled"/></td>
<td>12 x Infrared LEDs <br/>(940 nm)</td>
<td><a href="https://www.adafruit.com/product/387">Adafruit</a></td>
<td>Allow device to see in the darkness. More LEDs more light more power consumption</td>
</tr><tr readability="3"><td><img src="https://qp8kjw-db3pap001.files.1drv.com/y4mAqLBwxHx96hEhdzTo5xfWGteJnKugHsgDT10o99MKFvBVrFzn-PKXqMFtwvCak39dj34PSGYE6Bu07mQ62-rBZWiYq7lU23fQJLet25VMn6lVIw7jaZElvVuIbyIcHNC6C1Hs01Rh_nub9j-ahVvrYFuc60iWYDue5RYS1g9BM0kul6ItTXNzqKOR8UyMU22Lud5EZINywq4OdP_UtxM_Q?width=256&height=80&cropmode=none" alt="resistor"/></td>
<td>4 x resistors <br/>(27 Ohm, 1/4 W)</td>
<td><a href="https://www.amazon.com/E-Projects-25EP51427R0-Ohm-Resistors-Pack/dp/B0185FERU0/ref=sr_1_1?s=industrial&ie=UTF8&qid=1502073844&sr=1-1&keywords=27+Ohm+1%2F4+W">Amazon</a></td>
<td>Resistors to pair with InfraRed LEDs</td>
</tr><tr readability="2"><td><img src="https://b7pqta-db3pap001.files.1drv.com/y4m0k3yK2qwwzchX8cSX8jPg2lJmmYBSzAUtdYFQq5Usok4ZaJzAnogolBRAn8tVWa70zEeYsa0KJIu6_nSH6MdQv6kfTj53EAO7t0k1e2Ce8fUucBEqnVjVQI5YWUm_UsdGdZzFoyjETJFwWrHsj09lq10q0C3T-SYEEen0OBKHDUNG4ttks3Sqt8_sFVX__zb0-OWhuM4x9djFFSYQlHXUQ?width=330&height=80&cropmode=none" alt="tip120"/></td>
<td>TIP120 Darlington <br/>transistor</td>
<td><a href="https://www.adafruit.com/product/976">Adafruit</a></td>
<td>A transistor is used to control all LEDs through GPIO.</td>
</tr><tr readability="3"><td><img src="https://qp8kjw-db3pap001.files.1drv.com/y4mAqLBwxHx96hEhdzTo5xfWGteJnKugHsgDT10o99MKFvBVrFzn-PKXqMFtwvCak39dj34PSGYE6Bu07mQ62-rBZWiYq7lU23fQJLet25VMn6lVIw7jaZElvVuIbyIcHNC6C1Hs01Rh_nub9j-ahVvrYFuc60iWYDue5RYS1g9BM0kul6ItTXNzqKOR8UyMU22Lud5EZINywq4OdP_UtxM_Q?width=256&height=80&cropmode=none" alt="resistor"/></td>
<td>1 x resistors <br/>(270 Ohm, 1/4 W)</td>
<td><a href="https://www.amazon.com/Electronics-Salon-100PCS-Axial-Carbon-Resistor/dp/B01E26MMU8/ref=sr_1_8?ie=UTF8&qid=1500358378&sr=8-8&keywords=270+Ohm+1%2F4+W">Amazon</a></td>
<td>A resistor to pair with the transistor</td>
</tr></tbody></table><p>When all parts are in place it’s time to assemble them. Below is a simplified connection scheme.</p>
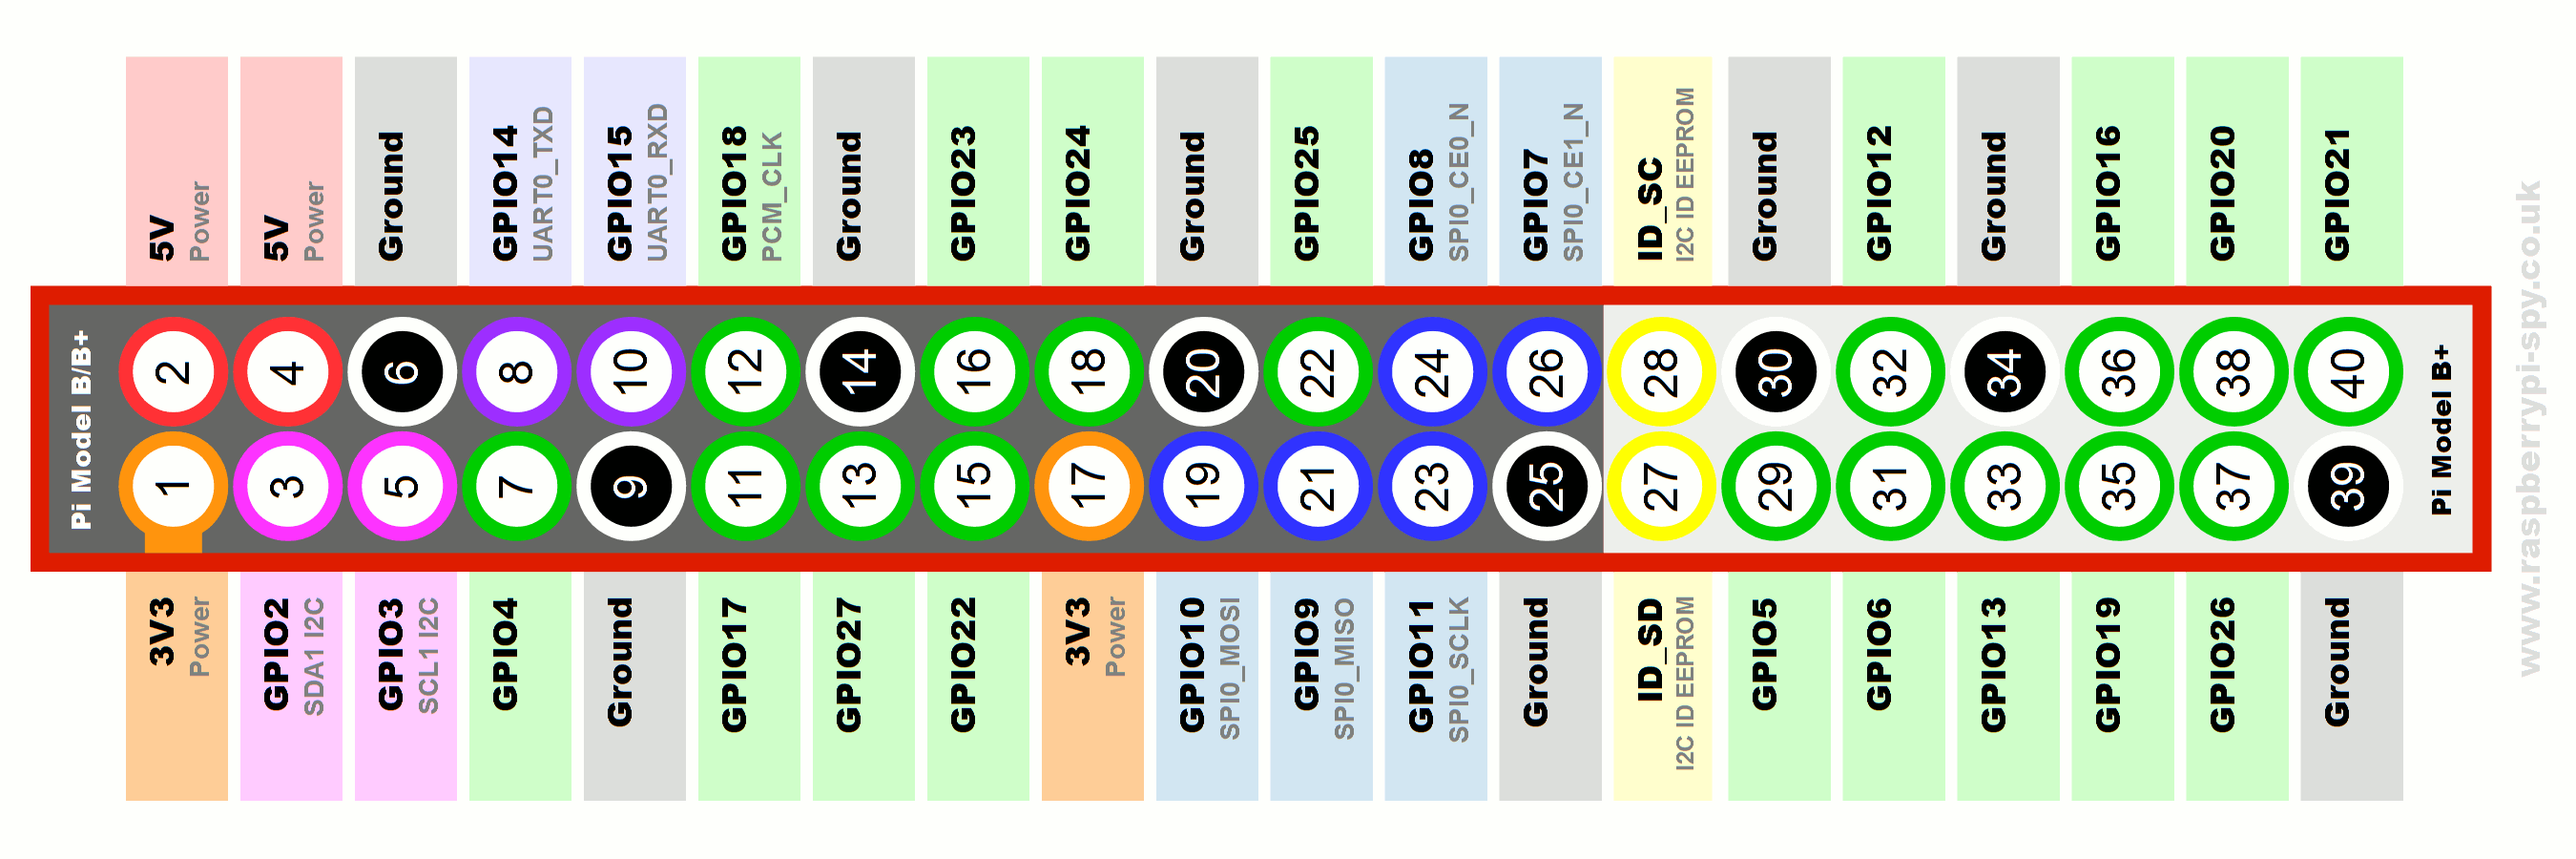
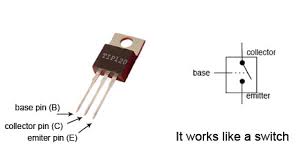
<p><img src=„https://ivadim.github.io/img/fruitnanny/fruitnanny-scheme.png“ alt=„connections“/></p> <p><img src=„https://ivadim.github.io/img/fruitnanny/gpio.png“ alt=„rpi-gpio“/></p> <p><img src=„https://ivadim.github.io/img/fruitnanny/tip120c.jpg“ alt=„tip120-c“/></p> <h3 id=„dht22-connection“>DHT22 connection</h3> <p>It requires 3 wires to connect DHT22. First leg(+) connects to pin 17 on raspberry (3.3V). Second(control) to pin 18 (GPIO24), third one is skipped and fourth(-) connects to pin 20 (Ground).</p> <h3 id=„leds-connection“>LEDs connection</h3> <p>A light system is divided into 4 groups of three infrared LEDs and one 27 Ohm resistor, and TIP120 transistor. This <a href=„http://www.electricaltechnology.org/2013/08/how-to-calculate-value-of-resistor-for-LED-circuits.html“>“how to”</a> can be useful to understand LED parameters.</p> <p>All LEDs anodes(long leg) are soldered together and connected to TIP120 leg #3 (Emitter). Each of cathodes(short legs) connects to a resistor and then all together to pin 6(Ground) on raspberry.</p> <p>I used next formula and <a href=„https://cdn-shop.adafruit.com/datasheets/IR333_A_datasheet.pdf“>datasheet</a> to calculate resistor’s value:</p> <p>
R = (Vsupply – (VF x No. of LED’s)) / IF
</p> <p>
25 Ohm = (5V - 3*1.5V) / 0.02A
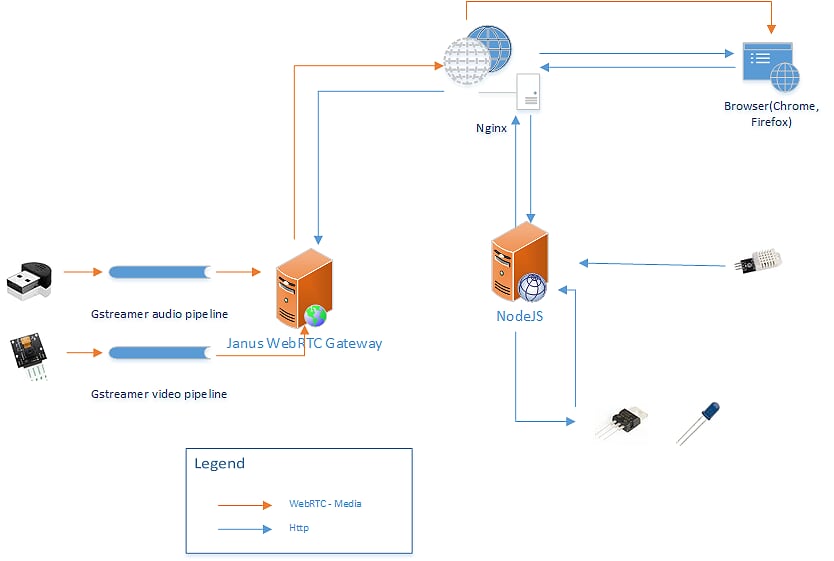
</p> <p>27 Ohm resistor has the closest value(up) to the result.</p> <p>TIP120’s #1 leg(Base) connects to pin 3 (GPIO2) through 270 Ohm transistor. This channel to control programmatically lights by changing GPIO value. Leg #2 connects to pin 2 (5V).</p> <p>Several words about the transistor. RaspberryPi’s gpio pin output is maxed 16mA and 3.3V. So transistor must be able to switch state based on that pretty small amperage. After a small research I found Darlington type of transistors and bought TIP 120. It was designed for higher loads(up to 5A and 60V through Collector-Emitter) but it suits needs of this device as well.</p> <p>Example of soldering:</p> <p><img src=„https://dnuaha-db3pap001.files.1drv.com/y4m6VdikN1hE5hzGbhSf9ASr81SrJrnlhbAowFvhjZpMGrstM_C2ukn-bmHgKLSehtucx13hdJgE8Y99pMq7trcaIgyTc-6ryBM4BrjRWLvkjJFGiUTKlx62llj7JwNveXjklfsMQDq3L4JkaWb1zaqc5Ik6_oZAo4yLxLbhAwZAuYph-BKoVI2TjKwqSruDM5mvVE_g_g5JHdBjQs4Z9Asuw?width=300&height=200&cropmode=none“ alt=„soldering-transistor“/></p> <p><img src=„https://qe8njw-db3pap001.files.1drv.com/y4maXjm77whjRFMuMZT3DgvuK9oMYd5vYMnoMVkllowA1d-1gLa5qh9WwgnocaoQL9GICjSIoXhs4Jm5q1apfpElfYflakRwnmsPCFsxf3jl7cPdn4aQV_CHGm26NP4HmT_DscwNum-DkKiCk8M2DmPyBiQ3gjdtJSfWZ5O50CI50GuUOU2ZSH50tsRY-7o5oNLVJj8k4Kuu2aN9EKn1KmtQw?width=495&height=660&cropmode=none“ alt=„soldering“/></p> <h3 id=„camera-and-mic-connections“>Camera and Mic connections</h3> <p>Connect a microphone to any USB ports and a camera module to CSI port.</p> <h2 id=„software“>Software</h2> <p>When everything is assembled it’s time to breathe a life into the device.</p> <p><img src=„https://ivadim.github.io/img/fruitnanny/FruitNannyDiagram.png“ alt=„architecture“/></p> <p>The system is based on raspbian OS and next applications:</p> <ul><li> <a href=„https://github.com/meetecho/janus-gateway“>Janus WebRTC gateway</a> - setup a WebRTC connections between browser and media streams.</li>
<li>
<a href=„https://nodejs.org/en/“>NodeJS</a> - is a server-side javascript environment. It’s used for 2 main purposes - 1. serve html and other content to browser, 2. run scripts on the server side.</li>
<li>
<a href=„https://nginx.org/en/“>Nginx</a> - is a proxy to Nodejs and Janus allowing to use single URL access.</li>
<li>
<a href=„https://gstreamer.freedesktop.org/“>GStreamer</a> is a library to create media pipelines. It forwards a H264 encoded video stream from camera module without modifications to browser. An audio stream is encoded using Opus codec before forwarding.</li> </ul><h3 id=„1-raspbian-setup“>1. Raspbian setup</h3> <p>Get a new or existing micro SD card and flash a raspbian into it:</p> <ul><li><a href=„https://www.raspberrypi.org/documentation/installation/installing-images“>https://www.raspberrypi.org/documentation/installation/installing-images</a></li>
<li><a href="https://www.howtoforge.com/tutorial/howto-install-raspbian-on-raspberry-pi/">https://www.howtoforge.com/tutorial/howto-install-raspbian-on-raspberry-pi/</a></li>
</ul><h3 id=„2-basic-configuration“>2. Basic configuration</h3> <p>Install basic software:</p> <div class=„highlighter-rouge“ readability=„7“> <pre>sudo apt-get update sudo apt-get install vim git nano emacs libraspberrypi-dev autoconf automake libtool pkg-config \
alsa-base alsa-tools alsa-utils
</pre> </div> <p>Install NodeJS to serve WebUI:</p> <div class=„highlighter-rouge“ readability=„6“> <pre>curl -sL https://deb.nodesource.com/setup_6.x | sudo -E bash - sudo apt install -y nodejs </pre> </div> <p>Run raspberry config to enable camera and resize partition (options 1 and 5):</p> <div class=„highlighter-rouge“> <pre>sudo raspi-config </pre> </div> <p><img src=„https://otzhbw-db3pap001.files.1drv.com/y4mCf9NGpSjPALhZzxnvhIn6zKqyPvmXWLUjeUnnQmZEkURzjuu9fALeLQ-ZNo0VpY0O47zXjqsXItoSK_Y6iQw6UE_zUhARLck0ol4ZZEAKkYRi5nz3yLIH-3WYhf29pPbT-GYcFNqw3_U8jWtbxr0R3oQni607Q6lGIMRRXESqJTz2iL6KSGainmjocFaq08AxSlMjOGixyVxt3jrIt8sDw?width=1024&height=700&cropmode=none“ alt=„raspi-config“/></p> <p>Upgrade the Raspberry Pi’s firmware:</p> <div class=„highlighter-rouge“ readability=„6“> <pre>sudo apt-get install rpi-update sudo rpi-update </pre> </div> <p>Follow <a href=„https://www.raspberrypi.org/documentation/configuration/wireless/wireless-cli.md“>this instruction</a> to setup WiFi. It’s good to disable WiFi “power save mode” which is enabled by default:</p> <div class=„highlighter-rouge“ readability=„6“> <pre>sudo iw dev wlan0 set power_save off </pre> </div> <p>Add line to
/etc/network/interfaces
</p> <div class=„highlighter-rouge“> <pre>wireless-power off </pre> </div> <p>Access trough <strong>.local</strong> domain (for instance pi.local or fruitnanny.local)</p> <div class=„highlighter-rouge“ readability=„6“> <pre>sudo apt-get install avahi-daemon </pre> </div> <p><a href=„https://github.com/ivadim/fruitnanny“>FruitNanny repository</a> contains web application, configs and additional tools. They all will be used later in the tutorial.</p> <div class=„highlighter-rouge“ readability=„7“> <pre>cd /opt sudo mkdir fruitnanny sudo chown pi:pi fruitnanny git clone https://github.com/ivadim/fruitnanny </pre> </div> <h3 id=„4-audio-and-video-pipeline-setup“>4. Audio and Video pipeline setup</h3> <p>Install GStreamer and media plugin to allow media processing:</p> <div class=„highlighter-rouge“ readability=„8“> <pre>sudo apt-get install gstreamer1.0-tools gstreamer1.0-plugins-good gstreamer1.0-plugins-bad \
  gstreamer1.0-plugins-ugly gstreamer1.0-plugins-bad libgstreamer1.0-dev \
  libgstreamer-plugins-base1.0-dev gstreamer1.0-alsa
</pre> </div> <p>Official repository doesn’t contain a gstreamer plugin for rpi camera module, it need to be built from <a href=„https://github.com/thaytan/gst-rpicamsrc“>sources</a>:</p> <div class=„highlighter-rouge“ readability=„7“> <pre>git clone https://github.com/thaytan/gst-rpicamsrc /tmp/gst-rpicamsrc cd /tmp/gst-rpicamsrc /autogen.sh –prefix=/usr –libdir=/usr/lib/arm-linux-gnueabihf/ make sudo make install </pre> </div> <p>Files /opt/fruitnanny/bin/video.sh and /opt/fruitnanny/bin/audio.sh contain media pipepline setups</p> <p><strong>Video pipeline</strong>:</p> <div class=„highlighter-rouge“ readability=„13“> <pre>gst-launch-1.0 -v rpicamsrc name=src preview=0 exposure-mode=night fullscreen=0 bitrate=1000000 annotation-mode=time+date annotation-text-size=20 ! video/x-h264,width=960,height=540,framerate=8/1 ! queue max-size-bytes=0 max-size-buffers=0 ! h264parse ! rtph264pay config-interval=1 pt=96 ! queue ! udpsink host=127.0.0.1 port=5004 sync=false </pre> </div> <p>Gstreamer asks rpicamsrc for annotated with datetime watermark frames in 960×540 px format and 8 fps then parses them and sends to udp port 5004.</p> <p><strong>Audio pipeline</strong>:</p> <div class=„highlighter-rouge“ readability=„7“> <pre>gst-launch-1.0 -v alsasrc device=device=hw:1 ! audioconvert ! audioresample ! opusenc ! rtpopuspay ! queue max-size-bytes=0 max-size-buffers=0 ! udpsink host=127.0.0.1 port=5002 </pre> </div> <p>Gstreamer asks alsa driver for the audio stream, parses it, resamples, encodes it with opus codec and sens it to udp port 5002.</p> <p>Janus listens both 5002 and 5004 ports for incoming streams.</p> <h3 id=„5-janus-webrtc-gateway“>5. Janus WebRTC Gateway</h3> <p><a href=„https://github.com/meetecho/janus-gateway“>Janus WebRTC Gateway</a> is a WebRTC server which setup communication between browser and media streams.</p> <h4 id=„installation“>Installation</h4> <div class=„language-bash highlighter-rouge“ readability=„10“> <pre># get sources git clone https://github.com/meetecho/janus-gateway /tmp/janus-gateway cd /tmp/janus-gateway git checkout v0.2.4 # install prerequisites sudo apt-get install libmicrohttpd-dev libjansson-dev libnice-dev \
  libssl-dev libsrtp-dev libsofia-sip-ua-dev libglib2.0-dev \
  libopus-dev libogg-dev pkg-config gengetopt
# build binaries sh autogen.sh ./configure –disable-websockets –disable-data-channels –disable-rabbitmq –disable-mqtt make make install </pre> </div> <p>Fruitannany’s specific Janus configuration files are located in folder
/opt/fruitnanny/configuration/janus/
:</p> <ul><li>
janus.cfg
- general janus config. Compare to original file it disables only some unused plugins.</li>
<li>
janus.transport.http.cfg
- enables http access to janus.</li>
<li>
janus.plugin.streaming.cfg
- configures media streams. 5002 port for audio and 5004 for video.</li> </ul><p>Copy these files into Janus config directory:</p> <div class=„highlighter-rouge“ readability=„8“> <pre>cp /opt/fruitnanny/configuration/janus/janus.cfg /usr/local/etc/janus cp /opt/fruitnanny/configuration/janus/janus.plugin.streaming.cfg /usr/local/etc/janus cp /opt/fruitnanny/configuration/janus/janus.transport.http.cfg /usr/local/etc/janus </pre> </div> <p>SSL certificates need to be generated to access Janus gateway through https protocol, same certificates will be used for Nginx:</p> <div class=„highlighter-rouge“ readability=„7“> <pre>cd /usr/local/share/janus/certs sudo openssl req -x509 -sha256 -nodes -days 365 -newkey rsa:2048 \
</pre> </div> <h3 id=„sensors-and-leds-access“>Sensors and LEDs access</h3> <p>Enable access to GPIO without root.</p> <div class=„highlighter-rouge“ readability=„6“> <pre>sudo adduser $USER gpio </pre> </div> <h4 id=„leds“>LEDs</h4> <p>The application need to have ability to turn on and off infrared LEDs from browser. I added a simple <a href=„https://github.com/ivadim/fruitnanny/blob/master/bin/light.sh“>shell script</a> to the Fruitnanny which can blink with infrared light. The same file is used by NodeJS Web app.</p> <h4 id=„dht22“>DHT22</h4> <p>Install Adafruit DHT module:</p> <div class=„highlighter-rouge“ readability=„7“> <pre>git clone https://github.com/adafruit/Adafruit_Python_DHT /tmp/Adafruit_Python_DHT cd /tmp/Adafruit_Python_DHT sudo apt-get install build-essential python-dev python-pip sudo python setup.py install </pre> </div> <p>After module installation Python can get data from the DHT22 sensor. As for LEDs, Fruitnanny contains a <a href=„https://github.com/ivadim/fruitnanny/blob/master/bin/dht22.py“>python script</a> which prints out current temperature and humidity. The same script is run by the NodeJS Web app.</p> <h3 id=„autostart-audio-video-nodejs-and-janus“>Autostart Audio, Video, NodeJS and Janus</h3> <p>Now we are one step closer to the final step. Main applications were installed and configured and it’s time to start them.</p> <div class=„highlighter-rouge“ readability=„8“> <pre>cp /opt/fruitnanny/configuration/systemd/audio.service /etc/systemd/system/ cp /opt/fruitnanny/configuration/systemd/video.service /etc/systemd/system/ cp /opt/fruitnanny/configuration/systemd/janus.service /etc/systemd/system/ </pre> </div> <p>And time to start everything:</p> <div class=„highlighter-rouge“ readability=„8“> <pre>sudo systemctl enable audio sudo systemctl start audio sudo systemctl enable video sudo systemctl start video sudo systemctl enable janus sudo systemctl start janus </pre> </div> <p>At this point you should have everything up and running. To disable some services run
sudo systemctl stop SERVICE_NAME
.</p> <p>Install nodejs process manager (PM2) for automatic nodejs app startup:</p> <div class=„highlighter-rouge“ readability=„7“> <pre>sudo npm install pm2 -g pm2 startup sudo su -c „env PATH=$PATH:/usr/bin pm2 startup linux -u pi –hp /home/pi“ pm2 save </pre> </div> <p>And time to start Fruitnanny:</p> <div class=„highlighter-rouge“ readability=„6“> <pre>cd /opt/fruitnanny npm install pm2 start server/app.js –name=„fruitnanny“ </pre> </div> <h3 id=„nginx“>Nginx</h3> <p>To be able to serve janus and nodejs request from one entry point URL(
http://RASPBERRY_IP/
) I set a Nginx proxy to forward requests to the NodeJS(
http://127.0.0.1:7000
) app and to the Janus(
https://127.0.0.1:8089
) gateway.</p> <p>Run next commands to install and configure Nginx:</p> <div class=„highlighter-rouge“ readability=„10“> <pre># install nginx sudo apt-get install nginx # remove default site sudo rm -f /etc/nginx/sites-enabled/default # copy fruitnanny configs sudo cp /opt/fruitnanny/configuration/nginx/fruitnanny_http /etc/nginx/sites-available/fruitnanny_http sudo cp /opt/fruitnanny/configuration/nginx/fruitnanny_https /etc/nginx/sites-available/fruitnanny_https # enable new configs sudo ln -s /etc/nginx/sites-available/fruitnanny_http /etc/nginx/sites-enabled/ sudo ln -s /etc/nginx/sites-available/fruitnanny_https /etc/nginx/sites-enabled/ </pre> </div> <p>These sites enable ‘basic authentication’ to protect access to the system. To add a new user and password pair run:</p> <div class=„highlighter-rouge“ readability=„7“> <pre>sudo sh -c „echo -n 'fruitnanny:' >> /etc/nginx/.htpasswd“ sudo sh -c „openssl passwd -apr1 >> /etc/nginx/.htpasswd“ </pre> </div> <p>Now accessing
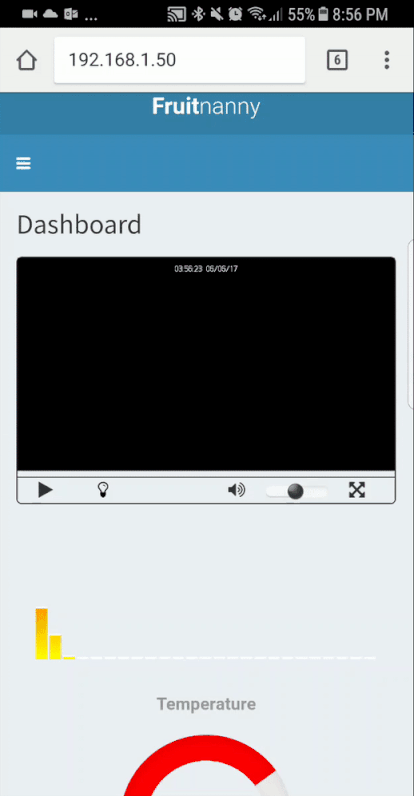
http://RASPBERRY_IP/
you will be asked to enter credentials and after can see a web page with Video Player.</p> <p><img src=„https://mtzbbw-db3pap001.files.1drv.com/y4mF_McCBUDn5_wKHRoqNgzOo9MEz3kFjlfDESPUWJW46IeLKrR9lVVPfo-mKKt1vHKgxEt2bKFSjUZOiQnmuBk7I72fChjOKdQTRo-Uv-F5uEiDq_fqhl1SvUOYrwCHBFtXtw_6y2RXMrlj4KRr7AiYSAfDXqzWxZ8BFl_7LSXS4kY4tVBRTtliV6wExh1Q9t4MvutPi3_-OyvFaxfHMdFsw?width=360&height=268&cropmode=none“ alt=„password“/></p> <p><img src=„https://zurpeq-db3pap001.files.1drv.com/y4m3uJezg8tlnhuRJQyn32FOSpV42mNwXb6mKKL6i32TAgZZNr0gWCqyFY6CZ15j4wZB4oCc4NTGK1SsG0jAu_I-NT95_KpIGLz-WSQXBoTcvV98XZNOPcdZ7pyn4fBChtEHoATI2kderr4OpXUhpvdqxRTqkJMb9mUM71Rdsf7a7JNHHBCYiwtryaXepuO90L7Pcg7UEln1sm0HgAKaKDmBQ?width=660&height=304&cropmode=none“ alt=„web-view“/></p> <h2 id=„case“>Case</h2> <p>I used <a href=„https://www.sketchup.com/“>SketchUp</a> to create 3D models. It was my first experiment with 3D printing and I would fail if not help from my friend Christos. The first model I created was not designed properly and slicer(special software to transform a basic 3d model into a 3d printer language) couldn’t even read it. The second model collapsed on the printing bed and only third attempt was successful…</p> <p>All models are available on Thingiverse and GitHub:</p> <ul><li><a href=„https://www.thingiverse.com/thing:2311567“>https://www.thingiverse.com/thing:2311567</a></li>
<li><a href="https://github.com/ivadim/fruitnanny/tree/master/case">https://github.com/ivadim/fruitnanny/tree/master/case</a></li>
</ul><p>Case contains next parts:</p> <ul><li> <strong>Main case</strong> - where RaspberryPI and main electronics live</li>
<li>
<strong>Top cover</strong> - holds LEDs and Camera module</li>
<li>
<strong>Cap</strong> - for easy access to Ethernet port</li>
<li>
<strong>DHT22 cradle</strong> - isolates sensor from hot Raspberry PI</li> </ul><p><img src=„https://alpqta-db3pap001.files.1drv.com/y4mcpV_nd89zJG-pTJ4LuRV594XIqAlkmLEp2er_QMtgvOT646PUqZzonId4dxdFTwJHLh4dzXkkp8xbswKHB6Q_XAgFKRdFQMknDmBschuHvbhOyH2Z2AZ8ZbUBTmsXOHK0FyVaPCn8D5d19GFijpfG6DYBLTI7enXtgh44t0zBq6wFivN1EHHs8_wny5KesWwTvlQOPlEhY6HNAE-qTDn_w?width=567&height=428&cropmode=none“ alt=„3d-1“/></p> <p><img src=„https://azq4vw-db3pap001.files.1drv.com/y4mJDCdxl-SFzo2J6bN6_BrBW564XCCxQVZgqsrHPnEaNE0-8zA3A5kggcpklNS16kvgexGEYIglCerz86tuTJRwiFuRBVY9Ip-U8yghm-cFJLdN1uEUILQvO_shxBQHD2zY5OTZDWgMGSwe2gm5gLCz4Auz4tPPbG3qIGc5Aez1sGtzfghjmqzQMD09PM9KZP_dAyzPny_48N3qqLz8rfZYA?width=559&height=423&cropmode=none“ alt=„3d-2“/></p> <p>I love how the case looks like but next time I would make it bigger and increase size and number of ventilation holes. Currently, all electronics and wires are tightly coupled and it causes problem with heat, the case needs more airflow.</p> <p>The guide turned out into a huge instruction but I hope it will help someone who has a similar idea of building a baby monitor. Feel free to adjust the project to your needs, you can add or remove some sensors, add or remove some functionality, create a completely different case. All my sources are opensources <img class=„emoji“ title=„:blush:“ alt=„:blush:“ src=„https://assets-cdn.github.com/images/icons/emoji/unicode/1f60a.png“ height=„20“ width=„20“ align=„absmiddle“/></p> <p>On my own, I had more ideas but didn’t have time resolve all of them. Some of them:</p> <ul><li>iOS application.</li>
<li>Motion detection and notifications - <a href="https://github.com/Motion-Project/motion">motion</a> application for Raspberry can detect movements using a camera, the only problem that video stream must be splittet between Janus and Motion. I almost accomplished this with GStreamer, ffmpeg and <a href="https://github.com/umlaeute/v4l2loopback">v4l2loopback</a>. Ping me if you are interested in my findings.</li>
<li>logging temperature and humidity into a database for future analysis.</li>
</ul><p>Thank you for your attention!</p> </html>