<html> <div class=„page-content all-page-view-content“ readability=„45“> <div class=„row-fluid build-image“><a href=„https://learn.adafruit.com/assets/49442“><img class=„49442-asset img-responsive“ srcset=„https://cdn-learn.adafruit.com/assets/assets/000/049/442/medium260/circuitpython_pyboards.jpg?1513729514 260w, https://cdn-learn.adafruit.com/assets/assets/000/049/442/medium640/circuitpython_pyboards.jpg?1513729514 640w, https://cdn-learn.adafruit.com/assets/assets/000/049/442/medium800/circuitpython_pyboards.jpg?1513729514 800w, https://cdn-learn.adafruit.com/assets/assets/000/049/442/large1024/circuitpython_pyboards.jpg?1513729514 1024w“ sizes=„(max-width: 768px) 100vw, (max-width: 1024px) 65vw, (max-width: 1365px) 47vw, 750px“ src=„https://cdn-learn.adafruit.com/assets/assets/000/049/442/medium800/circuitpython_pyboards.jpg?1513729514“ alt=„circuitpython_pyboards.jpg“/></a></div> <div class=„row-fluid build-text“ readability=„52“> <p>So, you've got this new<strong> CircuitPython compatible board</strong>. You plugged it in. Maybe it showed up as a disk drive called CIRCUITPY. Maybe it didn't! Either way, you need to know where to go from here. Well, we've got you covered!</p> <h2>This guide will get you started with CircuitPython!</h2> <p>There are many amazing things about your new board. One of them is the ability to run CircuitPython. You may have seen that name on the Adafruit site somewhere. Not sure what it is? We can help!</p> <p>„But I've never coded in my life. There's no way I do it!“ You absolutely can! CircuitPython is designed to help you learn from the ground up. If you're new to everything, this is the place to start!</p> <p>This guide will walk you through how to get started with CircuitPython. You'll learn how to install CircuitPython, get updated to the newest version of CircuitPython, how to setup a serial connection, and how to edit the files.</p> <p>Welcome to CircuitPython!</p> </div> </div><div class=„page-content all-page-view-content“ readability=„57“> <div class=„row-fluid build-text“ readability=„38“> <p>CircuitPython is a programming language designed to simplify experimenting and learning to program on low-cost microcontroller boards. It makes getting started easier than ever with no upfront desktop downloads needed. Once you get your board set up, open any text editor, and get started editing code. It's that simple.</p> </div> <div class=„row-fluid build-image“><a href=„https://learn.adafruit.com/assets/49445“><img class=„49445-asset img-responsive“ srcset=„https://cdn-learn.adafruit.com/assets/assets/000/049/445/medium260/circuitpython_python-logo-master-flat.png?1513729728 260w, https://cdn-learn.adafruit.com/assets/assets/000/049/445/medium640/circuitpython_python-logo-master-flat.png?1513729728 640w, https://cdn-learn.adafruit.com/assets/assets/000/049/445/medium800/circuitpython_python-logo-master-flat.png?1513729728 800w, https://cdn-learn.adafruit.com/assets/assets/000/049/445/large1024/circuitpython_python-logo-master-flat.png?1513729728 1024w“ sizes=„(max-width: 768px) 100vw, (max-width: 1024px) 65vw, (max-width: 1365px) 47vw, 750px“ src=„https://cdn-learn.adafruit.com/assets/assets/000/049/445/medium800/circuitpython_python-logo-master-flat.png?1513729728“ alt=„circuitpython_python-logo-master-flat.png“/></a></div> <div class=„row-fluid build-text“ readability=„48“> <p>Python is the fastest growing programming language. It's taught in schools and universities. It's a high-level programming language which means it's designed to be easier to read, write and maintain. It supports modules and packages which means it's easy to reuse your code for other projects. It has a built in interpreter which means there are no extra steps, like compiling, to get your code to work. And of course, Python is Open Source Software which means it's free for anyone to use, modify or improve upon.</p> <p>CircuitPython adds hardware support to all of these amazing features. If you already have Python knowledge, you can easily apply that to using CircuitPython. If you have no previous experience, it's really simple to get started!</p> </div> <div class=„row-fluid build-image“><a href=„https://learn.adafruit.com/assets/49441“><img class=„49441-asset img-responsive“ srcset=„https://cdn-learn.adafruit.com/assets/assets/000/049/441/medium260/circuitpython_circuit_playground_adafruit_blinka_computer.png?1513729326 260w, https://cdn-learn.adafruit.com/assets/assets/000/049/441/medium640/circuitpython_circuit_playground_adafruit_blinka_computer.png?1513729326 640w, https://cdn-learn.adafruit.com/assets/assets/000/049/441/medium800/circuitpython_circuit_playground_adafruit_blinka_computer.png?1513729326 800w, https://cdn-learn.adafruit.com/assets/assets/000/049/441/large1024/circuitpython_circuit_playground_adafruit_blinka_computer.png?1513729326 1024w“ sizes=„(max-width: 768px) 100vw, (max-width: 1024px) 65vw, (max-width: 1365px) 47vw, 750px“ src=„https://cdn-learn.adafruit.com/assets/assets/000/049/441/medium800/circuitpython_circuit_playground_adafruit_blinka_computer.png?1513729326“ alt=„circuitpython_circuit_playground_adafruit_blinka_computer.png“/></a></div> <p> <h2>Why would I use CircuitPython?</h2> </p> <div class=„row-fluid build-text“ readability=„47“> <p>CircuitPython is designed to run on microcontroller boards. A microcontroller board is a board with a microcontroller chip that's essentially an itty-bitty all-in-one computer. The board you're holding is a microcontroller board! CircuitPython is easy to use because all you need is that little board, a USB cable, and a computer with a USB connection. But that's only the beginning.</p> <p>Other reasons to use CircuitPython include:</p> <ul><li><strong>You want to get up and running quickly.</strong> Create a file, edit your code, save the file, and it runs immediately. There is no compiling, no downloading and no uploading needed.</li> <li><strong>You're new to programming.</strong> CircuitPython is designed with education in mind. It's easy to start learning how to program and you get immediate feedback from the board.</li> <li><strong>Easily update your code.</strong> Since your code lives on the disk drive, you can edit it whenever you like, you can also keep multiple files around for easy experimentation.</li> <li><strong>The serial console and REPL.</strong> These allow for live feedback from your code and interactive programming.</li> <li><strong>File storage.</strong> The internal storage for CircuitPython makes it great for data-logging, playing audio clips, and otherwise interacting with files.</li> <li><strong>Strong hardware support.</strong> There are many libraries and drivers for sensors, breakout boards and other external components.</li> <li><strong>It's Python!</strong> Python is the fastest-growing programming language. It's taught in schools and universities. CircuitPython is almost-completely compatible with Python. It simply adds hardware support.</li> </ul><p>This is just the beginning. CircuitPython continues to evolve, and is constantly being updated. We welcome and encourage feedback from the community, and we incorporate this into how we are developing CircuitPython. That's the core of the open source concept. This makes CircuitPython better for you and everyone who uses it!</p>
</div> </div><div class=„page-content all-page-view-content“ readability=„74“> <div class=„row-fluid build-text“ readability=„38“> <p>Some of the CircuitPython compatible boards come with CircuitPython installed. Others are <em>CircuitPython-ready</em>, but need to have it installed. As well, you may want to update the version of CircuitPython already installed on your board. The steps are the same for installing and updating. Here we will cover how to install or update CircuitPython on your board.</p> </div> <p>You only have to install CircuitPython ONCE, after that you are free to code all you like without going through this process again until you want to upgrade!</p> <div class=„row-fluid build-text“ readability=„31“> <p>The first thing you'll want to do is download the most recent version of CircuitPython.</p> </div> <p><a href=„https://github.com/adafruit/circuitpython/releases/latest“ class=„btn btn-large btn-block btn-primary“ target=„_self“ type=„button“>Click here to see the latest CircuitPython release</a></p> <div class=„row-fluid build-text“ readability=„34“> <p>Scroll down to the list of CircuitPython files, and choose the file appropriate to your board. Each file includes the name of the board it's compatible with. Download the file for your board.</p> </div> <div class=„row-fluid build-image“><a href=„https://learn.adafruit.com/assets/48919“><img class=„48919-asset img-responsive“ srcset=„https://cdn-learn.adafruit.com/assets/assets/000/048/919/medium260/circuitpython_Screen_Shot_2017-12-06_at_17.12.20.png?1512598665 260w, https://cdn-learn.adafruit.com/assets/assets/000/048/919/medium640/circuitpython_Screen_Shot_2017-12-06_at_17.12.20.png?1512598665 640w, https://cdn-learn.adafruit.com/assets/assets/000/048/919/medium800/circuitpython_Screen_Shot_2017-12-06_at_17.12.20.png?1512598665 800w, https://cdn-learn.adafruit.com/assets/assets/000/048/919/large1024/circuitpython_Screen_Shot_2017-12-06_at_17.12.20.png?1512598665 1024w“ sizes=„(max-width: 768px) 100vw, (max-width: 1024px) 65vw, (max-width: 1365px) 47vw, 750px“ src=„https://cdn-learn.adafruit.com/assets/assets/000/048/919/medium800/circuitpython_Screen_Shot_2017-12-06_at_17.12.20.png?1512598665“ alt=„circuitpython_Screen_Shot_2017-12-06_at_17.12.20.png“/></a></div> <div class=„row-fluid build-text“ readability=„34“> <p>Next, you'll want to plug in your board using a known-good USB data cable. Make sure the USB cable is a data cable! There are some that work only for charging and can lead to a lot of frustration.</p> </div> <p>If you're using Windows 7, you need to a driver before plugging in your board.</p> <div class=„row-fluid build-text“ readability=„35“> <p>If you're using Windows 7, use the link below to download the driver package. You will not need to install drivers on Mac, Linux or Windows 10.</p> </div> <p><a href=„https://github.com/adafruit/Adafruit_Windows_Drivers/releases/latest“ class=„btn btn-large btn-block btn-primary“ target=„_self“ type=„button“>Download Adafruit Windows 7 Driver Installer</a></p> <div class=„row-fluid build-text“ readability=„43“> <p>CircuitPython boards ship with a bootloader called UF2 (<strong>U</strong>SB <strong>F</strong>lasher version <strong>2</strong>) that makes installing and updating CircuitPython a quick and easy process. The bootloader is the mode your board needs to be in for the CircuitPython .uf2 file you downloaded to work.</p> <p>Find the reset button on your board. It's a small, black button, and on most of the boards, it will be the only button available. (On Circuit Playground Express, it's the smaller button located in the center of the board.)</p> </div> <div class=„row-fluid build-image“><a href=„https://learn.adafruit.com/assets/48977“><img class=„48977-asset img-responsive“ srcset=„https://cdn-learn.adafruit.com/assets/assets/000/048/977/medium260/circuitpython_ResetButton.jpg?1512750806 260w, https://cdn-learn.adafruit.com/assets/assets/000/048/977/medium640/circuitpython_ResetButton.jpg?1512750806 640w, https://cdn-learn.adafruit.com/assets/assets/000/048/977/medium800/circuitpython_ResetButton.jpg?1512750806 800w, https://cdn-learn.adafruit.com/assets/assets/000/048/977/large1024/circuitpython_ResetButton.jpg?1512750806 1024w“ sizes=„(max-width: 768px) 100vw, (max-width: 1024px) 65vw, (max-width: 1365px) 47vw, 750px“ src=„https://cdn-learn.adafruit.com/assets/assets/000/048/977/medium800/circuitpython_ResetButton.jpg?1512750806“ alt=„circuitpython_ResetButton.jpg“/></a></div> <div class=„row-fluid build-text“ readability=„46“> <p>Tap this button twice to enter the bootloader. If it doesn't work on the first try, don't be discouraged. The rhythm of the taps needs to be correct and sometimes it takes a few tries. If you have a Circuit Playground Express, and it's fresh-out-of-the-bag try pressing the button once.</p> <p>Once successful, the RGB LED on the board will flash red and then stay green. A new drive will show up on your computer. The drive will be called 
<em>boardname</em>BOOT
where <em>
boardname
</em> is a reference to your specific board. For example, a Feather will have
FEATHERBOOT
and a Trinket will have
TRINKETBOOT
etc. Going forward we'll just call the boot drive
BOOT
</p> </div> <div class=„row-fluid build-image“><a href=„https://learn.adafruit.com/assets/48978“><img class=„48978-asset img-responsive“ srcset=„https://cdn-learn.adafruit.com/assets/assets/000/048/978/medium260/circuitpython_FeatherBootWindows.png?1512750806 260w, https://cdn-learn.adafruit.com/assets/assets/000/048/978/medium640/circuitpython_FeatherBootWindows.png?1512750806 640w, https://cdn-learn.adafruit.com/assets/assets/000/048/978/medium800/circuitpython_FeatherBootWindows.png?1512750806 800w, https://cdn-learn.adafruit.com/assets/assets/000/048/978/large1024/circuitpython_FeatherBootWindows.png?1512750806 1024w“ sizes=„(max-width: 768px) 100vw, (max-width: 1024px) 65vw, (max-width: 1365px) 47vw, 750px“ src=„https://cdn-learn.adafruit.com/assets/assets/000/048/978/medium800/circuitpython_FeatherBootWindows.png?1512750806“ alt=„circuitpython_FeatherBootWindows.png“/></a></div> <div class=„row-fluid build-text“ readability=„32“> <p>The board is now in bootloader mode! This is what we need to install or update CircuitPython.</p> <p>Now find the file you downloaded. Drag that file to the
BOOT
drive on your computer.</p> </div> <div class=„row-fluid build-image“><a href=„https://learn.adafruit.com/assets/49259“><img class=„49259-asset img-responsive“ srcset=„https://cdn-learn.adafruit.com/assets/assets/000/049/259/medium260/circuitpython_circuit_playground_drag.png?1513181045 260w, https://cdn-learn.adafruit.com/assets/assets/000/049/259/medium640/circuitpython_circuit_playground_drag.png?1513181045 640w, https://cdn-learn.adafruit.com/assets/assets/000/049/259/medium800/circuitpython_circuit_playground_drag.png?1513181045 800w, https://cdn-learn.adafruit.com/assets/assets/000/049/259/large1024/circuitpython_circuit_playground_drag.png?1513181045 1024w“ sizes=„(max-width: 768px) 100vw, (max-width: 1024px) 65vw, (max-width: 1365px) 47vw, 750px“ src=„https://cdn-learn.adafruit.com/assets/assets/000/049/259/medium800/circuitpython_circuit_playground_drag.png?1513181045“ alt=„circuitpython_circuit_playground_drag.png“/></a></div> <div class=„row-fluid build-text“ readability=„33“> <p>The lights should flash again,
BOOT
will disappear and a <strong>new</strong> drive will show up on your computer called
CIRCUITPY
.</p> </div> <div class=„row-fluid build-image“><a href=„https://learn.adafruit.com/assets/48980“><img class=„48980-asset img-responsive“ srcset=„https://cdn-learn.adafruit.com/assets/assets/000/048/980/medium260/circuitpython_adafruit_gemma_circuipy.png?1512750807 260w, https://cdn-learn.adafruit.com/assets/assets/000/048/980/medium640/circuitpython_adafruit_gemma_circuipy.png?1512750807 640w, https://cdn-learn.adafruit.com/assets/assets/000/048/980/medium800/circuitpython_adafruit_gemma_circuipy.png?1512750807 800w, https://cdn-learn.adafruit.com/assets/assets/000/048/980/large1024/circuitpython_adafruit_gemma_circuipy.png?1512750807 1024w“ sizes=„(max-width: 768px) 100vw, (max-width: 1024px) 65vw, (max-width: 1365px) 47vw, 750px“ src=„https://cdn-learn.adafruit.com/assets/assets/000/048/980/medium800/circuitpython_adafruit_gemma_circuipy.png?1512750807“ alt=„circuitpython_adafruit_gemma_circuipy.png“/></a></div> <div class=„row-fluid build-text“ readability=„31“> <p>Congratulations! You've successfully installed or updated CircuitPython!</p> </div> </div><div class=„page-content all-page-view-content“ readability=„121“> <div class=„row-fluid build-text“ readability=„46“> <p>One of the best things about CircuitPython is how simple it is to get code up and running. In this section, we're going to cover how to create and edit your first CircuitPython program.</p> <p>To create and edit code, all you'll need is an editor. There are many options. There are basic text editors built into every operating system such as Notepad on Windows, TextEdit on Mac, and gedit on Linux. There are also excellent options available for download that are designed for editing code. <a href=„https://atom.io/“>Atom</a> is a code editor that works on all three operating systems. There are many options for all operating systems.</p> <p><strong>Code editors have features that are specific to editing code, but any text editor will be fine.</strong></p> </div> <p> <h2>Creating Code</h2> </p> <div class=„row-fluid build-text“ readability=„32“> <p>Open your editor, and create a new file. Copy and paste the following code into your editor:</p> </div> <div class=„build-code code-element“ readability=„11“> <pre class=„code-text-only c4“> import board import digitalio import time led = digitalio.DigitalInOut(board.D13) led.direction = digitalio.Direction.OUTPUT while True:
  led.value = True
  time.sleep(0.5)
  led.value = False
  time.sleep(0.5)
</pre> <pre class=„prettyprint linenums“> import board import digitalio import time led = digitalio.DigitalInOut(board.D13) led.direction = digitalio.Direction.OUTPUT while True:
  led.value = True
  time.sleep(0.5)
  led.value = False
  time.sleep(0.5)
</pre></div> <div class=„row-fluid build-text“ readability=„34“> <p>Save this file as <strong>code.py</strong> on your CIRCUITPY drive.</p> <p>On each board you'll find a tiny red LED. It should now be blinking. Once per second</p> <p>Congratulations, you've just run your first CircuitPython program!</p> </div> <p> <h2>Editing Code</h2> </p> <div class=„row-fluid build-text“ readability=„36“> <p>To edit code, open the <strong>code.py</strong> file on your CIRCUITPY drive into your editor. Make the desired changes to your code. Save the file. That's it!</p> <p>Your code changes are run as soon as the file is done saving.</p> <p>There's just one warning we have to give you before we continue…</p> </div> <p>Don't Click Reset or Unplug!</p> <div class=„row-fluid build-text“ readability=„62“> <p>The CircuitPython code on your board detects when the files are changed or written and will automatically re-start your code. This makes coding very fast because you save, and it re-runs.</p> <p><strong>However, you must</strong> <strong>wait until the file is done being saved before unplugging or resetting your board!</strong> <strong>On Windows using some editors this can sometimes take up to</strong> <strong>90 seconds, on Linux it can take 30 seconds</strong> to complete because the text editor does not save the file completely. Mac OS does not seem to have this delay, which is nice!</p> <p>This is really important to be aware of. If you unplug or reset the board before your computer finishes writing the file to your board, you can corrupt the drive. If this happens, you may lose the code you've written, so it's important to backup your code to your computer regularly.</p> <p>There are a few ways to avoid this:</p> <h2>1. Use an editor that writes out the file completely when you save it.</h2> <p>Recommended editors:</p> <ul><li><a href=„https://codewith.mu/“><strong>mu</strong></a> is an editor that safely writes all changes</li> <li><a href=„https://www.gnu.org/software/emacs/“><strong>emacs</strong></a> is also an editor that will <a href=„https://www.gnu.org/software/emacs/manual/html_node/emacs/Customize-Save.html“>fulIy write files on save</a></li> <li><a href=„http://www.vim.org/“><strong>vim</strong></a> (<strong>vi</strong>) safely writes all changes</li> <li><strong><a href=„https://www.sublimetext.com/“>Sublime Text</a> </strong>safely writes all changes</li> <li>The <strong><a href=„https://www.jetbrains.com/pycharm/“>PyCharm IDE</a></strong> is safe if „Safe Write“ is turned on in Settings->System Settings->Synchronization (true by default).</li> <li>If you are using <a href=„https://atom.io/“><strong>Atom</strong></a>, <a href=„https://atom.io/packages/circuitpython-force-to-drive“>install this package</a> so that it will always write out all changes to files on
CIRCUITPY
.</li> <li><strong><a href=„https://code.visualstudio.com/“>Visual Studio Code</a></strong> appears to safely write all changes</li> <li><strong>gedit</strong> on Linux appears to safely write all changes</li> </ul><p>We <em>don't</em> recommend these editors:</p> <ul><li><strong>notepad</strong> (the default windows editor) and N<strong>otepad++</strong> can be slow to write, so we recommend the editors above! If you are using notepad, be sure to eject the drive (see below)</li> <li><strong>IDLE</strong> does not force-write out the file</li> <li><strong>Anything else</strong> - we haven't tested other editors so please use a recommended one!</li> </ul><h2>2. Eject or Sync the Drive After Writing</h2> <p>If you are using one of our not-recommended-editors, not all is lost! You can still make it work.</p> <p>On Windows, you can <strong>Eject</strong> or <strong>Safe Remove</strong> the CIRCUITPY drive. It won't actually eject, but it will force the operating system to save your file to disk. On Linux, use the <strong>sync</strong> command in a terminal to force the write to disk.</p> </div> <div class=„build-faq“ readability=„7“> <h2 class=„question“> Oh No I Did Something Wrong and Now The CIRCUITPY Drive Doesn't Show Up!!!</h2> <div class=„answer“ readability=„9“> <p>Don't worry! Corrupting the drive isn't the end of the world (or your board!). If this happens, follow the steps found on the <a href=„https://learn.adafruit.com/adafruit-feather-m0-express-designed-for-circuit-python-circuitpython/troubleshooting#circuitpy-drive-issues“>Troubleshooting</a> page of every board guide to get your board up and running again.</p> </div> </div> <div class=„row-fluid build-text“ readability=„33“> <p>Now! Let's try editing the program you added to your board. Open your <strong>code.py</strong> file into your editor. We'll make a simple change. Change the first
0.5
to
0.1
. The code should look like this:</p> </div> <div class=„build-code code-element“ readability=„11“> <pre class=„code-text-only c4“> import board import digitalio import time led = digitalio.DigitalInOut(board.D13) led.direction = digitalio.Direction.OUTPUT while True:
  led.value = True
  time.sleep(0.1)
  led.value = False
  time.sleep(0.5)
</pre> <pre class=„prettyprint linenums“> import board import digitalio import time led = digitalio.DigitalInOut(board.D13) led.direction = digitalio.Direction.OUTPUT while True:
  led.value = True
  time.sleep(0.1)
  led.value = False
  time.sleep(0.5)
</pre></div> <div class=„row-fluid build-text“ readability=„36“> <p>Leave the rest of the code as-is. Save your file. See what happens to the LED on your board? Something changed! Do you know why? Let's find out! </p> <p>First, we'll take a look at the code we're editing.</p> <p>Here is the original code again:</p> </div> <div class=„build-code code-element“ readability=„11“> <pre class=„code-text-only c4“> import board import digitalio import time led = digitalio.DigitalInOut(board.D13) led.direction = digitalio.Direction.OUTPUT while True:
  led.value = True
  time.sleep(0.5)
  led.value = False
  time.sleep(0.5)
</pre> <pre class=„prettyprint linenums“> import board import digitalio import time led = digitalio.DigitalInOut(board.D13) led.direction = digitalio.Direction.OUTPUT while True:
  led.value = True
  time.sleep(0.5)
  led.value = False
  time.sleep(0.5)
</pre></div> <div class=„row-fluid build-text“ readability=„37“> <h2>Imports & Libraries</h2> <p>Each CircuitPython program you run needs to have a lot of information to work. The reason CircuitPython is so simple to use is that most of that information is stored in other files and works in the background. These files are called <strong>libraries</strong>. Some of them are built into CircuitPython. Others are stored on your CIRCUITPY drive in a folder called <strong>lib</strong>.</p> </div> <div class=„build-code code-element“ readability=„7“> <pre class=„code-text-only c4“> import board import digitalio import time </pre> <pre class=„prettyprint linenums“> import board import digitalio import time </pre></div> <div class=„row-fluid build-text“ readability=„42“> <p>The
import
statements tells the board that you're going to use a particular library in your code. In this example, we imported three libraries:
board
,
digitalio
, and
time
. All three of these libraries are built into CircuitPython, so no separate files are needed. That's one of the things that makes this an excellent first example. You don't need any thing extra to make it work!
board
gives you access to the <em>hardware on your board</em>,
digitalio
lets you <em>access that hardware as inputs/outputs</em> and
time
let's you pass time by 'sleeping'</p> </div> <div class=„row-fluid build-text“ readability=„31“> <h2>Setting Up The LED</h2> <p>The next two lines setup the code to use the LED.</p> </div> <div class=„build-code code-element“ readability=„7“> <pre class=„code-text-only c4“> led = digitalio.DigitalInOut(board.D13) led.direction = digitalio.Direction.OUTPUT </pre> <pre class=„prettyprint linenums“> led = digitalio.DigitalInOut(board.D13) led.direction = digitalio.Direction.OUTPUT </pre></div> <div class=„row-fluid build-text“ readability=„36“> <p>Your board knows the red LED as
D13
. So, we initialise that pin, and we set it to output. We set
led
to equal the rest of that information so we don't have to type it all out again later in our code.</p> </div> <div class=„row-fluid build-text“ readability=„41“> <h2>Loop-de-loops</h2> <p>The third section starts with a 
while
statement.
while True:
essentially means, „forever do the following:“.
while True:
creates a loop. Code will loop „while“ the condition is „true“ (vs. false), and as
True
is never False, the code will loop forever. All code that is indented under
while True:
is „inside“ the loop.</p> <p>Inside our loop, we have four items:</p> </div> <div class=„build-code code-element“ readability=„7“> <pre class=„code-text-only c4“> while True:
  led.value = True
  time.sleep(0.5)
  led.value = False
  time.sleep(0.5)
</pre> <pre class=„prettyprint linenums“> while True:
  led.value = True
  time.sleep(0.5)
  led.value = False
  time.sleep(0.5)
</pre></div> <div class=„row-fluid build-text“ readability=„53“> <p>First, we have
led.value = True
. This line tells the LED to turn on. On the next line, we have
time.sleep(0.5)
. This line is telling CircuitPython to pause running code for 0.5 seconds. Since this is between turning the led on and off, the led will be on for 0.5 seconds.</p> <p>The next two lines are similar.
led.value = False
tells the LED to turn off, and
time.sleep(0.5)
tells CircuitPython to pause for another 0.5 seconds. This occurs between turning the led off and back on so the LED will be off for 0.5 seconds too.</p> <p>Then the loop will begin again, and continue to do so as long as the code is running!</p> <p>So, when you changed the first
0.5
to
0.1
, you decreased the amount of time that the code leaves the LED on. So it blinks on really quickly before turning off!</p> <p>Great job! You've edited code in a CircuitPython program!</p> <p>We don't have to stop there! Let's keep going. Change the second
0.5
to
0.1
so it looks like this:</p> </div> <div class=„build-code code-element“ readability=„7“> <pre class=„code-text-only c4“> while True:
  led.value = True
  time.sleep(0.1)
  led.value = False
  time.sleep(0.1)
</pre> <pre class=„prettyprint linenums“> while True:
  led.value = True
  time.sleep(0.1)
  led.value = False
  time.sleep(0.1)
</pre></div> <div class=„row-fluid build-text“ readability=„42“> <p>Now it blinks really fast! You decreased the both time that the code leaves the LED on and off!</p> <p>Now try increasing both of the
0.1
to
1
. Your LED will blink much more slowly because you've increased the amount of time that the LED is turned on and off.</p> <p>Well done! You're doing great! You're ready to start into new examples and edit them to see what happens! These were simple changes, but major changes are done using the same process. Make your desired change, save it, and get the results. That's really all there is to it!</p> </div> <div class=„row-fluid build-text“ readability=„43“> <p>CircuitPython looks for a code file on the board to run. There are four options: <strong>code.txt</strong>, <strong>code.py</strong>, <strong>main.txt</strong> and <strong>main.py</strong>. CircuitPython looks for those files, in that order, and then runs the first one it finds. While we suggest using <strong>code.py</strong> as your code file, it is important to know that the other options exist. If your program doesn't seem to be updating as you work, make sure you haven't created another code file that's being read instead of the one you're working on.</p> </div> </div><div class=„page-content all-page-view-content row-fluid build-text“ readability=„65“> <p>One of the staples of CircuitPython (and programming in general!) is something called a „print statement“. This is a line you include in your code that causes your code to output text. A print statement in CircuitPython looks like this:</p> <p>
print("Hello, world!")
</p> <p>This line would result in:</p> <p>
Hello, world!
</p> <p>However, these print statements need somewhere to display. That's where the serial console comes in!</p> <p>The serial console receives output from your CircuitPython board sent over USB and displays it so you can see it. This is necessary when you've included a print statement in your code and you'd like to see what you printed. It is also helpful for troubleshooting errors, because your board will send errors and the serial console will print those too.</p> <p>The serial console requires a terminal program. A terminal is a program that gives you a text-based interface to perform various tasks. In this case, we'll use it to connect to the serial console. Windows requires you to download a terminal program. Mac and Linux both have one built in, though other options are available for download.</p> <p>In the next two sections, we'll explain how to connect to the serial console on Windows, Mac and Linux.</p> </div><div class=„page-content all-page-view-content“ readability=„61“> <div class=„row-fluid build-text“ readability=„35“> <p>If you're using Windows 7, use the link below to download the driver package. You will not need to install drivers on Mac, Linux or Windows 10.</p> </div> <p><a href=„https://github.com/adafruit/Adafruit_Windows_Drivers/releases/latest“ class=„btn btn-large btn-block btn-primary“ target=„_self“ type=„button“>Download Windows 7 Drivers</a></p> <div class=„row-fluid build-text“ readability=„43“> <p>First, you'll want to find out which serial port your board is using. When you plug your board in to USB on your computer, it connects to a serial port. The port is like a door through which your board can communicate with your computer using USB.</p> <p>We'll use Windows Device Manager to determine which port the board is using. The easiest way to determine which port the board is using is to first check <strong>without</strong> the board plugged in. Open Device Manager. Click on Ports (COM & LPT). You should find something already in that list with (COM#) after it where # is a number.</p> </div> <div class=„row-fluid build-image“><a href=„https://learn.adafruit.com/assets/48981“><img class=„48981-asset img-responsive“ srcset=„https://cdn-learn.adafruit.com/assets/assets/000/048/981/medium260/circuitpython_DeviceManagerWithoutBoard.png?1512750809 260w, https://cdn-learn.adafruit.com/assets/assets/000/048/981/medium640/circuitpython_DeviceManagerWithoutBoard.png?1512750809 640w, https://cdn-learn.adafruit.com/assets/assets/000/048/981/medium800/circuitpython_DeviceManagerWithoutBoard.png?1512750809 800w, https://cdn-learn.adafruit.com/assets/assets/000/048/981/large1024/circuitpython_DeviceManagerWithoutBoard.png?1512750809 1024w“ sizes=„(max-width: 768px) 100vw, (max-width: 1024px) 65vw, (max-width: 1365px) 47vw, 750px“ src=„https://cdn-learn.adafruit.com/assets/assets/000/048/981/medium800/circuitpython_DeviceManagerWithoutBoard.png?1512750809“ alt=„circuitpython_DeviceManagerWithoutBoard.png“/></a></div> <div class=„row-fluid build-text“ readability=„33“> <p>Now plug in your board. The Device Manager list will refresh and a new item will appear under Ports (COM & LPT). You'll find a different (COM#) after this item in the list.</p> </div> <div class=„row-fluid build-image“><a href=„https://learn.adafruit.com/assets/48982“><img class=„48982-asset img-responsive“ srcset=„https://cdn-learn.adafruit.com/assets/assets/000/048/982/medium260/circuitpython_DeviceManagerWithBoard.png?1512750810 260w, https://cdn-learn.adafruit.com/assets/assets/000/048/982/medium640/circuitpython_DeviceManagerWithBoard.png?1512750810 640w, https://cdn-learn.adafruit.com/assets/assets/000/048/982/medium800/circuitpython_DeviceManagerWithBoard.png?1512750810 800w, https://cdn-learn.adafruit.com/assets/assets/000/048/982/large1024/circuitpython_DeviceManagerWithBoard.png?1512750810 1024w“ sizes=„(max-width: 768px) 100vw, (max-width: 1024px) 65vw, (max-width: 1365px) 47vw, 750px“ src=„https://cdn-learn.adafruit.com/assets/assets/000/048/982/medium800/circuitpython_DeviceManagerWithBoard.png?1512750810“ alt=„circuitpython_DeviceManagerWithBoard.png“/></a></div> <div class=„row-fluid build-text“ readability=„37“> <p>Sometimes the item will refer to the name of the board. Other times it may be called something like USB Serial Device, as seen in the image above. Either way, there is a new (COM#) following the name. This is the port your board is using.</p> </div> <div class=„row-fluid build-text“ readability=„47“> <p>If you're using Windows, you'll need to download a terminal program. We're going to use PuTTY.</p> <p>The first thing to do is download the <a href=„https://www.chiark.greenend.org.uk/~sgtatham/putty/latest.html“>latest version of PuTTY</a>. You'll want to download the Windows installer file. It is most likely that you'll need the 64-bit version. Download the file and install the program on your machine. If you run into issues, you can try downloading the 32-bit version instead. However, the 64-bit version will work on most PCs.</p> <p>Now you need to open PuTTY.</p> <ul><li>Under <strong>Connection type:</strong> choose the button next to <strong>Serial</strong>.</li> <li>In the box under <strong>Serial line</strong>, enter the serial port you found that your board is using.</li> <li>In the box under <strong>Speed</strong>, enter 115200. This called the baud rate, which is the speed in bits per second that data is sent over the serial connection. For boards with built in USB it doesn't matter so much but for ESP8266 and other board with a separate chip, the speed required by the board is 115200 bits per second. So you might as well just use 115200!</li> </ul><p>If you want to save those settings for later, use the options under <strong>Load, save or delete a stored session.</strong> Enter a name in the box under <strong>Saved Sessions</strong>, and click the <strong>Save</strong> button on the right.</p> </div> <div class=„row-fluid build-image“><a href=„https://learn.adafruit.com/assets/48985“><img class=„48985-asset img-responsive“ srcset=„https://cdn-learn.adafruit.com/assets/assets/000/048/985/medium260/circuitpython_PUTTY.png?1512750813 260w, https://cdn-learn.adafruit.com/assets/assets/000/048/985/medium640/circuitpython_PUTTY.png?1512750813 640w, https://cdn-learn.adafruit.com/assets/assets/000/048/985/medium800/circuitpython_PUTTY.png?1512750813 800w, https://cdn-learn.adafruit.com/assets/assets/000/048/985/large1024/circuitpython_PUTTY.png?1512750813 1024w“ sizes=„(max-width: 768px) 100vw, (max-width: 1024px) 65vw, (max-width: 1365px) 47vw, 750px“ src=„https://cdn-learn.adafruit.com/assets/assets/000/048/985/medium800/circuitpython_PUTTY.png?1512750813“ alt=„circuitpython_PUTTY.png“/></a></div> <div class=„row-fluid build-text“ readability=„34“> <p>Once your settings are entered, you're ready to connect to the serial console. Click „Open“ at the bottom of the window. A new window will open.</p> </div> <div class=„row-fluid build-image“><a href=„https://learn.adafruit.com/assets/48986“><img class=„48986-asset img-responsive“ srcset=„https://cdn-learn.adafruit.com/assets/assets/000/048/986/medium260/circuitpython_PUTTYConsole.png?1512750813 260w, https://cdn-learn.adafruit.com/assets/assets/000/048/986/medium640/circuitpython_PUTTYConsole.png?1512750813 640w, https://cdn-learn.adafruit.com/assets/assets/000/048/986/medium800/circuitpython_PUTTYConsole.png?1512750813 800w, https://cdn-learn.adafruit.com/assets/assets/000/048/986/large1024/circuitpython_PUTTYConsole.png?1512750813 1024w“ sizes=„(max-width: 768px) 100vw, (max-width: 1024px) 65vw, (max-width: 1365px) 47vw, 750px“ src=„https://cdn-learn.adafruit.com/assets/assets/000/048/986/medium800/circuitpython_PUTTYConsole.png?1512750813“ alt=„circuitpython_PUTTYConsole.png“/></a></div> <div class=„row-fluid build-text“ readability=„35“> <p>If no code is running, the window will either be blank or will look like the window above. Now you're ready to see the results of your code.</p> <p>Great job! You've connected to the serial console!</p> </div> </div><div class=„page-content all-page-view-content“ readability=„73“> <div class=„row-fluid build-text“ readability=„57“> <p>Connecting to the serial console on Mac and Linux uses essentially the same process. Neither operating system needs drivers installed. On MacOSX, <strong>Terminal comes</strong> installed. On Linux, there are a variety such as gnome-terminal (called Terminal) or Konsole on KDE.</p> <p>First you'll want to find out which serial port your board is using. When you plug your board in to USB on your computer, it connects to a serial port. The port is like a door through which your board can communicate with your computer using USB.</p> <p>We're going to use Terminal to determine what port the board is using. The easiest way to determine which port the board is using is to first check <strong>without</strong> the board plugged in. On Mac, open Terminal and type the following:</p> <p>
ls /dev/tty.*
</p> <p>Each serial connection shows up in the
/dev/
directory. It has a name that starts with
tty.
. The command
ls
shows you a list of items in a directory. You can use
*
as a wildcard, to search for files that start with the same letters but end in something different. In this case, we're asking to see all of the listings in
/dev/
that start with
tty.
and end in anything. This will show us the current serial connections.</p> </div> <div class=„row-fluid build-image“><a href=„https://learn.adafruit.com/assets/49012“><img class=„49012-asset img-responsive“ srcset=„https://cdn-learn.adafruit.com/assets/assets/000/049/012/medium260/circuitpython_MacCurrentSerialPorts.png?1512778572 260w, https://cdn-learn.adafruit.com/assets/assets/000/049/012/medium640/circuitpython_MacCurrentSerialPorts.png?1512778572 640w, https://cdn-learn.adafruit.com/assets/assets/000/049/012/medium800/circuitpython_MacCurrentSerialPorts.png?1512778572 800w, https://cdn-learn.adafruit.com/assets/assets/000/049/012/large1024/circuitpython_MacCurrentSerialPorts.png?1512778572 1024w“ sizes=„(max-width: 768px) 100vw, (max-width: 1024px) 65vw, (max-width: 1365px) 47vw, 750px“ src=„https://cdn-learn.adafruit.com/assets/assets/000/049/012/medium800/circuitpython_MacCurrentSerialPorts.png?1512778572“ alt=„circuitpython_MacCurrentSerialPorts.png“/></a></div> <div class=„row-fluid build-text“ readability=„43“> <p>For Linux, the procedure is the same, however, the name is slightly different. If you're using Linux, you'll type:</p> <p>
ls /dev/ttyACM*
</p> <p>The concept is the same with Linux. We are asking to see the listings in the
/dev/
folder, starting with
ttyACM
and ending with anything. This will show you the current serial connections. In the example below, the error is indicating that are no current serial connections starting with
ttyACM
.</p> </div> <div class=„row-fluid build-image“><a href=„https://learn.adafruit.com/assets/49009“><img class=„49009-asset img-responsive“ srcset=„https://cdn-learn.adafruit.com/assets/assets/000/049/009/medium260/circuitpython_LinuxSerialBoard.png?1512778193 260w, https://cdn-learn.adafruit.com/assets/assets/000/049/009/medium640/circuitpython_LinuxSerialBoard.png?1512778193 640w, https://cdn-learn.adafruit.com/assets/assets/000/049/009/medium800/circuitpython_LinuxSerialBoard.png?1512778193 800w, https://cdn-learn.adafruit.com/assets/assets/000/049/009/large1024/circuitpython_LinuxSerialBoard.png?1512778193 1024w“ sizes=„(max-width: 768px) 100vw, (max-width: 1024px) 65vw, (max-width: 1365px) 47vw, 750px“ src=„https://cdn-learn.adafruit.com/assets/assets/000/049/009/medium800/circuitpython_LinuxSerialBoard.png?1512778193“ alt=„circuitpython_LinuxSerialBoard.png“/></a></div> <div class=„row-fluid build-text“ readability=„35“> <p>Now, plug your board. Using Mac, type:</p> <p>
ls /dev/tty.*
</p> <p>This will show you the current serial connections, which will now include your board.</p> </div> <div class=„row-fluid build-image“><a href=„https://learn.adafruit.com/assets/49013“><img class=„49013-asset img-responsive“ srcset=„https://cdn-learn.adafruit.com/assets/assets/000/049/013/medium260/circuitpython_MacSerialPortswithBoard.png?1512778605 260w, https://cdn-learn.adafruit.com/assets/assets/000/049/013/medium640/circuitpython_MacSerialPortswithBoard.png?1512778605 640w, https://cdn-learn.adafruit.com/assets/assets/000/049/013/medium800/circuitpython_MacSerialPortswithBoard.png?1512778605 800w, https://cdn-learn.adafruit.com/assets/assets/000/049/013/large1024/circuitpython_MacSerialPortswithBoard.png?1512778605 1024w“ sizes=„(max-width: 768px) 100vw, (max-width: 1024px) 65vw, (max-width: 1365px) 47vw, 750px“ src=„https://cdn-learn.adafruit.com/assets/assets/000/049/013/medium800/circuitpython_MacSerialPortswithBoard.png?1512778605“ alt=„circuitpython_MacSerialPortswithBoard.png“/></a></div> <div class=„row-fluid build-text“ readability=„36“> <p>Using Mac, a new listing has appeared called
/dev/tty.usbmodem141441
. The 
tty.usbmodem141441
part of this listing is the name the example board is using. Yours will be called something similar.</p> <p>Using Linux, type:</p> <p>
ls /dev/ttyACM*
</p> <p>This will show you the current serial connections, which will now include your board.</p> </div> <div class=„row-fluid build-image“><a href=„https://learn.adafruit.com/assets/49010“><img class=„49010-asset img-responsive“ srcset=„https://cdn-learn.adafruit.com/assets/assets/000/049/010/medium260/circuitpython_LinuxSerialBoard.png?1512778203 260w, https://cdn-learn.adafruit.com/assets/assets/000/049/010/medium640/circuitpython_LinuxSerialBoard.png?1512778203 640w, https://cdn-learn.adafruit.com/assets/assets/000/049/010/medium800/circuitpython_LinuxSerialBoard.png?1512778203 800w, https://cdn-learn.adafruit.com/assets/assets/000/049/010/large1024/circuitpython_LinuxSerialBoard.png?1512778203 1024w“ sizes=„(max-width: 768px) 100vw, (max-width: 1024px) 65vw, (max-width: 1365px) 47vw, 750px“ src=„https://cdn-learn.adafruit.com/assets/assets/000/049/010/medium800/circuitpython_LinuxSerialBoard.png?1512778203“ alt=„circuitpython_LinuxSerialBoard.png“/></a></div> <div class=„row-fluid build-text“ readability=„34“> <p>Using Linux, a new listing has appeared called
/dev/ttyACM0
. The
ttyACM0
part of this listing is the name the example board is using. Yours will be called something similar.</p> </div> <div class=„row-fluid build-text“ readability=„41“> <p>Now that you know the name your board is using, you're ready connect to the serial console. We're going to use a command called
screen
. The
screen
command is included with MacOS. Linux users may need to install it using their package manager. To connect to the serial console, use Terminal. Type the following command, replacing
board_name
with the name you found your board is using:</p> <p>
screen /dev/tty.board_name 115200
</p> </div> <div class=„row-fluid build-text“ readability=„38“> <p>The first part of this establishes using the screen command. The second part tells screen the name of the board you're trying to use. The third part tells screen what baud rate to use for the serial connection. The baud rate is the speed in bits per second that data is sent over the serial connection. In this case, the speed required by the board is 115200 bits per second.</p> </div> <div class=„row-fluid build-image“ readability=„7“><a href=„https://learn.adafruit.com/assets/49014“><img class=„49014-asset img-responsive“ srcset=„https://cdn-learn.adafruit.com/assets/assets/000/049/014/medium260/circuitpython_ScreenCommandMac.png?1512778621 260w, https://cdn-learn.adafruit.com/assets/assets/000/049/014/medium640/circuitpython_ScreenCommandMac.png?1512778621 640w, https://cdn-learn.adafruit.com/assets/assets/000/049/014/medium800/circuitpython_ScreenCommandMac.png?1512778621 800w, https://cdn-learn.adafruit.com/assets/assets/000/049/014/large1024/circuitpython_ScreenCommandMac.png?1512778621 1024w“ sizes=„(max-width: 768px) 100vw, (max-width: 1024px) 65vw, (max-width: 1365px) 47vw, 750px“ src=„https://cdn-learn.adafruit.com/assets/assets/000/049/014/medium800/circuitpython_ScreenCommandMac.png?1512778621“ alt=„circuitpython_ScreenCommandMac.png“/></a> <p>MacOS screen command using example board name</p> </div> <div class=„row-fluid build-image“ readability=„7“><a href=„https://learn.adafruit.com/assets/49011“><img class=„49011-asset img-responsive“ srcset=„https://cdn-learn.adafruit.com/assets/assets/000/049/011/medium260/circuitpython_linuxscreencommand.png?1512778390 260w, https://cdn-learn.adafruit.com/assets/assets/000/049/011/medium640/circuitpython_linuxscreencommand.png?1512778390 640w, https://cdn-learn.adafruit.com/assets/assets/000/049/011/medium800/circuitpython_linuxscreencommand.png?1512778390 800w, https://cdn-learn.adafruit.com/assets/assets/000/049/011/large1024/circuitpython_linuxscreencommand.png?1512778390 1024w“ sizes=„(max-width: 768px) 100vw, (max-width: 1024px) 65vw, (max-width: 1365px) 47vw, 750px“ src=„https://cdn-learn.adafruit.com/assets/assets/000/049/011/medium800/circuitpython_linuxscreencommand.png?1512778390“ alt=„circuitpython_linuxscreencommand.png“/></a> <p>Linux screen command using example board name</p> </div> <div class=„row-fluid build-text“ readability=„36“> <p>Press enter to run the command. It will open in the same window. If no code is running, the window will be blank. Otherwise, you'll see the output of your code.</p> <p>Great job! You've connected to the serial console!</p> </div> </div><div class=„page-content all-page-view-content“ readability=„72“> <div class=„row-fluid build-text“ readability=„40“> <p>Once you've successfully connected to the serial console, it's time to start using it.</p> <p>The code you wrote earlier has no output to the serial console. So, we're going to edit it to create some output.</p> <p>Open your code.py file into your editor, and include a
statement. You can print anything you like! Just include your phrase between the quotation marks inside the parentheses. For example:</p> </div> <div class=„build-code code-element“ readability=„15“> <pre class=„code-text-only c4“> import board import digitalio import time led = digitalio.DigitalInOut(board.D13) led.direction = digitalio.Direction.OUTPUT while True:
  print("Hello, CircuitPython!")
  led.value = True
  time.sleep(1)
  led.value = False
  time.sleep = 1
</pre> <pre class=„prettyprint linenums“> import board import digitalio import time led = digitalio.DigitalInOut(board.D13) led.direction = digitalio.Direction.OUTPUT while True:
  print("Hello, CircuitPython!")
  led.value = True
  time.sleep(1)
  led.value = False
  time.sleep = 1
</pre></div> <div class=„row-fluid build-text“ readability=„32“> <p>Save your file.</p> <p>Now, let's go take a look at the window with our connection to the serial console.</p> </div> <div class=„row-fluid build-image“><a href=„https://learn.adafruit.com/assets/49225“><img class=„49225-asset img-responsive“ srcset=„https://cdn-learn.adafruit.com/assets/assets/000/049/225/medium260/circuitpython_CPHelloCPconsole.png?1513104648 260w, https://cdn-learn.adafruit.com/assets/assets/000/049/225/medium640/circuitpython_CPHelloCPconsole.png?1513104648 640w, https://cdn-learn.adafruit.com/assets/assets/000/049/225/medium800/circuitpython_CPHelloCPconsole.png?1513104648 800w, https://cdn-learn.adafruit.com/assets/assets/000/049/225/large1024/circuitpython_CPHelloCPconsole.png?1513104648 1024w“ sizes=„(max-width: 768px) 100vw, (max-width: 1024px) 65vw, (max-width: 1365px) 47vw, 750px“ src=„https://cdn-learn.adafruit.com/assets/assets/000/049/225/medium800/circuitpython_CPHelloCPconsole.png?1513104648“ alt=„circuitpython_CPHelloCPconsole.png“/></a></div> <div class=„row-fluid build-text“ readability=„32“> <p>Excellent! Our print statement is showing up in our console! Try changing the printed text to something else.</p> </div> <div class=„row-fluid build-image“><a href=„https://learn.adafruit.com/assets/49228“><img class=„49228-asset img-responsive“ srcset=„https://cdn-learn.adafruit.com/assets/assets/000/049/228/medium260/circuitpython_CPHelloBackPrintStatement.png?1513105568 260w, https://cdn-learn.adafruit.com/assets/assets/000/049/228/medium640/circuitpython_CPHelloBackPrintStatement.png?1513105568 640w, https://cdn-learn.adafruit.com/assets/assets/000/049/228/medium800/circuitpython_CPHelloBackPrintStatement.png?1513105568 800w, https://cdn-learn.adafruit.com/assets/assets/000/049/228/large1024/circuitpython_CPHelloBackPrintStatement.png?1513105568 1024w“ sizes=„(max-width: 768px) 100vw, (max-width: 1024px) 65vw, (max-width: 1365px) 47vw, 750px“ src=„https://cdn-learn.adafruit.com/assets/assets/000/049/228/medium800/circuitpython_CPHelloBackPrintStatement.png?1513105568“ alt=„circuitpython_CPHelloBackPrintStatement.png“/></a></div> <div class=„row-fluid build-text“ readability=„33“> <p>Keep your serial console window where you can see it. Save your file. You'll see what the serial console displays when the board reboots. Then you'll see your new change!</p> </div> <div class=„row-fluid build-image“><a href=„https://learn.adafruit.com/assets/49229“><img class=„49229-asset img-responsive“ srcset=„https://cdn-learn.adafruit.com/assets/assets/000/049/229/medium260/circuitpython_CPHelloBackConsole.png?1513107530 260w, https://cdn-learn.adafruit.com/assets/assets/000/049/229/medium640/circuitpython_CPHelloBackConsole.png?1513107530 640w, https://cdn-learn.adafruit.com/assets/assets/000/049/229/medium800/circuitpython_CPHelloBackConsole.png?1513107530 800w, https://cdn-learn.adafruit.com/assets/assets/000/049/229/large1024/circuitpython_CPHelloBackConsole.png?1513107530 1024w“ sizes=„(max-width: 768px) 100vw, (max-width: 1024px) 65vw, (max-width: 1365px) 47vw, 750px“ src=„https://cdn-learn.adafruit.com/assets/assets/000/049/229/medium800/circuitpython_CPHelloBackConsole.png?1513107530“ alt=„circuitpython_CPHelloBackConsole.png“/></a></div> <div class=„row-fluid build-text“ readability=„37“> <p>The
Traceback (most recent call last):
is telling you the last thing your board was doing before you saved your file. This is normal behavior and will happen every time the board resets. This is really handy for troubleshooting. Let's introduce an error so we can see how it is used.</p> <p>Delete the
e
at the end of
True
from the line
led.value = True
so that it says
led.value = Tru
</p> </div> <div class=„row-fluid build-image“><a href=„https://learn.adafruit.com/assets/49237“><img class=„49237-asset img-responsive“ srcset=„https://cdn-learn.adafruit.com/assets/assets/000/049/237/medium260/circuitpython_CPEditorCreatedError.png?1513108616 260w, https://cdn-learn.adafruit.com/assets/assets/000/049/237/medium640/circuitpython_CPEditorCreatedError.png?1513108616 640w, https://cdn-learn.adafruit.com/assets/assets/000/049/237/medium800/circuitpython_CPEditorCreatedError.png?1513108616 800w, https://cdn-learn.adafruit.com/assets/assets/000/049/237/large1024/circuitpython_CPEditorCreatedError.png?1513108616 1024w“ sizes=„(max-width: 768px) 100vw, (max-width: 1024px) 65vw, (max-width: 1365px) 47vw, 750px“ src=„https://cdn-learn.adafruit.com/assets/assets/000/049/237/medium800/circuitpython_CPEditorCreatedError.png?1513108616“ alt=„circuitpython_CPEditorCreatedError.png“/></a></div> <div class=„row-fluid build-text“ readability=„43“> <p>Save your file. You will notice that your red LED will stop blinking, and you may have a colored status LED blinking at you. This is because the code is no longer correct and can no longer run properly. We need to fix it!</p> <p>Usually when you run into errors, it's not because you introduced them on purpose. You may have 200 lines of code, and have no idea where your error could be hiding. This is where the serial console can help. Let's take a look!</p> </div> <div class=„row-fluid build-image“><a href=„https://learn.adafruit.com/assets/49241“><img class=„49241-asset img-responsive“ srcset=„https://cdn-learn.adafruit.com/assets/assets/000/049/241/medium260/circuitpython_CPConsoleCodeError.png?1513109775 260w, https://cdn-learn.adafruit.com/assets/assets/000/049/241/medium640/circuitpython_CPConsoleCodeError.png?1513109775 640w, https://cdn-learn.adafruit.com/assets/assets/000/049/241/medium800/circuitpython_CPConsoleCodeError.png?1513109775 800w, https://cdn-learn.adafruit.com/assets/assets/000/049/241/large1024/circuitpython_CPConsoleCodeError.png?1513109775 1024w“ sizes=„(max-width: 768px) 100vw, (max-width: 1024px) 65vw, (max-width: 1365px) 47vw, 750px“ src=„https://cdn-learn.adafruit.com/assets/assets/000/049/241/medium800/circuitpython_CPConsoleCodeError.png?1513109775“ alt=„circuitpython_CPConsoleCodeError.png“/></a></div> <div class=„row-fluid build-text“ readability=„51“> <p>The
Traceback (most recent call last):
is telling you that the last thing it was able to run was line 10 in your code. The next line is your error:
NameError: name 'Tru' is not defined
. This error might not mean a lot to you, but combined with knowing the issue is on line 10, it gives you a great place to start!</p> <p>Go back to your code, and take a look at line 10. Obviously, you know what the problem is already. But if you didn't, you'd want to look at line 10 and see if you could figure it out. If you're still unsure, try googling the error to get some help. In this case, you know what to look for. You spelled True wrong. Fix the typo and save your file.</p> </div> <div class=„row-fluid build-image“><a href=„https://learn.adafruit.com/assets/49240“><img class=„49240-asset img-responsive“ srcset=„https://cdn-learn.adafruit.com/assets/assets/000/049/240/medium260/circuitpython_CPConsoleCodeErrorFixed.png?1513109537 260w, https://cdn-learn.adafruit.com/assets/assets/000/049/240/medium640/circuitpython_CPConsoleCodeErrorFixed.png?1513109537 640w, https://cdn-learn.adafruit.com/assets/assets/000/049/240/medium800/circuitpython_CPConsoleCodeErrorFixed.png?1513109537 800w, https://cdn-learn.adafruit.com/assets/assets/000/049/240/large1024/circuitpython_CPConsoleCodeErrorFixed.png?1513109537 1024w“ sizes=„(max-width: 768px) 100vw, (max-width: 1024px) 65vw, (max-width: 1365px) 47vw, 750px“ src=„https://cdn-learn.adafruit.com/assets/assets/000/049/240/medium800/circuitpython_CPConsoleCodeErrorFixed.png?1513109537“ alt=„circuitpython_CPConsoleCodeErrorFixed.png“/></a></div> <div class=„row-fluid build-text“ readability=„44“> <p>Nice job fixing the error! Your serial console is streaming and your red LED Is blinking again.</p> <p>The serial console will display any output generated by your code. Some sensors, such as a humidity sensor or a thermistor, receive data and you can use print statements to display that information. You can also use print statements for troubleshooting. If your code isn't working, and you want to know where it's failing, you can put print statements in various places to see where it stops printing.</p> <p>The serial console has many uses, and is an amazing tool overall for learning and programming!</p> </div> </div><div class=„page-content all-page-view-content“ readability=„89“> <div class=„row-fluid build-text“ readability=„55“> <p>The other feature of the serial connection is the <strong>R</strong>ead-<strong>E</strong>valuate<strong>-</strong><strong>P</strong>rint-<strong>L</strong>oop, or REPL. The REPL allows you to enter individual lines of code and have them run immediately. It's really handy if you're running into trouble with a particular program and can't figure out why. It's interactive so it's great for testing new ideas.</p> <p>To use the REPL, you first need to be connected to the serial console. Once that connection has been established, you'll want to press <strong>Ctrl + C</strong>.</p> <p>If there is code running, it will stop and you'll see
Press any key to enter the REPL. Use CTRL-D to reload.
Follow those instructions, and press any key on your keyboard.</p> <p>The
Traceback (most recent call last):
is telling you the last thing your board was doing before you pressed Ctrl + C and interrupted it. The
KeyboardInterrupt
is you pressing Ctrl + C. This information can be handy when troubleshooting, but for now, don't worry about it. Just note that it is expected behavior.</p> </div> <div class=„row-fluid build-image“><a href=„https://learn.adafruit.com/assets/49068“><img class=„49068-asset img-responsive“ srcset=„https://cdn-learn.adafruit.com/assets/assets/000/049/068/medium260/circuitpython_EnterREPLCodeRunning.png?1512872175 260w, https://cdn-learn.adafruit.com/assets/assets/000/049/068/medium640/circuitpython_EnterREPLCodeRunning.png?1512872175 640w, https://cdn-learn.adafruit.com/assets/assets/000/049/068/medium800/circuitpython_EnterREPLCodeRunning.png?1512872175 800w, https://cdn-learn.adafruit.com/assets/assets/000/049/068/large1024/circuitpython_EnterREPLCodeRunning.png?1512872175 1024w“ sizes=„(max-width: 768px) 100vw, (max-width: 1024px) 65vw, (max-width: 1365px) 47vw, 750px“ src=„https://cdn-learn.adafruit.com/assets/assets/000/049/068/medium800/circuitpython_EnterREPLCodeRunning.png?1512872175“ alt=„circuitpython_EnterREPLCodeRunning.png“/></a></div> <div class=„row-fluid build-text“ readability=„35“> <p>If there is no code running, you will enter the REPL immediately after pressing Ctrl + C. There is no information about what your board was doing before you interrupted it because there is no code running.</p> </div> <div class=„row-fluid build-image“><a href=„https://learn.adafruit.com/assets/49261“><img class=„49261-asset img-responsive“ srcset=„https://cdn-learn.adafruit.com/assets/assets/000/049/261/medium260/circuitpython_EnterREPLNoCodeRunning.png?1513187805 260w, https://cdn-learn.adafruit.com/assets/assets/000/049/261/medium640/circuitpython_EnterREPLNoCodeRunning.png?1513187805 640w, https://cdn-learn.adafruit.com/assets/assets/000/049/261/medium800/circuitpython_EnterREPLNoCodeRunning.png?1513187805 800w, https://cdn-learn.adafruit.com/assets/assets/000/049/261/large1024/circuitpython_EnterREPLNoCodeRunning.png?1513187805 1024w“ sizes=„(max-width: 768px) 100vw, (max-width: 1024px) 65vw, (max-width: 1365px) 47vw, 750px“ src=„https://cdn-learn.adafruit.com/assets/assets/000/049/261/medium800/circuitpython_EnterREPLNoCodeRunning.png?1513187805“ alt=„circuitpython_EnterREPLNoCodeRunning.png“/></a></div> <div class=„row-fluid build-text“ readability=„32“> <p>Either way, once you press a key you'll see a
>>>
prompt welcoming you to the REPL!</p> </div> <div class=„row-fluid build-image“><a href=„https://learn.adafruit.com/assets/49260“><img class=„49260-asset img-responsive“ srcset=„https://cdn-learn.adafruit.com/assets/assets/000/049/260/medium260/circuitpython_Screen_Shot_2017-12-09_at_19.57.55.png?1513187713 260w, https://cdn-learn.adafruit.com/assets/assets/000/049/260/medium640/circuitpython_Screen_Shot_2017-12-09_at_19.57.55.png?1513187713 640w, https://cdn-learn.adafruit.com/assets/assets/000/049/260/medium800/circuitpython_Screen_Shot_2017-12-09_at_19.57.55.png?1513187713 800w, https://cdn-learn.adafruit.com/assets/assets/000/049/260/large1024/circuitpython_Screen_Shot_2017-12-09_at_19.57.55.png?1513187713 1024w“ sizes=„(max-width: 768px) 100vw, (max-width: 1024px) 65vw, (max-width: 1365px) 47vw, 750px“ src=„https://cdn-learn.adafruit.com/assets/assets/000/049/260/medium800/circuitpython_Screen_Shot_2017-12-09_at_19.57.55.png?1513187713“ alt=„circuitpython_Screen_Shot_2017-12-09_at_19.57.55.png“/></a></div> <div class=„row-fluid build-text“ readability=„33“> <p>If you have trouble getting to the
>>>
prompt, try pressing Ctrl + C a few more times.</p> <p>The first thing you get from the REPL is information about your board.</p> </div> <div class=„row-fluid build-image“><a href=„https://learn.adafruit.com/assets/49067“><img class=„49067-asset img-responsive“ srcset=„https://cdn-learn.adafruit.com/assets/assets/000/049/067/medium260/circuitpython_REPLInfoLine.png?1512869212 260w, https://cdn-learn.adafruit.com/assets/assets/000/049/067/medium640/circuitpython_REPLInfoLine.png?1512869212 640w, https://cdn-learn.adafruit.com/assets/assets/000/049/067/medium800/circuitpython_REPLInfoLine.png?1512869212 800w, https://cdn-learn.adafruit.com/assets/assets/000/049/067/large1024/circuitpython_REPLInfoLine.png?1512869212 1024w“ sizes=„(max-width: 768px) 100vw, (max-width: 1024px) 65vw, (max-width: 1365px) 47vw, 750px“ src=„https://cdn-learn.adafruit.com/assets/assets/000/049/067/medium800/circuitpython_REPLInfoLine.png?1512869212“ alt=„circuitpython_REPLInfoLine.png“/></a></div> <div class=„row-fluid build-text“ readability=„37“> <p>This line tells you the version of CircuitPython you're using and when it was released. Next, it gives you the type of board you're using and the type of microcontroller the board uses. Each part of this may be different for your board depending on the versions you're working with.</p> <p>This is followed by the CircuitPython prompt.</p> </div> <div class=„row-fluid build-image“><a href=„https://learn.adafruit.com/assets/49066“><img class=„49066-asset img-responsive“ srcset=„https://cdn-learn.adafruit.com/assets/assets/000/049/066/medium260/circuitpython_REPLPrompt.png?1512869196 260w, https://cdn-learn.adafruit.com/assets/assets/000/049/066/medium640/circuitpython_REPLPrompt.png?1512869196 640w, https://cdn-learn.adafruit.com/assets/assets/000/049/066/medium800/circuitpython_REPLPrompt.png?1512869196 800w, https://cdn-learn.adafruit.com/assets/assets/000/049/066/large1024/circuitpython_REPLPrompt.png?1512869196 1024w“ sizes=„(max-width: 768px) 100vw, (max-width: 1024px) 65vw, (max-width: 1365px) 47vw, 750px“ src=„https://cdn-learn.adafruit.com/assets/assets/000/049/066/medium800/circuitpython_REPLPrompt.png?1512869196“ alt=„circuitpython_REPLPrompt.png“/></a></div> <div class=„row-fluid build-text“ readability=„37“> <p>From this prompt you can run all sorts of commands and code. The first thing we'll do is run
help()
. This will tell us where to start exploring the REPL. To run code in the REPL, type it in next to the REPL prompt.</p> <p>Type
help()
next to the prompt in the REPL.</p> </div> <div class=„row-fluid build-image“><a href=„https://learn.adafruit.com/assets/49078“><img class=„49078-asset img-responsive“ srcset=„https://cdn-learn.adafruit.com/assets/assets/000/049/078/medium260/circuitpython_REPLtypehelp.png?1512875967 260w, https://cdn-learn.adafruit.com/assets/assets/000/049/078/medium640/circuitpython_REPLtypehelp.png?1512875967 640w, https://cdn-learn.adafruit.com/assets/assets/000/049/078/medium800/circuitpython_REPLtypehelp.png?1512875967 800w, https://cdn-learn.adafruit.com/assets/assets/000/049/078/large1024/circuitpython_REPLtypehelp.png?1512875967 1024w“ sizes=„(max-width: 768px) 100vw, (max-width: 1024px) 65vw, (max-width: 1365px) 47vw, 750px“ src=„https://cdn-learn.adafruit.com/assets/assets/000/049/078/medium800/circuitpython_REPLtypehelp.png?1512875967“ alt=„circuitpython_REPLtypehelp.png“/></a></div> <div class=„row-fluid build-text“ readability=„31“> <p>Then press enter. You should then see a message.</p> </div> <div class=„row-fluid build-image“><a href=„https://learn.adafruit.com/assets/49071“><img class=„49071-asset img-responsive“ srcset=„https://cdn-learn.adafruit.com/assets/assets/000/049/071/medium260/circuitpython_REPLHelp.png?1512872236 260w, https://cdn-learn.adafruit.com/assets/assets/000/049/071/medium640/circuitpython_REPLHelp.png?1512872236 640w, https://cdn-learn.adafruit.com/assets/assets/000/049/071/medium800/circuitpython_REPLHelp.png?1512872236 800w, https://cdn-learn.adafruit.com/assets/assets/000/049/071/large1024/circuitpython_REPLHelp.png?1512872236 1024w“ sizes=„(max-width: 768px) 100vw, (max-width: 1024px) 65vw, (max-width: 1365px) 47vw, 750px“ src=„https://cdn-learn.adafruit.com/assets/assets/000/049/071/medium800/circuitpython_REPLHelp.png?1512872236“ alt=„circuitpython_REPLHelp.png“/></a></div> <div class=„row-fluid build-text“ readability=„41“> <p>First part of the message is another reference to the version of CircuitPython you're using. Second, a URL for the CircuitPython related project guides. Then… wait. What's this?
To list built-in modules, please do `help("modules")`.
Remember the libraries you learned about while going through creating code? That's exactly what this is talking about! This is a perfect place to start. Let's take a look!</p> <p>Type
help("modules")
into the REPL next to the prompt, and press enter.</p> </div> <div class=„row-fluid build-image“><a href=„https://learn.adafruit.com/assets/49074“><img class=„49074-asset img-responsive“ srcset=„https://cdn-learn.adafruit.com/assets/assets/000/049/074/medium260/circuitpython_REPLHelpModules.png?1512873793 260w, https://cdn-learn.adafruit.com/assets/assets/000/049/074/medium640/circuitpython_REPLHelpModules.png?1512873793 640w, https://cdn-learn.adafruit.com/assets/assets/000/049/074/medium800/circuitpython_REPLHelpModules.png?1512873793 800w, https://cdn-learn.adafruit.com/assets/assets/000/049/074/large1024/circuitpython_REPLHelpModules.png?1512873793 1024w“ sizes=„(max-width: 768px) 100vw, (max-width: 1024px) 65vw, (max-width: 1365px) 47vw, 750px“ src=„https://cdn-learn.adafruit.com/assets/assets/000/049/074/medium800/circuitpython_REPLHelpModules.png?1512873793“ alt=„circuitpython_REPLHelpModules.png“/></a></div> <div class=„row-fluid build-text“ readability=„45“> <p>This is a list of all the core libraries built into CircuitPython. We discussed how board contains all of the pins on the board that you can use in your code. From the REPL, you are able to see that list!</p> <p>Type
import board
into the REPL and press enter. It'll go to a new prompt. It might look like nothing happened, but that's not the case! If you recall, the
import
statement simply tells the code to expect to do something with that module. In this case, it's telling the REPL that you plan to do something with that module.</p> </div> <div class=„row-fluid build-image“><a href=„https://learn.adafruit.com/assets/49076“><img class=„49076-asset img-responsive“ srcset=„https://cdn-learn.adafruit.com/assets/assets/000/049/076/medium260/circuitpython_REPLImportBoard.png?1512874065 260w, https://cdn-learn.adafruit.com/assets/assets/000/049/076/medium640/circuitpython_REPLImportBoard.png?1512874065 640w, https://cdn-learn.adafruit.com/assets/assets/000/049/076/medium800/circuitpython_REPLImportBoard.png?1512874065 800w, https://cdn-learn.adafruit.com/assets/assets/000/049/076/large1024/circuitpython_REPLImportBoard.png?1512874065 1024w“ sizes=„(max-width: 768px) 100vw, (max-width: 1024px) 65vw, (max-width: 1365px) 47vw, 750px“ src=„https://cdn-learn.adafruit.com/assets/assets/000/049/076/medium800/circuitpython_REPLImportBoard.png?1512874065“ alt=„circuitpython_REPLImportBoard.png“/></a></div> <div class=„row-fluid build-text“ readability=„32“> <p>Next, type
dir(board)
into the REPL and press enter.</p> </div> <div class=„row-fluid build-image“><a href=„https://learn.adafruit.com/assets/49075“><img class=„49075-asset img-responsive“ srcset=„https://cdn-learn.adafruit.com/assets/assets/000/049/075/medium260/circuitpython_REPLdirboard.png?1512874046 260w, https://cdn-learn.adafruit.com/assets/assets/000/049/075/medium640/circuitpython_REPLdirboard.png?1512874046 640w, https://cdn-learn.adafruit.com/assets/assets/000/049/075/medium800/circuitpython_REPLdirboard.png?1512874046 800w, https://cdn-learn.adafruit.com/assets/assets/000/049/075/large1024/circuitpython_REPLdirboard.png?1512874046 1024w“ sizes=„(max-width: 768px) 100vw, (max-width: 1024px) 65vw, (max-width: 1365px) 47vw, 750px“ src=„https://cdn-learn.adafruit.com/assets/assets/000/049/075/medium800/circuitpython_REPLdirboard.png?1512874046“ alt=„circuitpython_REPLdirboard.png“/></a></div> <div class=„row-fluid build-text“ readability=„48“> <p>This is a list of all of the pins on your board that are available for you to use in your code. Each board's list will differ slightly depending on the number of pins available. Do you see
D13
? That's the pin you used to blink the red LED!</p> <p>The REPL can also be used to run code. Be aware that <strong>any code you enter into the REPL isn't saved</strong> anywhere. If you're testing something new that you'd like to keep, make sure you have it saved somewhere on your computer as well!</p> <p>Every programmer in every programming language starts with a piece of code that says, „Hello, World.“ We're going to say hello to something else. Type into the REPL:</p> <p>
print("Hello, CircuitPython!")
</p> <p>Then press enter.</p> </div> <div class=„row-fluid build-image“><a href=„https://learn.adafruit.com/assets/49079“><img class=„49079-asset img-responsive“ srcset=„https://cdn-learn.adafruit.com/assets/assets/000/049/079/medium260/circuitpython_PrintHelloCircuitPython.png?1512876510 260w, https://cdn-learn.adafruit.com/assets/assets/000/049/079/medium640/circuitpython_PrintHelloCircuitPython.png?1512876510 640w, https://cdn-learn.adafruit.com/assets/assets/000/049/079/medium800/circuitpython_PrintHelloCircuitPython.png?1512876510 800w, https://cdn-learn.adafruit.com/assets/assets/000/049/079/large1024/circuitpython_PrintHelloCircuitPython.png?1512876510 1024w“ sizes=„(max-width: 768px) 100vw, (max-width: 1024px) 65vw, (max-width: 1365px) 47vw, 750px“ src=„https://cdn-learn.adafruit.com/assets/assets/000/049/079/medium800/circuitpython_PrintHelloCircuitPython.png?1512876510“ alt=„circuitpython_PrintHelloCircuitPython.png“/></a></div> <div class=„row-fluid build-text“ readability=„42“> <p>That's all there is to running code in the REPL! Nice job!</p> <p>You can write single lines of code that run stand-alone. You can also write entire programs into the REPL to test them. As we said though, remember that nothing typed into the REPL is saved.</p> <p>There's a lot the REPL can do for you. It's great for testing new ideas if you want to see if a few new lines of code will work. It's fantastic for troubleshooting code by entering it one line at a time and finding out where it fails. It lets you see what libraries are available and explore those libraries.</p> <p>Try typing more into the REPL to see what happens!</p> </div> <div class=„row-fluid build-text“ readability=„41“> <p>When you're ready to leave the REPL and return to the serial console, simply press <strong>Ctrl + D</strong>. This will reload your board and reenter the serial console. You will restart the program you had running before entering the REPL. In the console window, you'll see any output from the program you had running. And if your program was affecting anything visual on the board, you'll see that start up again as well.</p> <p>You can return to the REPL at any time!</p> </div> </div><div class=„page-content all-page-view-content“ readability=„88“> <div class=„row-fluid build-image“><a href=„https://learn.adafruit.com/assets/49461“><img class=„49461-asset img-responsive“ srcset=„https://cdn-learn.adafruit.com/assets/assets/000/049/461/medium260/circuitpython_pygroup.jpg?1513735403 260w, https://cdn-learn.adafruit.com/assets/assets/000/049/461/medium640/circuitpython_pygroup.jpg?1513735403 640w, https://cdn-learn.adafruit.com/assets/assets/000/049/461/medium800/circuitpython_pygroup.jpg?1513735403 800w, https://cdn-learn.adafruit.com/assets/assets/000/049/461/large1024/circuitpython_pygroup.jpg?1513735403 1024w“ sizes=„(max-width: 768px) 100vw, (max-width: 1024px) 65vw, (max-width: 1365px) 47vw, 750px“ src=„https://cdn-learn.adafruit.com/assets/assets/000/049/461/medium800/circuitpython_pygroup.jpg?1513735403“ alt=„circuitpython_pygroup.jpg“/></a></div> <div class=„row-fluid build-text“ readability=„38“> <p>Now it's time to do something great with what you've learned! Every CircuitPython board is perfect for projects. However, each one excels in different areas. We're going to give you some details about each board, and highlight Learn guides where each one is used. You can try these out or get ideas for your own project!</p> </div> <p> <h2>Trinket M0</h2> </p> <div class=„row-fluid build-image“><a href=„https://learn.adafruit.com/assets/49120“><img class=„49120-asset img-responsive“ srcset=„https://cdn-learn.adafruit.com/assets/assets/000/049/120/medium260/circuitpython_TrinketM0Prod.jpg?1512941857 260w, https://cdn-learn.adafruit.com/assets/assets/000/049/120/medium640/circuitpython_TrinketM0Prod.jpg?1512941857 640w, https://cdn-learn.adafruit.com/assets/assets/000/049/120/medium800/circuitpython_TrinketM0Prod.jpg?1512941857 800w, https://cdn-learn.adafruit.com/assets/assets/000/049/120/large1024/circuitpython_TrinketM0Prod.jpg?1512941857 1024w“ sizes=„(max-width: 768px) 100vw, (max-width: 1024px) 65vw, (max-width: 1365px) 47vw, 750px“ src=„https://cdn-learn.adafruit.com/assets/assets/000/049/120/medium800/circuitpython_TrinketM0Prod.jpg?1512941857“ alt=„circuitpython_TrinketM0Prod.jpg“/></a></div> <div class=„row-fluid build-text“ readability=„46“> <p>The <a href=„https://www.adafruit.com/product/3500“>Adafruit Trinket M0</a> is the smallest CircuitPython board we carry. But don't let that fool you! It's a tiny board with a lot of power. We wanted to design a microcontroller board that was small enough to fit into any project, and low cost enough to use without hesitation. Planning to test a proof of concept and need a CircuitPython board to throw in? Not ready to disassemble the project you worked so hard to design to extract the board you used last time? Trinket M0 has you covered. It's the lowest cost CircuitPython board available but it easily holds its own with the bigger boards!</p> <p>Trinket M0 ships with CircuitPython and comes with demo code already on the board. You can open and edit the main.py file found on the CIRCUITPY drive to get started, or create your own! The <a href=„https://learn.adafruit.com/adafruit-trinket-m0-circuitpython-arduino“>Trinket M0 guide</a> gives you everything you need to know about your board. Check out the <a href=„https://learn.adafruit.com/adafruit-trinket-m0-circuitpython-arduino/circuitpython“>CircuitPython</a> section to find a huge list of examples to try.</p> <p>You can use Trinket M0 to make the <a href=„https://learn.adafruit.com/chilled-drinkibot“>Chilled Drinkibot</a> which uses the Trinket to control thermoelectric cooling of a beverage. Or build a spooky Halloween project that turns your candy bucket into a <a href=„https://learn.adafruit.com/screaming-cauldron/overview“>Screaming Cauldron</a>!</p> </div> <p> <h2>Gemma M0</h2> </p> <div class=„row-fluid build-image“><a href=„https://learn.adafruit.com/assets/49111“><img class=„49111-asset img-responsive“ srcset=„https://cdn-learn.adafruit.com/assets/assets/000/049/111/medium260/circuitpython_GemmaM0Prod.jpg?1512939812 260w, https://cdn-learn.adafruit.com/assets/assets/000/049/111/medium640/circuitpython_GemmaM0Prod.jpg?1512939812 640w, https://cdn-learn.adafruit.com/assets/assets/000/049/111/medium800/circuitpython_GemmaM0Prod.jpg?1512939812 800w, https://cdn-learn.adafruit.com/assets/assets/000/049/111/large1024/circuitpython_GemmaM0Prod.jpg?1512939812 1024w“ sizes=„(max-width: 768px) 100vw, (max-width: 1024px) 65vw, (max-width: 1365px) 47vw, 750px“ src=„https://cdn-learn.adafruit.com/assets/assets/000/049/111/medium800/circuitpython_GemmaM0Prod.jpg?1512939812“ alt=„circuitpython_GemmaM0Prod.jpg“/></a></div> <div class=„row-fluid build-text“ readability=„46“> <p>The <a href=„https://www.adafruit.com/product/3501“>Adafruit Gemma M0</a> is a tiny CircuitPython board with just enough built-in to build many simple projects. It's designed to be worked into your wearable projects, with big holes around the outside for sewing (and they're alligator clip friendly too!). Gemma M0 will super-charge your wearables and is easier to use than ever. There are capacitive touch pads, an on-off switch and an RGB DotStar LED built right into the board so there's plenty you can do without adding a thing. Add conductive thread and LEDs and you'll have a blinky wearable in no time!</p> <p>Like Trinket, Gemma M0 ships with CircuitPython and has demo code already on the board. You can open and edit the main.py file on the CIRCUITPY drive, or create your own! The <a href=„https://learn.adafruit.com/adafruit-gemma-m0/overview“>Gemma M0 guide</a> shows you all the info about your board, and has a great list of <a href=„https://learn.adafruit.com/adafruit-gemma-m0/circuitpython“>CircuitPython examples</a> to try out.</p> <p>Use Gemma M0 to create a pair of <a href=„https://learn.adafruit.com/gemma_m0_clockwork_goggles“>Clockwork Goggles</a> with fun light patterns on NeoPixel rings. Or accessorise with this 3D printed <a href=„https://learn.adafruit.com/gemma-m0-sheikah-pendant“>Sheikah Pendant</a> to add a bit of light to your next costume!</p> </div> <p> <h2>Circuit Playground Express</h2> </p> <div class=„row-fluid build-image“><a href=„https://learn.adafruit.com/assets/49114“><img class=„49114-asset img-responsive“ srcset=„https://cdn-learn.adafruit.com/assets/assets/000/049/114/medium260/circuitpython_CPXProd.jpg?1512940941 260w, https://cdn-learn.adafruit.com/assets/assets/000/049/114/medium640/circuitpython_CPXProd.jpg?1512940941 640w, https://cdn-learn.adafruit.com/assets/assets/000/049/114/medium800/circuitpython_CPXProd.jpg?1512940941 800w, https://cdn-learn.adafruit.com/assets/assets/000/049/114/large1024/circuitpython_CPXProd.jpg?1512940941 1024w“ sizes=„(max-width: 768px) 100vw, (max-width: 1024px) 65vw, (max-width: 1365px) 47vw, 750px“ src=„https://cdn-learn.adafruit.com/assets/assets/000/049/114/medium800/circuitpython_CPXProd.jpg?1512940941“ alt=„circuitpython_CPXProd.jpg“/></a></div> <div class=„row-fluid build-text“ readability=„52“> <p>The <a href=„https://www.adafruit.com/product/3333“>Adafruit Circuit Playground Express</a> is the next step towards a perfect introduction to electronics and programming. It's packed full of sensors, LEDs, buttons and switches, and it's super easy to get started with! This board is super versatile. Whether you're new to electronics and programming, or a seasoned veteran, Circuit Playground Express is an amazing board to work with. With so much built into the board, you can learn how different types of electronics work and learn to program them all without purchasing any other parts. All you need is a USB cable and the board! But, that's just the beginning. Many of the pads around the outside of the board function in multiple ways allowing you to wire other things to the board. For example, you could wire up a servo or a potentiometer. The possibilities are endless!</p> <p>The <a href=„https://learn.adafruit.com/adafruit-circuit-playground-express/overview“>Circuit Playground Express guide</a> has tons of information on all the fantastic features of the board. The <a href=„https://learn.adafruit.com/adafruit-circuit-playground-express/adafruit2-circuitpython“>CircuitPython section</a> of the guide has an extensive list of examples using the built-in features of the CircuitPython and the board. There is also a section called <a href=„https://learn.adafruit.com/adafruit-circuit-playground-express/python-playground“>Python Playground</a> with more demos and a <a href=„https://learn.adafruit.com/adafruit-circuit-playground-express/playground-drum-machine“>Drum Machine project</a> to try out.</p> <p>You can turn your Circuit Playground Express into a capacitive touch tone <a href=„https://learn.adafruit.com/circuit-playground-express-piano-in-the-key-of-lime/overview“>Piano in the Key of Lime</a> using the touch pads on the board. Use the built in accelerometer to make a <a href=„https://learn.adafruit.com/ufo-circuit-playground-express“>UFO Flying Saucer</a> complete with lights and alien sounds using your board, and some extra supplies from around the house or a 3D printed saucer!</p> </div> <p> <h2>Feather M0 Express</h2> </p> <div class=„row-fluid build-image“><a href=„https://learn.adafruit.com/assets/49117“><img class=„49117-asset img-responsive“ srcset=„https://cdn-learn.adafruit.com/assets/assets/000/049/117/medium260/circuitpython_FeatherProd.jpg?1512941234 260w, https://cdn-learn.adafruit.com/assets/assets/000/049/117/medium640/circuitpython_FeatherProd.jpg?1512941234 640w, https://cdn-learn.adafruit.com/assets/assets/000/049/117/medium800/circuitpython_FeatherProd.jpg?1512941234 800w, https://cdn-learn.adafruit.com/assets/assets/000/049/117/large1024/circuitpython_FeatherProd.jpg?1512941234 1024w“ sizes=„(max-width: 768px) 100vw, (max-width: 1024px) 65vw, (max-width: 1365px) 47vw, 750px“ src=„https://cdn-learn.adafruit.com/assets/assets/000/049/117/medium800/circuitpython_FeatherProd.jpg?1512941234“ alt=„circuitpython_FeatherProd.jpg“/></a></div> <div class=„row-fluid build-text“ readability=„48“> <p>The <a href=„https://www.adafruit.com/product/3403“>Adafruit Feather M0 Express</a> is the first Feather designed specifically for CircuitPython. It's part of a line of <a href=„https://learn.adafruit.com/adafruit-feather/feather-specification?view=all“>Adafruit Feather development boards</a> designed to work standalone or stacked, and is powered by USB or lithium ion battery so it works for both stationary and on-the-go projects. Feather M0 Express comes with two headers for use with a solderless breadboard, or you can solder wires directly to the pins on the board. This allows for prototyping while you're working on your project and permanent installation when you're ready. One of the things that makes the Feather M0 Express amazing is the the huge array of boards called <a href=„https://www.adafruit.com/category/871“>Featherwings</a> which are designed to fit right on the Feather. There are CircuitPython libraries for many of these boards and more are being written all the time.</p> <p>Feather M0 Express ships CircuitPython-ready with the UF2 bootloader installed and ready for you to install CircuitPython when you receive your board. Create your first program, save it to the board, and off you go! The <a href=„https://learn.adafruit.com/adafruit-feather-m0-express-designed-for-circuit-python-circuitpython“>Feather M0 Express guide</a> has all the details about your board, and a <a href=„https://learn.adafruit.com/adafruit-feather-m0-express-designed-for-circuit-python-circuitpython/circuitpython-setup“>CircuitPython section</a> to get you started.</p> <p>Feather M0 Express can be used to power all kinds of projects. Build a <a href=„https://learn.adafruit.com/circuitpython-painter“>CircuitPython Painter</a> POV LED wand using 3D printed parts and DotStar strips. Create an engraved edge-lit <a href=„https://learn.adafruit.com/led-acrylic-sign“>LED Acrylic Sign</a> with NeoPixels. There are guides to go with the Featherwings that explain how to use them with CircuitPython, like the <a href=„https://learn.adafruit.com/micropython-hardware-ssd1306-oled-display?view=all“>OLED Display</a> and <a href=„https://learn.adafruit.com/micropython-hardware-sd-cards/tdicola-circuitpython?view=all“>Adalogger Featherwing</a>.</p> </div> <p> <h2>Metro M0 Express</h2> </p> <div class=„row-fluid build-image“><a href=„https://learn.adafruit.com/assets/49118“><img class=„49118-asset img-responsive“ srcset=„https://cdn-learn.adafruit.com/assets/assets/000/049/118/medium260/circuitpython_MetroProd.jpg?1512941538 260w, https://cdn-learn.adafruit.com/assets/assets/000/049/118/medium640/circuitpython_MetroProd.jpg?1512941538 640w, https://cdn-learn.adafruit.com/assets/assets/000/049/118/medium800/circuitpython_MetroProd.jpg?1512941538 800w, https://cdn-learn.adafruit.com/assets/assets/000/049/118/large1024/circuitpython_MetroProd.jpg?1512941538 1024w“ sizes=„(max-width: 768px) 100vw, (max-width: 1024px) 65vw, (max-width: 1365px) 47vw, 750px“ src=„https://cdn-learn.adafruit.com/assets/assets/000/049/118/medium800/circuitpython_MetroProd.jpg?1512941538“ alt=„circuitpython_MetroProd.jpg“/></a></div> <div class=„row-fluid build-text“ readability=„56“> <p><a href=„https://www.adafruit.com/product/3505“>Metro M0 Express</a> is the first Metro board designed to work with CircuitPython. This is not a beginner board. If you're just getting started, we'd recommend one of the previous boards. It has a lot of the same features as Feather M0 Express, as well as some development specific features (like the SWD port built in!). The Metro M0 Express is designed to work with the Arduino form-factor, so if you've already got Arduino shields, this board would be great for you. There are CircuitPython libraries for some shields already. It has 25 GPIO pins (the most of any of these boards!) so it's great if you're looking for a lot of options.</p> <p>Metro M0 Express ships CircuitPython-ready with the UF2 bootloader installed and is ready for you to install CircuitPython when you receive your board. Create your first program, save it to the board, and you're good to go! The <a href=„https://learn.adafruit.com/adafruit-metro-m0-express-designed-for-circuitpython“>Metro M0 Express guide</a> gives you all the details about your board, and the <a href=„https://learn.adafruit.com/adafruit-metro-m0-express-designed-for-circuitpython/circuitpython-setup“>CircuitPython section</a> is available to get you started.</p> <p>All sensors and breakout boards with CircuitPython libraries will work with the Metro M0 Express running CircuitPython. Find the guide for your sensor and follow the guide to find out how to wire it up. There are a ton of options available.</p> <p>Now you're ready to jump into some more Learn Guides or simply get started with a brand new project. Great job, and good luck!</p> </div> </div><div class=„page-content all-page-view-content“ readability=„116“> <div class=„row-fluid build-text“ readability=„42“> <p>Each CircuitPython program you run needs to have a lot of information to work. The reason CircuitPython is so simple to use is that most of that information is stored in other files and works in the background. These files are called <strong>libraries</strong>. Some of them are built into CircuitPython. Others are stored on your
CIRCUITPY
drive in a folder called
lib
. Part of what makes CircuitPython so awesome is its ability to store code separately from the firmware itself. Storing code separately from the firmware makes it easier to update both the code you write and the libraries you depend.</p> <p>Your board may ship with a
lib
folder already, its in the base directory of the drive. If not, simply create the folder yourself.</p> </div> <div class=„row-fluid build-image“><a href=„https://learn.adafruit.com/assets/49267“><img class=„49267-asset img-responsive“ srcset=„https://cdn-learn.adafruit.com/assets/assets/000/049/267/medium260/circuitpython_gemma_libfolder.png?1513200206 260w, https://cdn-learn.adafruit.com/assets/assets/000/049/267/medium640/circuitpython_gemma_libfolder.png?1513200206 640w, https://cdn-learn.adafruit.com/assets/assets/000/049/267/medium800/circuitpython_gemma_libfolder.png?1513200206 800w, https://cdn-learn.adafruit.com/assets/assets/000/049/267/large1024/circuitpython_gemma_libfolder.png?1513200206 1024w“ sizes=„(max-width: 768px) 100vw, (max-width: 1024px) 65vw, (max-width: 1365px) 47vw, 750px“ src=„https://cdn-learn.adafruit.com/assets/assets/000/049/267/medium800/circuitpython_gemma_libfolder.png?1513200206“ alt=„circuitpython_gemma_libfolder.png“/></a></div> <div class=„row-fluid build-text“ readability=„45“> <p>CircuitPython libraries work in the same was as regular Python modules so the <a href=„https://docs.python.org/3/tutorial/modules.html“>Python docs</a> are a great reference for how it all should work. In Python terms, we can place our library files in the
lib
directory because its part of the Python path by default.</p> <p>One downside of this approach of separate libraries is that they are not built in. To use them, one needs to copy them to the
CIRCUITPY
drive before they can be used. Fortunately, we provide a bundle full of our libraries.</p> <p>Our bundle and releases also feature optimized versions of the libraries with the
.mpy
file extension. These files take less space on the drive and have a smaller memory footprint as they are loaded.</p> </div> <p> <h2>Installing the CircuitPython Library Bundle</h2> </p> <div class=„row-fluid build-text“ readability=„44“> <p>We're constantly updating and improving our libraries, so we don't (at this time) ship our CircuitPython boards with the full library bundle. Instead, you can find example code in the guides for your board that depends on external libraries. Some of these libraries may be available from us at Adafruit, some may be written by community members!</p> <p>Either way, as you start to explore CircuitPython, you'll want to know how to get libraries on board.</p> <p>You can grab the latest Adafruit CircuitPython 2.x Bundle release by clicking this button:</p> </div> <p><a href=„https://github.com/adafruit/Adafruit_CircuitPython_Bundle/releases/latest“ class=„btn btn-large btn-block btn-primary“ target=„_self“ type=„button“>Click for the Latest Adafruit CircuitPython Library Bundle Release</a></p> <div class=„row-fluid build-text“ readability=„40“> <p>If you need another version, <a href=„https://github.com/adafruit/Adafruit_CircuitPython_Bundle/releases/latest/“>you can also visit the bundle release page</a> which will let you select exactly what version you're looking for, as well as information about changes.</p> <p><strong>Either way, download the version that matches your CircuitPython run-time.</strong> For example, if you're running v2.2 download the v2 bundle. If you're running 3.0, download the v3 bundle. There's also a
py
bundle which contains the uncompressed python files, you probably <em>don't</em> want that!</p> </div> <div class=„row-fluid build-text“ readability=„35“> <p>After downloading the zip, extract its contents. This is usually done by double clicking on the zip. On Mac OSX, it places the file in the same directory as the zip.</p> </div> <div class=„row-fluid build-image“><a href=„https://learn.adafruit.com/assets/49328“><img class=„49328-asset img-responsive“ srcset=„https://cdn-learn.adafruit.com/assets/assets/000/049/328/medium260/circuitpython_adafruit_gemma_gemma_bundle_extracted.png?1513576332 260w, https://cdn-learn.adafruit.com/assets/assets/000/049/328/medium640/circuitpython_adafruit_gemma_gemma_bundle_extracted.png?1513576332 640w, https://cdn-learn.adafruit.com/assets/assets/000/049/328/medium800/circuitpython_adafruit_gemma_gemma_bundle_extracted.png?1513576332 800w, https://cdn-learn.adafruit.com/assets/assets/000/049/328/large1024/circuitpython_adafruit_gemma_gemma_bundle_extracted.png?1513576332 1024w“ sizes=„(max-width: 768px) 100vw, (max-width: 1024px) 65vw, (max-width: 1365px) 47vw, 750px“ src=„https://cdn-learn.adafruit.com/assets/assets/000/049/328/medium800/circuitpython_adafruit_gemma_gemma_bundle_extracted.png?1513576332“ alt=„circuitpython_adafruit_gemma_gemma_bundle_extracted.png“/></a></div> <div class=„row-fluid build-text“ readability=„32“> <p>When you open the folder, you'll see a large number of <strong>mpy</strong> files and folders</p> </div> <div class=„row-fluid build-image“><a href=„https://learn.adafruit.com/assets/49462“><img class=„49462-asset img-responsive“ srcset=„https://cdn-learn.adafruit.com/assets/assets/000/049/462/medium260/circuitpython_adafruit_gemma_libfol.png?1513735930 260w, https://cdn-learn.adafruit.com/assets/assets/000/049/462/medium640/circuitpython_adafruit_gemma_libfol.png?1513735930 640w, https://cdn-learn.adafruit.com/assets/assets/000/049/462/medium800/circuitpython_adafruit_gemma_libfol.png?1513735930 800w, https://cdn-learn.adafruit.com/assets/assets/000/049/462/large1024/circuitpython_adafruit_gemma_libfol.png?1513735930 1024w“ sizes=„(max-width: 768px) 100vw, (max-width: 1024px) 65vw, (max-width: 1365px) 47vw, 750px“ src=„https://cdn-learn.adafruit.com/assets/assets/000/049/462/medium800/circuitpython_adafruit_gemma_libfol.png?1513735930“ alt=„circuitpython_adafruit_gemma_libfol.png“/></a></div> <div class=„row-fluid build-text“ readability=„45“> <h2>Express Boards</h2> <p>If you are using a Feather M0 Express, Metro M0 Express or Circuit Playground Express (or any other „Express“ board) your CircuitPython board comes with at least 2 MB of Flash storage. This is <em>plenty</em> of space for all of our library files so we recommend you just install them all! (If you have a Gemma M0 or Trinket M0 or other non-Express board, skip down to the next section)</p> <p>On Express boards, the
lib
directory can be copied directly to the CIRCUITPY drive.</p> <p>Just drag the entire
lib
folder into the CIRCUITPY drive, and 'replace' any old files if your operating system prompts you</p> </div> <div class=„row-fluid build-text“ readability=„46“> <h2>Non-Express Boards</h2> <p><strong>If you are using Trinket M0 or Gemma M0, you will need to load the libraries individually, due to file space restrictions.</strong> If you are using a non-express board, or you would rather load libraries as you use them, you'll first want to create a
lib
folder on your
CIRCUITPY
drive. Open the drive, right click, choose the option to create a new folder, and call it
lib
. Then, open the
lib
folder you extracted from the downloaded zip. Inside you'll find a number of folders and
.mpy
files. Find the library you'd like to use, and copy it to the lib folder on CIRCUITPY.</p> </div> <div class=„row-fluid build-text“> <h2>Example:
ImportError
Due to Missing Library</h2> </div> <div class=„row-fluid build-text“ readability=„40“> <p>If you choose to load libraries as you need them, you may write up code that tries to use a library you haven't yet loaded.  We're going to demonstrate what happens when you try to utilise a library that you don't have loaded on your board, and cover the steps required to resolve the issue. <strong>This demonstration will only return an error if you do not have the required library loaded into the
lib
folder on your
CIRCUITPY
drive.</strong></p> <p>Let's use a modified version of the blinky example.</p> </div> <div class=„build-code code-element“ readability=„9“> <pre class=„code-text-only c4“> import board import time import simpleio led = simpleio.DigitalOut(board.D13) while True:
  led.value = True
  time.sleep(0.5)
  led.value = False
  time.sleep(0.5)
</pre> <pre class=„prettyprint linenums“> import board import time import simpleio led = simpleio.DigitalOut(board.D13) while True:
  led.value = True
  time.sleep(0.5)
  led.value = False
  time.sleep(0.5)
</pre></div> <div class=„row-fluid build-text“ readability=„32“> <p>Save this file. Nothing happens to your board. Let's check the serial console to see what's going on.</p> </div> <div class=„row-fluid build-image“><a href=„https://learn.adafruit.com/assets/49274“><img class=„49274-asset img-responsive“ srcset=„https://cdn-learn.adafruit.com/assets/assets/000/049/274/medium260/circuitpython_CPConsoleImportError.png?1513206004 260w, https://cdn-learn.adafruit.com/assets/assets/000/049/274/medium640/circuitpython_CPConsoleImportError.png?1513206004 640w, https://cdn-learn.adafruit.com/assets/assets/000/049/274/medium800/circuitpython_CPConsoleImportError.png?1513206004 800w, https://cdn-learn.adafruit.com/assets/assets/000/049/274/large1024/circuitpython_CPConsoleImportError.png?1513206004 1024w“ sizes=„(max-width: 768px) 100vw, (max-width: 1024px) 65vw, (max-width: 1365px) 47vw, 750px“ src=„https://cdn-learn.adafruit.com/assets/assets/000/049/274/medium800/circuitpython_CPConsoleImportError.png?1513206004“ alt=„circuitpython_CPConsoleImportError.png“/></a></div> <div class=„row-fluid build-text“ readability=„39“> <p>We have an
ImportError
. It says there is
no module named 'simpleio'
. That's the one we just included in our code!</p> <p>Click the link above to download the correct bundle. Extract the lib folder from the downloaded bundle file. Scroll down to find
simpleio.mpy
. This is the library file we're looking for! Follow the steps above to load an individual library file.</p> <p>The LED starts blinking again! Let's check the serial console.</p> </div> <div class=„row-fluid build-image“><a href=„https://learn.adafruit.com/assets/49278“><img class=„49278-asset img-responsive“ srcset=„https://cdn-learn.adafruit.com/assets/assets/000/049/278/medium260/circuitpython_CPConsoleNoError.png?1513210233 260w, https://cdn-learn.adafruit.com/assets/assets/000/049/278/medium640/circuitpython_CPConsoleNoError.png?1513210233 640w, https://cdn-learn.adafruit.com/assets/assets/000/049/278/medium800/circuitpython_CPConsoleNoError.png?1513210233 800w, https://cdn-learn.adafruit.com/assets/assets/000/049/278/large1024/circuitpython_CPConsoleNoError.png?1513210233 1024w“ sizes=„(max-width: 768px) 100vw, (max-width: 1024px) 65vw, (max-width: 1365px) 47vw, 750px“ src=„https://cdn-learn.adafruit.com/assets/assets/000/049/278/medium800/circuitpython_CPConsoleNoError.png?1513210233“ alt=„circuitpython_CPConsoleNoError.png“/></a></div> <div class=„row-fluid build-text“ readability=„35“> <p>No errors! Excellent. You've successfully resolved an
ImportError
!</p> <p>If you run into this error in the future, follow along with the steps above and choose the library that matches the one you're missing.</p> </div> <p> <h2>Library Install on Non-Express Boards</h2> </p> <div class=„row-fluid build-text“ readability=„52“> <p>If you have a Trinket M0 or Gemma M0, you'll want to follow the same steps in the example above to install libraries as you need them. You don't always need to wait for an
ImportError
as you probably know what library you added to your code. Simply open the
lib
folder you downloaded, find the library you need, and drag it to the
lib
folder on your
CIRCUITPY
drive.</p> <p>For these boards, your internal storage is from the chip itself. So, these boards don't have enough space for all of the libraries. If you try to copy over the entire
lib
folder you won't have enough space on your
CIRCUITPY
drive.</p> <p>You may end up running out of space on your Trinket M0 or Gemma M0 even if you only load libraries as you need them. There are a number of steps you can use to try to resolve this issue. You'll find them in the Troubleshooting page in the Learn guides for your board.</p> </div> <p> <h2>Updating CircuitPython Libraries</h2> </p> <div class=„row-fluid build-text“ readability=„49“> <p>Libraries are updated from time to time, and it's important to update the files you have on your
CIRCUITPY
drive.</p> <p>To update a single library, follow the same steps above. When you drag the library file to your lib folder, it will ask if you want to replace it. Say yes. That's it!</p> <p>If you'd like to update the entire bundle at once, drag the lib folder to your CIRUCITPY drive. Different operating systems will have a different dialog pop up. You want to tell it to replace the current folder. Then you're updated and ready to go!</p> <p>A new library bundle is released every time there's an update to a library. Updates include things like bug fixes and new features. It's important to check in every so often to see if the libraries you're using have been updated.</p> </div> </div><div class=„page-content all-page-view-content“ readability=„97“> <div class=„row-fluid build-image“><a href=„https://learn.adafruit.com/assets/47545“><img class=„47545-asset img-responsive“ srcset=„https://cdn-learn.adafruit.com/assets/assets/000/047/545/medium260/circuitpython_adafruit_code_community_googleplus.jpg?1508879596 260w, https://cdn-learn.adafruit.com/assets/assets/000/047/545/medium640/circuitpython_adafruit_code_community_googleplus.jpg?1508879596 640w, https://cdn-learn.adafruit.com/assets/assets/000/047/545/medium800/circuitpython_adafruit_code_community_googleplus.jpg?1508879596 800w, https://cdn-learn.adafruit.com/assets/assets/000/047/545/large1024/circuitpython_adafruit_code_community_googleplus.jpg?1508879596 1024w“ sizes=„(max-width: 768px) 100vw, (max-width: 1024px) 65vw, (max-width: 1365px) 47vw, 750px“ src=„https://cdn-learn.adafruit.com/assets/assets/000/047/545/medium800/circuitpython_adafruit_code_community_googleplus.jpg?1508879596“ alt=„circuitpython_adafruit_code_community_googleplus.jpg“/></a></div> <div class=„row-fluid build-text“ readability=„46“> <p>CircuitPython is a programming language that's super simple to get started with and great for learning. It runs on microcontrollers and works out of the box. You can plug it in and get started with any text editor. The best part? CircuitPython comes with an amazing, supportive community.</p> <p>Everyone is welcome! CircuitPython is Open Source. This means it's available for anyone to use, edit, copy and improve upon. This also means CircuitPython becomes better because of you being a part of it. It doesn't matter whether this is your first microcontroller board or you're a computer engineer, you have something important to offer the Adafruit CircuitPython community. We're going to highlight some of the many ways you can be a part of it!</p> </div> <p> <h2>Adafruit Discord</h2> </p> <div class=„row-fluid build-image“><a href=„https://learn.adafruit.com/assets/48351“><img class=„48351-asset img-responsive“ srcset=„https://cdn-learn.adafruit.com/assets/assets/000/048/351/medium260/circuitpython_Screen_Shot_2017-11-20_at_14.54.21.png?1511207983 260w, https://cdn-learn.adafruit.com/assets/assets/000/048/351/medium640/circuitpython_Screen_Shot_2017-11-20_at_14.54.21.png?1511207983 640w, https://cdn-learn.adafruit.com/assets/assets/000/048/351/medium800/circuitpython_Screen_Shot_2017-11-20_at_14.54.21.png?1511207983 800w, https://cdn-learn.adafruit.com/assets/assets/000/048/351/large1024/circuitpython_Screen_Shot_2017-11-20_at_14.54.21.png?1511207983 1024w“ sizes=„(max-width: 768px) 100vw, (max-width: 1024px) 65vw, (max-width: 1365px) 47vw, 750px“ src=„https://cdn-learn.adafruit.com/assets/assets/000/048/351/medium800/circuitpython_Screen_Shot_2017-11-20_at_14.54.21.png?1511207983“ alt=„circuitpython_Screen_Shot_2017-11-20_at_14.54.21.png“/></a></div> <div class=„row-fluid build-text“ readability=„60“> <p>The Adafruit Discord server is the best place to start. Discord is where the community comes together to volunteer and provide live support of all kinds. From general discussion to detailed problem solving, and everything in between, Discord is a digital maker space with makers from around the world.</p> <p>There are many different channels so you can choose the one best suited to your needs. Each channel is shown on Discord as „#channelname“. There's the #projecthelp channel for assistance with your current project or help coming up with ideas for your next one. There's the #showandtell channel for showing off your newest creation. Don't be afraid to ask a question in any channel! If you're unsure, #general is a great place to start. If another channel is more likely to provide you with a better answer, someone will guide you.</p> <p>The CircuitPython channel is where to go with your CircuitPython questions. #circuitpython is there for new users and developers alike so feel free to ask a question or post a comment! Everyone of any experience level is welcome to join in on the conversation. We'd love to hear what you have to say!</p> <p>The easiest way to contribute to the community is to assist others on Discord. Supporting others doesn't always mean answering questions. Join in celebrating successes! Celebrate your mistakes! Sometimes just hearing that someone else has gone through a similar struggle can be enough to keep a maker moving forward.</p> <p>The Adafruit Discord is the 24x7x365 hackerspace that you can bring your granddaughter to.</p> <p>Visit <a href=„https://adafru.it/discord“>https://adafru.it/discord</a> to sign up for Discord. We're looking forward to meeting you!</p> </div> <p> <h2>Adafruit Forums</h2> </p> <div class=„row-fluid build-image“><a href=„https://learn.adafruit.com/assets/47713“><img class=„47713-asset img-responsive“ srcset=„https://cdn-learn.adafruit.com/assets/assets/000/047/713/medium260/circuitpython_AdafruitForumsHeader.png?1509241590 260w, https://cdn-learn.adafruit.com/assets/assets/000/047/713/medium640/circuitpython_AdafruitForumsHeader.png?1509241590 640w, https://cdn-learn.adafruit.com/assets/assets/000/047/713/medium800/circuitpython_AdafruitForumsHeader.png?1509241590 800w, https://cdn-learn.adafruit.com/assets/assets/000/047/713/large1024/circuitpython_AdafruitForumsHeader.png?1509241590 1024w“ sizes=„(max-width: 768px) 100vw, (max-width: 1024px) 65vw, (max-width: 1365px) 47vw, 750px“ src=„https://cdn-learn.adafruit.com/assets/assets/000/047/713/medium800/circuitpython_AdafruitForumsHeader.png?1509241590“ alt=„circuitpython_AdafruitForumsHeader.png“/></a></div> <div class=„row-fluid build-text“ readability=„46“> <p>The <a href=„https://forums.adafruit.com“>Adafruit Forums</a> are the perfect place for support. Adafruit has wonderful paid support folks to answer any questions you may have. Whether your hardware is giving you issues or your code doesn't seem to be working, the forums are always there for you to ask. You need an Adafruit account to post to the forums. You can use the same account you use to order from Adafruit.</p> <p>While Discord may provide you with quicker responses than the forums, the forums are a more reliable source of information. If you want to be certain you're getting an Adafruit-supported answer, the forums are the best place to be.</p> <p>There are forum categories that cover all kinds of topics, including everything Adafruit. The <a href=„https://forums.adafruit.com/viewforum.php?f=60“>Adafruit CircuitPython and MicroPython</a> category under „Supported Products & Projects“ is the best place to post your CircuitPython questions.</p> </div> <div class=„row-fluid build-image“><a href=„https://learn.adafruit.com/assets/47714“><img class=„47714-asset img-responsive“ srcset=„https://cdn-learn.adafruit.com/assets/assets/000/047/714/medium260/circuitpython_AdafruitForumsCPandMP.png?1509241640 260w, https://cdn-learn.adafruit.com/assets/assets/000/047/714/medium640/circuitpython_AdafruitForumsCPandMP.png?1509241640 640w, https://cdn-learn.adafruit.com/assets/assets/000/047/714/medium800/circuitpython_AdafruitForumsCPandMP.png?1509241640 800w, https://cdn-learn.adafruit.com/assets/assets/000/047/714/large1024/circuitpython_AdafruitForumsCPandMP.png?1509241640 1024w“ sizes=„(max-width: 768px) 100vw, (max-width: 1024px) 65vw, (max-width: 1365px) 47vw, 750px“ src=„https://cdn-learn.adafruit.com/assets/assets/000/047/714/medium800/circuitpython_AdafruitForumsCPandMP.png?1509241640“ alt=„circuitpython_AdafruitForumsCPandMP.png“/></a></div> <div class=„row-fluid build-text“ readability=„44“> <p>Be sure to include the steps you took to get to where you are. If it involves wiring, post a picture! If your code is giving you trouble, include your code in your post! These are great ways to make sure that there's enough information to help you with your issue.</p> <p>You might think you're just getting started, but you definitely know something that someone else doesn't. The great thing about the forums is that you can help others too! Everyone is welcome and encouraged to provide constructive feedback to any of the posted questions. This is an excellent way to contribute to the community and share your knowledge!</p> </div> <p> <h2>Adafruit Github</h2> </p> <div class=„row-fluid build-image“><a href=„https://learn.adafruit.com/assets/48414“><img class=„48414-asset img-responsive“ srcset=„https://cdn-learn.adafruit.com/assets/assets/000/048/414/medium260/circuitpython_Screen_Shot_2017-11-21_at_18.26.55.png?1511306851 260w, https://cdn-learn.adafruit.com/assets/assets/000/048/414/medium640/circuitpython_Screen_Shot_2017-11-21_at_18.26.55.png?1511306851 640w, https://cdn-learn.adafruit.com/assets/assets/000/048/414/medium800/circuitpython_Screen_Shot_2017-11-21_at_18.26.55.png?1511306851 800w, https://cdn-learn.adafruit.com/assets/assets/000/048/414/large1024/circuitpython_Screen_Shot_2017-11-21_at_18.26.55.png?1511306851 1024w“ sizes=„(max-width: 768px) 100vw, (max-width: 1024px) 65vw, (max-width: 1365px) 47vw, 750px“ src=„https://cdn-learn.adafruit.com/assets/assets/000/048/414/medium800/circuitpython_Screen_Shot_2017-11-21_at_18.26.55.png?1511306851“ alt=„circuitpython_Screen_Shot_2017-11-21_at_18.26.55.png“/></a></div> <div class=„row-fluid build-text“ readability=„44“> <p>Whether you're just beginning or are life-long programmer who would like to contribute, there are ways for everyone to be a part of building CircuitPython. GitHub is the best source of ways to contribute to <a href=„https://github.com/adafruit/circuitpython“>CircuitPython</a> itself. If you need an account, visit <a href=„https://github.com/“>https://github.com/</a> and sign up.</p> <p>If you're new to GitHub or programming in general, there are great opportunities for you. Head over to <a href=„https://github.com/adafruit/circuitpython“>adafruit/circuitpython</a> on GitHub, click on „<a href=„https://github.com/adafruit/circuitpython/issues?page=1&q=is%3Aissue+is%3Aopen“>Issues</a>“, and you'll find a list that includes issues labeled „<a href=„https://github.com/adafruit/circuitpython/issues?q=is%3Aissue+is%3Aopen+label%3A%22good+first+issue%22“>good first issue</a>“. These are things we've identified as something that someone with any level of experience can help with. These issues include options like updating documentation, providing feedback, and fixing simple bugs.</p> </div> <div class=„row-fluid build-image“><a href=„https://learn.adafruit.com/assets/48163“><img class=„48163-asset img-responsive“ srcset=„https://cdn-learn.adafruit.com/assets/assets/000/048/163/medium260/circuitpython_Screen_Shot_2017-11-14_at_15.42.01.png?1510692193 260w, https://cdn-learn.adafruit.com/assets/assets/000/048/163/medium640/circuitpython_Screen_Shot_2017-11-14_at_15.42.01.png?1510692193 640w, https://cdn-learn.adafruit.com/assets/assets/000/048/163/medium800/circuitpython_Screen_Shot_2017-11-14_at_15.42.01.png?1510692193 800w, https://cdn-learn.adafruit.com/assets/assets/000/048/163/large1024/circuitpython_Screen_Shot_2017-11-14_at_15.42.01.png?1510692193 1024w“ sizes=„(max-width: 768px) 100vw, (max-width: 1024px) 65vw, (max-width: 1365px) 47vw, 750px“ src=„https://cdn-learn.adafruit.com/assets/assets/000/048/163/medium800/circuitpython_Screen_Shot_2017-11-14_at_15.42.01.png?1510692193“ alt=„circuitpython_Screen_Shot_2017-11-14_at_15.42.01.png“/></a></div> <div class=„row-fluid build-text“ readability=„59“> <p>Already experienced and looking for a challenge? Checkout the rest of the issues list and you'll find plenty of ways to contribute. You'll find everything from new driver requests to core module updates. There's plenty of opportunities for everyone at any level!</p> <p>When working with CircuitPython, you may find problems. If you find a bug, that's great! We love bugs! Posting a detailed issue to GitHub is an invaluable way to contribute to improving CircuitPython. Be sure to include the steps to replicate the issue as well as any other information you think is relevant. The more detail, the better!</p> <p>Testing new software is easy and incredibly helpful. Simply load the newest version of CircuitPython or a library onto your CircuitPython hardware, and use it. Let us know about any problems you find by posting a new issue to GitHub. Software testing on both current and beta releases is a very important part of contributing CircuitPython. We can't possibly find all the problems ourselves! We need your help to make CircuitPython even better.</p> <p>On GitHub, you can submit feature requests, provide feedback, report problems and much more. If you have questions, remember that Discord and the Forums are both there for help!</p> </div> <p> <h2>ReadTheDocs</h2> </p> <div class=„row-fluid build-image“><a href=„https://learn.adafruit.com/assets/47897“><img class=„47897-asset img-responsive“ srcset=„https://cdn-learn.adafruit.com/assets/assets/000/047/897/medium260/circuitpython_Screen_Shot_2017-11-02_at_22.53.06.png?1509677641 260w, https://cdn-learn.adafruit.com/assets/assets/000/047/897/medium640/circuitpython_Screen_Shot_2017-11-02_at_22.53.06.png?1509677641 640w, https://cdn-learn.adafruit.com/assets/assets/000/047/897/medium800/circuitpython_Screen_Shot_2017-11-02_at_22.53.06.png?1509677641 800w, https://cdn-learn.adafruit.com/assets/assets/000/047/897/large1024/circuitpython_Screen_Shot_2017-11-02_at_22.53.06.png?1509677641 1024w“ sizes=„(max-width: 768px) 100vw, (max-width: 1024px) 65vw, (max-width: 1365px) 47vw, 750px“ src=„https://cdn-learn.adafruit.com/assets/assets/000/047/897/medium800/circuitpython_Screen_Shot_2017-11-02_at_22.53.06.png?1509677641“ alt=„circuitpython_Screen_Shot_2017-11-02_at_22.53.06.png“/></a></div> <div class=„row-fluid build-text“ readability=„43“> <p><a href=„https://circuitpython.readthedocs.io/“>ReadTheDocs</a> is a an excellent resource for a more in depth look at CircuitPython. This is where you'll find things like API documentation and details about core modules. There is also a Design Guide that includes contribution guidelines for CircuitPython.</p> <p>RTD gives you access to a low level look at CircuitPython. There are details about each of the <a href=„https://circuitpython.readthedocs.io/en/2.x/shared-bindings/index.html“>core modules</a>. Each module lists the available libraries. Each module library page lists the available parameters and an explanation for each. In many cases, you'll find quick code examples to help you understand how the modules and parameters work, however it won't have detailed explanations like the Learn Guides. If you want help understanding what's going on behind the scenes in any CircuitPython code you're writing, ReadTheDocs is there to help!</p> </div> <div class=„row-fluid build-image“><a href=„https://learn.adafruit.com/assets/47899“><img class=„47899-asset img-responsive“ srcset=„https://cdn-learn.adafruit.com/assets/assets/000/047/899/medium260/circuitpython_Screen_Shot_2017-11-02_at_23.02.28.png?1509678174 260w, https://cdn-learn.adafruit.com/assets/assets/000/047/899/medium640/circuitpython_Screen_Shot_2017-11-02_at_23.02.28.png?1509678174 640w, https://cdn-learn.adafruit.com/assets/assets/000/047/899/medium800/circuitpython_Screen_Shot_2017-11-02_at_23.02.28.png?1509678174 800w, https://cdn-learn.adafruit.com/assets/assets/000/047/899/large1024/circuitpython_Screen_Shot_2017-11-02_at_23.02.28.png?1509678174 1024w“ sizes=„(max-width: 768px) 100vw, (max-width: 1024px) 65vw, (max-width: 1365px) 47vw, 750px“ src=„https://cdn-learn.adafruit.com/assets/assets/000/047/899/medium800/circuitpython_Screen_Shot_2017-11-02_at_23.02.28.png?1509678174“ alt=„circuitpython_Screen_Shot_2017-11-02_at_23.02.28.png“/></a></div> </div><div class=„page-content all-page-view-content“ readability=„47“> <p> <h2>Flashing with Bossac</h2> </p> <div class=„row-fluid build-text“ readability=„38“> <p>This method is only recommended if you can't use UF2 for some reason!</p> <p>To flash with
bossac
(BOSSA's command line tool) first download the latest version from <a href=„https://github.com/shumatech/BOSSA/releases/latest“>here</a>. The
ming32
version is for Windows,
apple-darwin
for Mac OSX and various
linux
options for Linux.</p> <p>
bossac
works with
.bin
files. Click the link and choose your board. Scroll down to find the correct
.bin
file and download it.</p> </div> <p><a href=„https://adafruit-circuit-python.s3.amazonaws.com/index.html?prefix=bin/“ class=„btn btn-large btn-block btn-primary“ target=„_self“ type=„button“>Download the .bin file for your CircuitPython board</a></p> <div class=„row-fluid build-text“ readability=„45“> <p>Once downloaded, extract the files from the zip and open the command line to the directory with
bossac
. Run the following command, replacing the file name with the
.bin
you've downloaded for your board:</p> <p>
bossac -e -w -v -R ~/Downloads/adafruit-circuitpython-feather_m0_express-2.1.0.bin
</p> <p>This will
e
rase the chip,
w
rite the given file,
v
erify the write and
R
eset the board. After reset, CircuitPython should be running. Express boards may cause a warning of an early eject of a USB drive but just ignore it. Nothing important was being written to the drive.</p> </div> </div><div class=„page-content all-page-view-content“ readability=„130“> <div class=„row-fluid build-text“ readability=„34“> <p>From time to time, you will run into issues when working with CircuitPython. Here are a few things you may encounter and how to resolve them.</p> </div> <div class=„row-fluid build-text“ readability=„50“> <h3>You may have a different board.</h3> <p>Only Adafruit Express boards and the Trinket M0 and Gemma M0 boards ship with the <a href=„https://learn.adafruit.com/adafruit-feather-m0-express-designed-for-circuit-python-circuitpython/uf2-bootloader?view=all#uf2-bootloader“>UF2 bootloader</a> installed. Feather M0 Basic, Feather M0 Adalogger, and similar boards use a regular Arduino-compatible bootloader, which does not show a
<em>boardname</em>BOOT
drive.</p> <h3><strong>MakeCode</strong></h3> <p>If you are running a <a href=„https://learn.adafruit.com/makecode/sharing-and-saving?view=all#step-1-bootloader-mode“>MakeCode</a> program on Circuit Playground Express, press the reset button just once to get the
CPLAYBOOT
drive to show up. Pressing it twice will not work.</p> <h3><strong>Windows 10</strong></h3> <p>Did you install the Adafruit Windows Drivers package by mistake? You don't need to install this package on Windows 10 for most Adafruit boards. The old version (v1.5) can interfere with recognizing your device. Go to <strong>Settings</strong> -> <strong>Apps</strong> and uninstall all the „Adafruit“ driver programs.</p> <h3><strong>Windows 7</strong></h3> <p>The latest version of the Adafruit Windows Drivers (version 2.0.0.0 or later) will fix the missing 
<em>boardname</em>BOOT
drive problem on Windows 7. To resolve this, first uninstall the old versions of the drivers:</p> <ul><li>Unplug any boards. In <strong>Uninstall or Change a Program (Control Panel->Programs->Uninstall a program)</strong>, uninstall everything named „Windows Driver Package - Adafruit Industries LLC …“.</li> </ul></div> <div class=„row-fluid build-image“><a href=„https://learn.adafruit.com/assets/49463“><img class=„49463-asset img-responsive“ srcset=„https://cdn-learn.adafruit.com/assets/assets/000/049/463/medium260/circuitpython_arduino_compatibles_arduino_uninstall.png?1513736815 260w, https://cdn-learn.adafruit.com/assets/assets/000/049/463/medium640/circuitpython_arduino_compatibles_arduino_uninstall.png?1513736815 640w, https://cdn-learn.adafruit.com/assets/assets/000/049/463/medium800/circuitpython_arduino_compatibles_arduino_uninstall.png?1513736815 800w, https://cdn-learn.adafruit.com/assets/assets/000/049/463/large1024/circuitpython_arduino_compatibles_arduino_uninstall.png?1513736815 1024w“ sizes=„(max-width: 768px) 100vw, (max-width: 1024px) 65vw, (max-width: 1365px) 47vw, 750px“ src=„https://cdn-learn.adafruit.com/assets/assets/000/049/463/medium800/circuitpython_arduino_compatibles_arduino_uninstall.png?1513736815“ alt=„circuitpython_arduino_compatibles_arduino_uninstall.png“/></a></div> <div class=„row-fluid build-text“> <ul><li>Now install the new 2.0.0.0 (or higher) Adafruit Windows Drivers Package:</li> </ul></div> <p><a href=„https://github.com/adafruit/Adafruit_Windows_Drivers/releases/latest“ class=„btn btn-large btn-block btn-primary“ target=„_self“ type=„button“>Install Latest Windows Drivers</a></p> <div class=„row-fluid build-text“> <ul><li>When running the installer, you'll be shown a list of drivers to choose from. You can check and uncheck the boxes to choose which drivers to install.</li> </ul></div> <div class=„row-fluid build-image“><a href=„https://learn.adafruit.com/assets/49464“><img class=„49464-asset img-responsive“ srcset=„https://cdn-learn.adafruit.com/assets/assets/000/049/464/medium260/circuitpython_arduino_compatibles_arduino_driver-installer-v2000.png?1513736897 260w, https://cdn-learn.adafruit.com/assets/assets/000/049/464/medium640/circuitpython_arduino_compatibles_arduino_driver-installer-v2000.png?1513736897 640w, https://cdn-learn.adafruit.com/assets/assets/000/049/464/medium800/circuitpython_arduino_compatibles_arduino_driver-installer-v2000.png?1513736897 800w, https://cdn-learn.adafruit.com/assets/assets/000/049/464/large1024/circuitpython_arduino_compatibles_arduino_driver-installer-v2000.png?1513736897 1024w“ sizes=„(max-width: 768px) 100vw, (max-width: 1024px) 65vw, (max-width: 1365px) 47vw, 750px“ src=„https://cdn-learn.adafruit.com/assets/assets/000/049/464/medium800/circuitpython_arduino_compatibles_arduino_driver-installer-v2000.png?1513736897“ alt=„circuitpython_arduino_compatibles_arduino_driver-installer-v2000.png“/></a></div> <div class=„row-fluid build-text“ readability=„34“> <p>You should now be done! Test by unplugging and replugging the board. You should see the
CIRCUITPY
drive, and when you double-click the reset button (single click on Circuit Playground Express running MakeCode), you should see the appropriate 
<em>boardname</em>BOOT
drive.</p> <p>Let us know in the <a href=„https://forums.adafruit.com“>Adafruit support forums</a> or on the <a href=„https://adafrui.it/discord“>Adafruit Discord</a> if this does not work for you!</p> </div> <div class=„row-fluid build-text“ readability=„51“> <p>The Feather M0 Express, Metro M0 Express, Gemma M0, and Trinket M0 all have a single NeoPixel or DotStar RGB LED on the board that indicates the status of CircuitPython. Here's what the colors and blinking mean:</p> <ul><li>steady <strong>GREEN</strong>:
code.py
(or
code.txt
,
main.py
, or
main.txt
) is running</li> <li>pulsing <strong>GREEN</strong>:
code.py
(etc.) has finished or does not exist</li> <li><strong>YELLOW</strong>: Circuit Python is in safe mode: it crashed and restarted</li> <li><strong>WHITE</strong>: REPL is running</li> <li><strong>BLUE</strong>: Circuit Python is starting up</li> </ul><p>Colors with multiple flashes following indicate a Python exception and then indicate the line number of the error. The color of the first flash indicates the type of error:</p> <ul><li><strong>GREEN</strong>: IndentationError</li> <li><strong>CYAN</strong>: SyntaxError</li> <li><strong>WHITE</strong>: NameError</li> <li><strong>ORANGE</strong>: OSError</li> <li><strong>PURPLE</strong>: ValueError</li> <li><strong>YELLOW</strong>: other error</li> </ul><p>These are followed by flashes indicating the line number, including place value. <strong>WHITE</strong> flashes are thousands' place, <strong>BLUE</strong> are hundreds' place, <strong>YELLOW</strong> are tens' place, and <strong>CYAN</strong> are one's place. So for example, an error on line 32 would flash <strong>YELLOW</strong> three times and then <strong>CYAN</strong> two times. Zeroes are indicated by an extra-long dark gap.</p> </div> <div class=„row-fluid build-text“ readability=„43“> <p>You may find that you can no longer save files to your
CIRCUITPY
drive. You may find that your
CIRCUITPY
stops showing up in your file explorer, or shows up as
NO_NAME
. These are indicators that your filesystem has become corrupted.</p> <p>This happens most often when the
CIRCUITPY
disk is not safely ejected before being reset by the button or being disconnected from USB. It can happen on Windows, Mac or Linux.</p> <p>In this situation, the board must be completely erased and CircuitPython must be reloaded onto the board.</p> </div> <p>You WILL lose everything on the board when you complete the following steps. If possible, make a copy of your code before continuing.</p> <div class=„row-fluid build-text“ readability=„31“> <h2> <strong>For the Circuit Playground Express,</strong> <strong>Feather M0 Express, and Metro M0 Express:</strong></h2> <p>       1.  Download the correct erase file:</p> </div> <p><a href=„https://cdn-learn.adafruit.com/assets/assets/000/048/746/original/flash_erase_express.ino.feather_m0_express.uf2?1512152098“ class=„btn btn-large btn-block btn-primary“ target=„_self“ type=„button“>Feather M0 Express</a></p> <div class=„row-fluid build-text“ readability=„46“> <p>       2.  Double-click the reset button on the board to bring up the
<em>boardname</em>BOOT
drive.<br/>       3.  Drag the erase
.uf2
file to the 
<em>boardname</em>BOOT
drive.<br/>       4.  The onboard NeoPixel will turn blue, indicating the erase has started.<br/>       5.  After approximately 15 seconds, the NeoPixel will start flashing green.<br/>       6.  Double-click the reset button on the board to bring up the 
<em>boardname</em>BOOT
 drive.<br/>       7.  Drag the appropriate latest release of CircuitPython
.uf2
file to the 
<em>boardname</em>BOOT
 drive.</p> <p>It should reboot automatically and you should see
CIRCUITPY
in your file explorer again.</p> <p>If the LED flashes red during step 5, it means the erase has failed. Repeat the steps starting with 2.</p> <p>If you haven't already downloaded the latest release of CircuitPython for your board, you can find it <a href=„https://github.com/adafruit/circuitpython/releases“>here</a>.</p> </div> <div class=„row-fluid build-text“ readability=„31“> <h2>For the Gemma M0, Trinket M0, Feather M0: Basic (Proto) and Feather Adalogger:</h2> <p>       1.  Download the erase file:</p> </div> <div class=„row-fluid build-text“ readability=„41“> <p>       2.  Double-click the reset button on the board to bring up the
<em>boardname</em>BOOT
drive.<br/>       3.  Drag the erase
.uf2
file to the
<em>boardname</em>BOOT
drive.<br/>       4.  The boot LED will start flashing again, and the
<em>boardname</em>BOOT
drive will reappear.<br/>       5.  Drag the appropriate latest release CircuitPython
.uf2
file to the
<em>boardname</em>BOOT
drive.</p> <p>It should reboot automatically and you should see
CIRCUITPY
in your file explorer again.</p> <p>If you haven't already downloaded the latest version of CircuitPython for your board, you can find it <a href=„https://github.com/adafruit/circuitpython/releases“>here</a>.</p> </div> <div class=„row-fluid build-text“ readability=„49“> <p>The file system on the board is very tiny. (Smaller than an ancient floppy disk.) So, its likely you'll run out of space but don't panic! There are a couple ways to free up space.</p> <p>The board ships with the Windows 7 serial driver too! Feel free to delete that if you don't need it or have already installed it. Its ~12KiB or so.</p> <h3>Delete something!</h3> <p>The simplest way of freeing up space is to delete files from the drive. Perhaps there are libraries in the
lib
folder that you aren't using anymore or test code that isn't in use.</p> <h3>Use tabs</h3> <p>One unique feature of Python is that the indentation of code matters. Usually the recommendation is to indent code with four spaces for every indent. In general, we recommend that too. <strong>However</strong>, one trick to storing more human-readable code is to use a single tab character for indentation. This approach uses 1/4 of the space for indentation and can be significant when we're counting bytes.</p> <h3>Mac OSX loves to add extra files.</h3> </div> <div class=„row-fluid build-image“><a href=„https://learn.adafruit.com/assets/49465“><img class=„49465-asset img-responsive“ srcset=„https://cdn-learn.adafruit.com/assets/assets/000/049/465/medium260/circuitpython_arduino_compatibles_gemma_out_of_space.png?1513737132 260w, https://cdn-learn.adafruit.com/assets/assets/000/049/465/medium640/circuitpython_arduino_compatibles_gemma_out_of_space.png?1513737132 640w, https://cdn-learn.adafruit.com/assets/assets/000/049/465/medium800/circuitpython_arduino_compatibles_gemma_out_of_space.png?1513737132 800w, https://cdn-learn.adafruit.com/assets/assets/000/049/465/large1024/circuitpython_arduino_compatibles_gemma_out_of_space.png?1513737132 1024w“ sizes=„(max-width: 768px) 100vw, (max-width: 1024px) 65vw, (max-width: 1365px) 47vw, 750px“ src=„https://cdn-learn.adafruit.com/assets/assets/000/049/465/medium800/circuitpython_arduino_compatibles_gemma_out_of_space.png?1513737132“ alt=„circuitpython_arduino_compatibles_gemma_out_of_space.png“/></a></div> <div class=„row-fluid build-text“ readability=„38“> <p>Luckily you can disable some of the extra hidden files that Mac OSX adds by running a few commands to disable search indexing and create zero byte placeholders. Follow the steps below to maximize the amount of space available on OSX:</p> <h3>Prevent & Remove Mac OSX Hidden Files</h3> <p>First find the volume name for your board.  With the board plugged in run this command in a terminal to list all the volumes:</p> </div> <div class=„build-code code-element“> <pre class=„code-text-only c4“> ls -l /Volumes </pre> <pre class=„prettyprint linenums“> ls -l /Volumes </pre></div> <div class=„row-fluid build-text“ readability=„31“> <p>Look for a volume with a name like 
CIRCUITPY
 (the default for CircuitPython).  The full path to the volume is the 
/Volumes/CIRCUITPY
 path.</p> <p>Now follow the <a href=„http://apple.stackexchange.com/questions/6707/how-to-stop-os-x-from-writing-spotlight-and-trash-files-to-memory-cards-and-usb/7135#7135“>steps from this question</a> to run these terminal commands that stop hidden files from being created on the board:</p> </div> <div class=„build-code code-element“ readability=„15“> <pre class=„code-text-only c4“> mdutil -i off /Volumes/CIRCUITPY cd /Volumes/CIRCUITPY rm -rf .{,_.}{fseventsd,Spotlight-V*,Trashes} mkdir .fseventsd touch .fseventsd/no_log .metadata_never_index .Trashes cd - </pre> <pre class=„prettyprint linenums“> mdutil -i off /Volumes/CIRCUITPY cd /Volumes/CIRCUITPY rm -rf .{,_.}{fseventsd,Spotlight-V*,Trashes} mkdir .fseventsd touch .fseventsd/no_log .metadata_never_index .Trashes cd - </pre></div> <div class=„row-fluid build-text“ readability=„41“> <p>Replace 
/Volumes/CIRCUITPY
 in the commands above with the full path to your board's volume if it's different.  At this point all the hidden files should be cleared from the board and some hidden files will be prevented from being created.</p> <p>However there are still some cases where hidden files will be created by Mac OSX.  In particular if you copy a file that was downloaded from the internet it will have special metadata that Mac OSX stores as a hidden file.  Luckily you can run a copy command from the terminal to copy files <strong>without</strong> this hidden metadata file.  See the steps below.</p> </div> <div class=„row-fluid build-text“ readability=„41“> <h3>Copy Files on Mac OSX Without Creating Hidden Files</h3> <p>Once you've disabled and removed hidden files with the above commands on Mac OSX you need to be careful to copy files to the board with a special command that prevents future hidden files from being created.  Unfortunately you <strong>cannot</strong> use drag and drop copy in Finder because it will still create these hidden extended attribute files in some cases (for files downloaded from the internet, like Adafruit's modules).</p> <p>To copy a file or folder use the <strong>-X</strong> option for the <strong>cp</strong> command in a terminal.  For example to copy a <strong>foo.mpy</strong> file to the board use a command like:</p> </div> <div class=„build-code code-element“ readability=„7“> <pre class=„code-text-only c4“>
cp -X foo.mpy /Volumes/CIRCUITPY
</pre> <pre class=„prettyprint linenums“>
cp -X foo.mpy /Volumes/CIRCUITPY
</pre></div> <div class=„row-fluid build-text“ readability=„31“> <p>Or to copy a folder and all of its child files/folders use a command like:</p> </div> <div class=„build-code code-element“ readability=„7“> <pre class=„code-text-only c4“> cp -rX folder_to_copy /Volumes/CIRCUITPY </pre> <pre class=„prettyprint linenums“> cp -rX folder_to_copy /Volumes/CIRCUITPY </pre></div> <div class=„row-fluid build-text“ readability=„33“> <h3>Other Mac OSX Space-Saving Tips</h3> <p>If you'd like to see the amount of space used on the drive and manually delete hidden files here's how to do so.  First list the amount of space used on the
CIRCUITPY
drive with the <strong>df</strong> command:</p> </div> <div class=„row-fluid build-image“><a href=„https://learn.adafruit.com/assets/49466“><img class=„49466-asset img-responsive“ srcset=„https://cdn-learn.adafruit.com/assets/assets/000/049/466/medium260/circuitpython_isk_free.png?1513737248 260w, https://cdn-learn.adafruit.com/assets/assets/000/049/466/medium640/circuitpython_isk_free.png?1513737248 640w, https://cdn-learn.adafruit.com/assets/assets/000/049/466/medium800/circuitpython_isk_free.png?1513737248 800w, https://cdn-learn.adafruit.com/assets/assets/000/049/466/large1024/circuitpython_isk_free.png?1513737248 1024w“ sizes=„(max-width: 768px) 100vw, (max-width: 1024px) 65vw, (max-width: 1365px) 47vw, 750px“ src=„https://cdn-learn.adafruit.com/assets/assets/000/049/466/medium800/circuitpython_isk_free.png?1513737248“ alt=„circuitpython_isk_free.png“/></a></div> <div class=„row-fluid build-text“ readability=„31“> <p>Lets remove the
._
files first.</p> </div> <div class=„row-fluid build-image“><a href=„https://learn.adafruit.com/assets/49467“><img class=„49467-asset img-responsive“ srcset=„https://cdn-learn.adafruit.com/assets/assets/000/049/467/medium260/circuitpython_arduino_compatibles_gemma_remove_files.png?1513737275 260w, https://cdn-learn.adafruit.com/assets/assets/000/049/467/medium640/circuitpython_arduino_compatibles_gemma_remove_files.png?1513737275 640w, https://cdn-learn.adafruit.com/assets/assets/000/049/467/medium800/circuitpython_arduino_compatibles_gemma_remove_files.png?1513737275 800w, https://cdn-learn.adafruit.com/assets/assets/000/049/467/large1024/circuitpython_arduino_compatibles_gemma_remove_files.png?1513737275 1024w“ sizes=„(max-width: 768px) 100vw, (max-width: 1024px) 65vw, (max-width: 1365px) 47vw, 750px“ src=„https://cdn-learn.adafruit.com/assets/assets/000/049/467/medium800/circuitpython_arduino_compatibles_gemma_remove_files.png?1513737275“ alt=„circuitpython_arduino_compatibles_gemma_remove_files.png“/></a></div> <div class=„row-fluid build-text“ readability=„31“> <p>Whoa! We have 13Ki more than before! This space can now be used for libraries and code!</p> </div> </div><div class=„page-content all-page-view-content“ readability=„143“> <div class=„row-fluid build-text“ readability=„34“> <p>From time to time, you will run into issues when working with CircuitPython. Here are a few things you may encounter and how to resolve them.</p> </div> <div class=„row-fluid build-text“ readability=„50“> <h3><strong>You may have a different board.</strong></h3> <p>Only Adafruit Express boards and the Trinket M0 and Gemma M0 boards ship with the <a href=„https://learn.adafruit.com/adafruit-feather-m0-express-designed-for-circuit-python-circuitpython/uf2-bootloader?view=all#uf2-bootloader“>UF2 bootloader</a> installed. Feather M0 Basic, Feather M0 Adalogger, and similar boards use a regular Arduino-compatible bootloader, which does not show a
<em>boardname</em>BOOT
drive.</p> <h3><strong>MakeCode</strong></h3> <p>If you are running a <a href=„https://learn.adafruit.com/makecode/sharing-and-saving?view=all#step-1-bootloader-mode“>MakeCode</a> program on Circuit Playground Express, press the reset button just once to get the
CPLAYBOOT
drive to show up. Pressing it twice will not work.</p> <h3><strong>Windows 10</strong></h3> <p>Did you install the Adafruit Windows Drivers package by mistake? You don't need to install this package on Windows 10 for most Adafruit boards. The old version (v1.5) can interfere with recognizing your device. Go to <strong>Settings</strong> -> <strong>Apps</strong> and uninstall all the „Adafruit“ driver programs.</p> <h3><strong>Windows 7</strong></h3> <p>The latest version of the Adafruit Windows Drivers (version 2.0.0.0 or later) will fix the missing 
<em>boardname</em>BOOT
drive problem on Windows 7. To resolve this, first uninstall the old versions of the drivers:</p> <ul><li>Unplug any boards. In <strong>Uninstall or Change a Program (Control Panel->Programs->Uninstall a program)</strong>, uninstall everything named „Windows Driver Package - Adafruit Industries LLC …“.</li> </ul></div> <div class=„row-fluid build-image“><a href=„https://learn.adafruit.com/assets/48742“><img class=„48742-asset img-responsive“ srcset=„https://cdn-learn.adafruit.com/assets/assets/000/048/742/medium260/arduino_compatibles_arduino_uninstall.png?1512151784 260w, https://cdn-learn.adafruit.com/assets/assets/000/048/742/medium640/arduino_compatibles_arduino_uninstall.png?1512151784 640w, https://cdn-learn.adafruit.com/assets/assets/000/048/742/medium800/arduino_compatibles_arduino_uninstall.png?1512151784 800w, https://cdn-learn.adafruit.com/assets/assets/000/048/742/large1024/arduino_compatibles_arduino_uninstall.png?1512151784 1024w“ sizes=„(max-width: 768px) 100vw, (max-width: 1024px) 65vw, (max-width: 1365px) 47vw, 750px“ src=„https://cdn-learn.adafruit.com/assets/assets/000/048/742/medium800/arduino_compatibles_arduino_uninstall.png?1512151784“ alt=„arduino_compatibles_arduino_uninstall.png“/></a></div> <div class=„row-fluid build-text“> <ul><li>Now install the new 2.0.0.0 (or higher) Adafruit Windows Drivers Package:</li> </ul></div> <p><a href=„https://github.com/adafruit/Adafruit_Windows_Drivers/releases/latest“ class=„btn btn-large btn-block btn-primary“ target=„_self“ type=„button“>Download Latest Drivers</a></p> <div class=„row-fluid build-text“> <ul><li>When running the installer, you'll be shown a list of drivers to choose from. You can check and uncheck the boxes to choose which drivers to install.</li> </ul></div> <div class=„row-fluid build-image“><a href=„https://learn.adafruit.com/assets/48744“><img class=„48744-asset img-responsive“ srcset=„https://cdn-learn.adafruit.com/assets/assets/000/048/744/medium260/arduino_compatibles_arduino_driver-installer-v2000.png?1512151861 260w, https://cdn-learn.adafruit.com/assets/assets/000/048/744/medium640/arduino_compatibles_arduino_driver-installer-v2000.png?1512151861 640w, https://cdn-learn.adafruit.com/assets/assets/000/048/744/medium800/arduino_compatibles_arduino_driver-installer-v2000.png?1512151861 800w, https://cdn-learn.adafruit.com/assets/assets/000/048/744/large1024/arduino_compatibles_arduino_driver-installer-v2000.png?1512151861 1024w“ sizes=„(max-width: 768px) 100vw, (max-width: 1024px) 65vw, (max-width: 1365px) 47vw, 750px“ src=„https://cdn-learn.adafruit.com/assets/assets/000/048/744/medium800/arduino_compatibles_arduino_driver-installer-v2000.png?1512151861“ alt=„arduino_compatibles_arduino_driver-installer-v2000.png“/></a></div> <div class=„row-fluid build-text“ readability=„34“> <p>You should now be done! Test by unplugging and replugging the board. You should see the
CIRCUITPY
drive, and when you double-click the reset button (single click on Circuit Playground Express running MakeCode), you should see the appropriate 
<em>boardname</em>BOOT
drive.</p> <p>Let us know in the <a href=„https://forums.adafruit.com“>Adafruit support forums</a> or on the <a href=„https://adafrui.it/discord“>Adafruit Discord</a> if this does not work for you!</p> </div> <div class=„row-fluid build-text“ readability=„51“> <p>The Feather M0 Express, Metro M0 Express, Gemma M0, and Trinket M0 all have a single NeoPixel or DotStar RGB LED on the board that indicates the status of CircuitPython. Here's what the colors and blinking mean:</p> <ul><li>steady <strong>GREEN</strong>:
code.py
(or
code.txt
,
main.py
, or
main.txt
) is running</li> <li>pulsing <strong>GREEN</strong>:
code.py
(etc.) has finished or does not exist</li> <li><strong>YELLOW</strong>: Circuit Python is in safe mode: it crashed and restarted</li> <li><strong>WHITE</strong>: REPL is running</li> <li><strong>BLUE</strong>: Circuit Python is starting up</li> </ul><p>Colors with multiple flashes following indicate a Python exception and then indicate the line number of the error. The color of the first flash indicates the type of error:</p> <ul><li><strong>GREEN</strong>: IndentationError</li> <li><strong>CYAN</strong>: SyntaxError</li> <li><strong>WHITE</strong>: NameError</li> <li><strong>ORANGE</strong>: OSError</li> <li><strong>PURPLE</strong>: ValueError</li> <li><strong>YELLOW</strong>: other error</li> </ul><p>These are followed by flashes indicating the line number, including place value. <strong>WHITE</strong> flashes are thousands' place, <strong>BLUE</strong> are hundreds' place, <strong>YELLOW</strong> are tens' place, and <strong>CYAN</strong> are one's place. So for example, an error on line 32 would flash <strong>YELLOW</strong> three times and then <strong>CYAN</strong> two times. Zeroes are indicated by an extra-long dark gap.</p> </div> <div class=„row-fluid build-text“ readability=„43“> <p>You may find that you can no longer save files to your
CIRCUITPY
drive. You may find that your
CIRCUITPY
stops showing up in your file explorer, or shows up as
NO_NAME
. These are indicators that your filesystem has become corrupted.</p> <p>This happens most often when the
CIRCUITPY
disk is not safely ejected before being reset by the button or being disconnected from USB. It can happen on Windows, Mac or Linux.</p> <p>In this situation, the board must be completely erased and CircuitPython must be reloaded onto the board.</p> </div> <p>You WILL lose everything on the board when you complete the following steps. If possible, make a copy of your code before continuing.</p> <div class=„row-fluid build-text“ readability=„31“> <h2> <strong>For the Circuit Playground Express,</strong> <strong>Feather M0 Express, and Metro M0 Express:</strong></h2> <p>       1.  Download the correct erase file:</p> </div> <div class=„row-fluid build-text“ readability=„46“> <p>       2.  Double-click the reset button on the board to bring up the
<em>boardname</em>BOOT
drive.<br/>       3.  Drag the erase
.uf2
file to the 
<em>boardname</em>BOOT
drive.<br/>       4.  The onboard NeoPixel will turn blue, indicating the erase has started.<br/>       5.  After approximately 15 seconds, the NeoPixel will start flashing green.<br/>       6.  Double-click the reset button on the board to bring up the 
<em>boardname</em>BOOT
 drive.<br/>       7.  Drag the appropriate latest release of CircuitPython
.uf2
file to the 
<em>boardname</em>BOOT
 drive.</p> <p>It should reboot automatically and you should see
CIRCUITPY
in your file explorer again.</p> <p>If the LED flashes red during step 5, it means the erase has failed. Repeat the steps starting with 2.</p> <p>If you haven't already downloaded the latest release of CircuitPython for your board, you can find it <a href=„https://github.com/adafruit/circuitpython/releases“>here</a>.</p> </div> <div class=„row-fluid build-text“ readability=„31“> <h2><strong>For the Gemma M0, Trinket M0, Feather M0: Basic (Proto) and Feather Adalogger:</strong></h2> <p>       1.  Download the erase file:</p> </div> <div class=„row-fluid build-text“ readability=„41“> <p>       2.  Double-click the reset button on the board to bring up the
<em>boardname</em>BOOT
drive.<br/>       3.  Drag the erase
.uf2
file to the
<em>boardname</em>BOOT
drive.<br/>       4.  The boot LED will start flashing again, and the
<em>boardname</em>BOOT
drive will reappear.<br/>       5.  Drag the appropriate latest release CircuitPython
.uf2
file to the
<em>boardname</em>BOOT
drive.</p> <p>It should reboot automatically and you should see
CIRCUITPY
in your file explorer again.</p> <p>If you haven't already downloaded the latest version of CircuitPython for your board, you can find it <a href=„https://github.com/adafruit/circuitpython/releases“>here</a>.</p> </div> <div class=„row-fluid build-text“ readability=„49“> <p>The file system on the board is very tiny. (Smaller than an ancient floppy disk.) So, its likely you'll run out of space but don't panic! There are a couple ways to free up space.</p> <p>The board ships with the Windows 7 serial driver too! Feel free to delete that if you don't need it or have already installed it. Its ~12KiB or so.</p> <h3>Delete something!</h3> <p>The simplest way of freeing up space is to delete files from the drive. Perhaps there are libraries in the
lib
folder that you aren't using anymore or test code that isn't in use.</p> <h3>Use tabs</h3> <p>One unique feature of Python is that the indentation of code matters. Usually the recommendation is to indent code with four spaces for every indent. In general, we recommend that too. <strong>However</strong>, one trick to storing more human-readable code is to use a single tab character for indentation. This approach uses 1/4 of the space for indentation and can be significant when we're counting bytes.</p> <h3>Mac OSX loves to add extra files.</h3> </div> <div class=„row-fluid build-image“><a href=„https://learn.adafruit.com/assets/49279“><img class=„49279-asset img-responsive“ srcset=„https://cdn-learn.adafruit.com/assets/assets/000/049/279/medium260/arduino_compatibles_gemma_out_of_space.png?1513222808 260w, https://cdn-learn.adafruit.com/assets/assets/000/049/279/medium640/arduino_compatibles_gemma_out_of_space.png?1513222808 640w, https://cdn-learn.adafruit.com/assets/assets/000/049/279/medium800/arduino_compatibles_gemma_out_of_space.png?1513222808 800w, https://cdn-learn.adafruit.com/assets/assets/000/049/279/large1024/arduino_compatibles_gemma_out_of_space.png?1513222808 1024w“ sizes=„(max-width: 768px) 100vw, (max-width: 1024px) 65vw, (max-width: 1365px) 47vw, 750px“ src=„https://cdn-learn.adafruit.com/assets/assets/000/049/279/medium800/arduino_compatibles_gemma_out_of_space.png?1513222808“ alt=„arduino_compatibles_gemma_out_of_space.png“/></a></div> <div class=„row-fluid build-text“ readability=„38“> <p>Luckily you can disable some of the extra hidden files that Mac OSX adds by running a few commands to disable search indexing and create zero byte placeholders. Follow the steps below to maximize the amount of space available on OSX:</p> <h3>Prevent & Remove Mac OSX Hidden Files</h3> <p>First find the volume name for your board.  With the board plugged in run this command in a terminal to list all the volumes:</p> </div> <div class=„build-code code-element“> <pre class=„code-text-only c4“> ls -l /Volumes </pre> <pre class=„prettyprint linenums“> ls -l /Volumes </pre></div> <div class=„row-fluid build-text“ readability=„31“> <p>Look for a volume with a name like 
CIRCUITPY
 (the default for CircuitPython).  The full path to the volume is the 
/Volumes/CIRCUITPY
 path.</p> <p>Now follow the <a href=„http://apple.stackexchange.com/questions/6707/how-to-stop-os-x-from-writing-spotlight-and-trash-files-to-memory-cards-and-usb/7135#7135“>steps from this question</a> to run these terminal commands that stop hidden files from being created on the board:</p> </div> <div class=„build-code code-element“ readability=„15“> <pre class=„code-text-only c4“> mdutil -i off /Volumes/CIRCUITPY cd /Volumes/CIRCUITPY rm -rf .{,_.}{fseventsd,Spotlight-V*,Trashes} mkdir .fseventsd touch .fseventsd/no_log .metadata_never_index .Trashes cd - </pre> <pre class=„prettyprint linenums“> mdutil -i off /Volumes/CIRCUITPY cd /Volumes/CIRCUITPY rm -rf .{,_.}{fseventsd,Spotlight-V*,Trashes} mkdir .fseventsd touch .fseventsd/no_log .metadata_never_index .Trashes cd - </pre></div> <div class=„row-fluid build-text“ readability=„41“> <p>Replace 
/Volumes/CIRCUITPY
 in the commands above with the full path to your board's volume if it's different.  At this point all the hidden files should be cleared from the board and some hidden files will be prevented from being created.</p> <p>However there are still some cases where hidden files will be created by Mac OSX.  In particular if you copy a file that was downloaded from the internet it will have special metadata that Mac OSX stores as a hidden file.  Luckily you can run a copy command from the terminal to copy files <strong>without</strong> this hidden metadata file.  See the steps below.</p> </div> <div class=„row-fluid build-text“ readability=„41“> <h3>Copy Files on Mac OSX Without Creating Hidden Files</h3> <p>Once you've disabled and removed hidden files with the above commands on Mac OSX you need to be careful to copy files to the board with a special command that prevents future hidden files from being created.  Unfortunately you <strong>cannot</strong> use drag and drop copy in Finder because it will still create these hidden extended attribute files in some cases (for files downloaded from the internet, like Adafruit's modules).</p> <p>To copy a file or folder use the <strong>-X</strong> option for the <strong>cp</strong> command in a terminal.  For example to copy a <strong>foo.mpy</strong> file to the board use a command like:</p> </div> <div class=„build-code code-element“ readability=„7“> <pre class=„code-text-only c4“> cp -X foo.mpy /Volumes/CIRCUITPY </pre> <pre class=„prettyprint linenums“> cp -X foo.mpy /Volumes/CIRCUITPY </pre></div> <div class=„row-fluid build-text“ readability=„31“> <p>Or to copy a folder and all of its child files/folders use a command like:</p> </div> <div class=„row-fluid build-text“ readability=„31“> <pre class=„prettyprint linenums prettyprinted“> cp -rX folder_to_copy /Volumes/CIRCUITPY </pre></div> <div class=„row-fluid build-text“ readability=„33“> <h3>Other Mac OSX Space-Saving Tips</h3> <p>If you'd like to see the amount of space used on the drive and manually delete hidden files here's how to do so.  First list the amount of space used on the
CIRCUITPY
drive with the df command:</p> </div> <div class=„row-fluid build-image“><a href=„https://learn.adafruit.com/assets/49282“><img class=„49282-asset img-responsive“ srcset=„https://cdn-learn.adafruit.com/assets/assets/000/049/282/medium260/arduino_compatibles_gemma_disk_free.png?1513223690 260w, https://cdn-learn.adafruit.com/assets/assets/000/049/282/medium640/arduino_compatibles_gemma_disk_free.png?1513223690 640w, https://cdn-learn.adafruit.com/assets/assets/000/049/282/medium800/arduino_compatibles_gemma_disk_free.png?1513223690 800w, https://cdn-learn.adafruit.com/assets/assets/000/049/282/large1024/arduino_compatibles_gemma_disk_free.png?1513223690 1024w“ sizes=„(max-width: 768px) 100vw, (max-width: 1024px) 65vw, (max-width: 1365px) 47vw, 750px“ src=„https://cdn-learn.adafruit.com/assets/assets/000/049/282/medium800/arduino_compatibles_gemma_disk_free.png?1513223690“ alt=„arduino_compatibles_gemma_disk_free.png“/></a></div> <div class=„row-fluid build-text“ readability=„31“> <p>Lets remove the
._
files first.</p> </div> <div class=„row-fluid build-image“><a href=„https://learn.adafruit.com/assets/49283“><img class=„49283-asset img-responsive“ srcset=„https://cdn-learn.adafruit.com/assets/assets/000/049/283/medium260/arduino_compatibles_gemma_remove_files.png?1513223745 260w, https://cdn-learn.adafruit.com/assets/assets/000/049/283/medium640/arduino_compatibles_gemma_remove_files.png?1513223745 640w, https://cdn-learn.adafruit.com/assets/assets/000/049/283/medium800/arduino_compatibles_gemma_remove_files.png?1513223745 800w, https://cdn-learn.adafruit.com/assets/assets/000/049/283/large1024/arduino_compatibles_gemma_remove_files.png?1513223745 1024w“ sizes=„(max-width: 768px) 100vw, (max-width: 1024px) 65vw, (max-width: 1365px) 47vw, 750px“ src=„https://cdn-learn.adafruit.com/assets/assets/000/049/283/medium800/arduino_compatibles_gemma_remove_files.png?1513223745“ alt=„arduino_compatibles_gemma_remove_files.png“/></a></div> <div class=„row-fluid build-text“ readability=„31“> <p>Whoa! We have 13Ki more than before! This space can now be used for libraries and code!</p> </div> </div> </html>
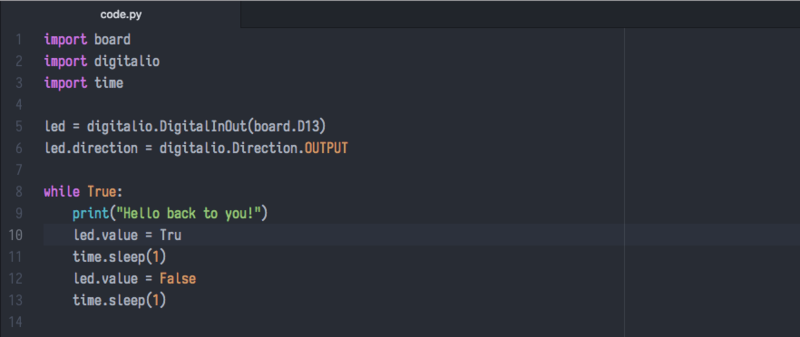
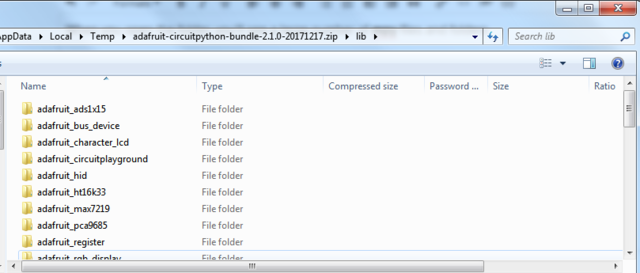
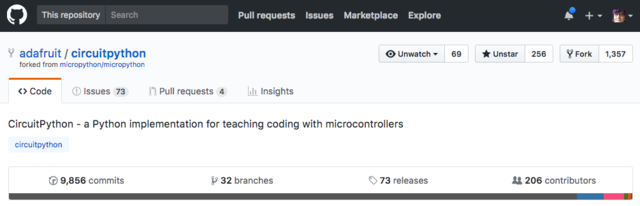