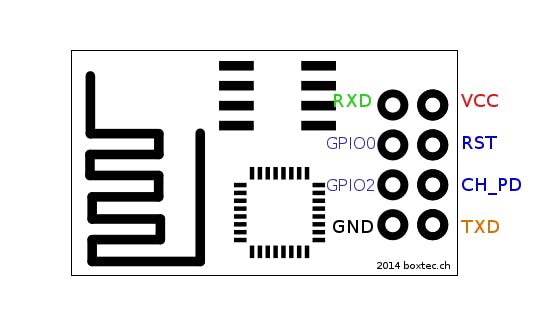
<html> <section id=„things“><div class=„project-section-title“> <h2 class=„hckuitypographyh2 title-with-anchor“>Things used in this project</h2> </div> <div class=„project-parts view-expanded c7“> <table class=„project-parts-table“><tbody><tr class=„head“><td colspan=„6“> <h3 class=„hckuitypographyh3“>Hardware components</h3> </td> </tr><tr><td class=„part-img“><img srcset=„https://hackster.imgix.net/uploads/image/file/51067/esp01.jpg?auto=compress%2Cformat&w=96&h=96&fit=fill&bg=ffffff 2x, https://hackster.imgix.net/uploads/image/file/51067/esp01.jpg?auto=compress%2Cformat&w=48&h=48&fit=fill&bg=ffffff“ alt=„ESP8266 ESP-01“ src=„https://hackster.imgix.net/uploads/image/file/51067/esp01.jpg?auto=compress%2Cformat&w=48&h=48&fit=fill&bg=ffffff“/></td> <td> <table><tbody><tr><td class=„hckuitypographybodyL“><a data-ha=„{"eventName":"Clicked link","customProps":{"value":"Everything ESP ESP8266 ESP-01","href":"/esp/products/esp8266-esp-01","type":"part","location":"things"},"clickOpts":{"delayRedirect":true}}“ class=„hckuitypographylinkBlue“ href=„https://www.hackster.io/esp/products/esp8266-esp-01“>Everything ESP ESP8266 ESP-01</a></td> </tr><tr><td class=„hckuitypographybodyS hckuitypographypebble hckuitypographybreakWord“/> </tr></tbody></table></td> <td class=„hckuitypographybodyL times“>×</td> <td class=„hckuitypographybodyL quantity“>1</td> <td class=„actions“> </td> </tr><tr><td class=„part-img“><img srcset=„https://hackster.imgix.net/uploads/image/file/160542/A000066_iso_both.jpg?auto=compress%2Cformat&w=96&h=96&fit=fill&bg=ffffff 2x, https://hackster.imgix.net/uploads/image/file/160542/A000066_iso_both.jpg?auto=compress%2Cformat&w=48&h=48&fit=fill&bg=ffffff“ alt=„Arduino UNO & Genuino UNO“ src=„https://hackster.imgix.net/uploads/image/file/160542/A000066_iso_both.jpg?auto=compress%2Cformat&w=48&h=48&fit=fill&bg=ffffff“/></td> <td> <table><tbody><tr><td class=„hckuitypographybodyL“><a data-ha=„{"eventName":"Clicked link","customProps":{"value":"Arduino UNO \u0026 Genuino UNO","href":"/arduino/products/arduino-uno-genuino-uno","type":"part","location":"things"},"clickOpts":{"delayRedirect":true}}“ class=„hckuitypographylinkBlue“ href=„https://www.hackster.io/arduino/products/arduino-uno-genuino-uno“>Arduino UNO & Genuino UNO</a></td> </tr><tr><td class=„hckuitypographybodyS hckuitypographypebble hckuitypographybreakWord“>You could also use a UARTbee or any UART to USB device</td> </tr></tbody></table></td> <td class=„hckuitypographybodyL times“>×</td> <td class=„hckuitypographybodyL quantity“>1</td> <td class=„actions“> </td> </tr><tr><td class=„part-img“><img srcset=„https://hackster.imgix.net/uploads/image/file/44496/11026-02.jpg?auto=compress%2Cformat&w=96&h=96&fit=fill&bg=ffffff 2x, https://hackster.imgix.net/uploads/image/file/44496/11026-02.jpg?auto=compress%2Cformat&w=48&h=48&fit=fill&bg=ffffff“ alt=„Jumper wires (generic)“ src=„https://hackster.imgix.net/uploads/image/file/44496/11026-02.jpg?auto=compress%2Cformat&w=48&h=48&fit=fill&bg=ffffff“/></td> <td> <table><tbody><tr><td class=„hckuitypographybodyL“>Jumper wires (generic)</td> </tr><tr><td class=„hckuitypographybodyS hckuitypographypebble hckuitypographybreakWord“/> </tr></tbody></table></td> <td class=„hckuitypographybodyL times“>×</td> <td class=„hckuitypographybodyL quantity“>1</td> <td class=„actions“> </td> </tr><tr class=„head“><td colspan=„6“> <h3 class=„hckuitypographyh3“>Software apps and online services</h3> </td> </tr><tr><td class=„part-img“><img srcset=„https://hackster.imgix.net/uploads/image/file/144203/IDE_web.jpg?auto=compress%2Cformat&w=96&h=96&fit=fill&bg=ffffff 2x, https://hackster.imgix.net/uploads/image/file/144203/IDE_web.jpg?auto=compress%2Cformat&w=48&h=48&fit=fill&bg=ffffff“ alt=„Arduino IDE“ src=„https://hackster.imgix.net/uploads/image/file/144203/IDE_web.jpg?auto=compress%2Cformat&w=48&h=48&fit=fill&bg=ffffff“/></td> <td> <table><tbody><tr><td class=„hckuitypographybodyL“><a data-ha=„{"eventName":"Clicked link","customProps":{"value":"Arduino IDE","href":"/arduino/products/arduino-ide","type":"part","location":"things"},"clickOpts":{"delayRedirect":true}}“ class=„hckuitypographylinkBlue“ href=„https://www.hackster.io/arduino/products/arduino-ide“>Arduino IDE</a></td> </tr><tr><td class=„hckuitypographybodyS hckuitypographypebble hckuitypographybreakWord“>version 1.6.6 or higher</td> </tr></tbody></table></td> <td colspan=„2“/> <td class=„actions“><a target=„_blank“ rel=„nofollow noopener“ class=„hckuibuttonsmd hckuibuttonsicon hckuibuttonsoutlineBlack“ title=„More info“ href=„https://www.arduino.cc/en/main/software“><em class=„hckuitypographyiconWrapper“><svg class=„hckuitypographyicon hckuitypographyicon16“><use xlink:href=„#svg-external-link“/></svg></em></a></td> </tr></tbody></table></div> </section> <section id=„story“> <div class=„project-story collapsible-section collapsed hljs-active hljs-monokai“ itemprop=„text“> <p class=„hckuitypographybodyL“>The ESP8266 is a low-cost WiFi module built by Espressif Systems. Its popularity has been growing among the hardware community thanks to it's nice features and stability. It can even be easily programmed using your Arduino IDE.</p> <p class=„hckuitypographybodyL“>In this post, we'll learn how to program your ESP8266 using an UARTbee or Arduino UNO, and the Arduino IDE.</p> <h3 class=„hckuitypographyh3 title-with-anchor“ id=„toc-wire-up-0“>Wire up!</h3> <p class=„hckuitypographybodyL“>First we'll need to identify the pinout of ESP8266. </p> <div class=„image_carouselcontainerhMJxn image_carouselwrapper102VA image_carouselscrollContainer3mmPE image_carouselimageContainer22WPm image_carouselimageWrapper39AG2“ data-hypernova-key=„ImageCarousel“ data-hypernova-id=„35c15af2-c488-4da9-915c-1709592da0b8“><img class=„image_carouselimage2-CjO“ alt=„“ srcset=„“ src=„https://hackster.imgix.net/uploads/image/file/164337/ubidots-esp-pins.png?auto=compress%2Cformat&w=740&h=555&fit=max“/></div> <p class=„hckuitypographybodyL“>To set the ESP8266 in programming mode you need to connect its wires like this:</p> <p class=„hckuitypographybodyL“><strong>ESP8266 UARTbee Arduino UNO</strong></p> <ul class=„hckuitypographybodyL“><li>RXD TXD</li> </ul><ul class=„hckuitypographybodyL“><li>RX GPIO0</li> </ul><ul class=„hckuitypographybodyL“><li>GND GND</li> </ul><ul class=„hckuitypographybodyL“><li>GPIO2 ——-</li> </ul><ul class=„hckuitypographybodyL“><li>———- GND</li> </ul><ul class=„hckuitypographybodyL“><li>GND GND</li> </ul><ul class=„hckuitypographybodyL“><li>VCC 3.3V</li> </ul><ul class=„hckuitypographybodyL“><li>3.3V RST</li> </ul><ul class=„hckuitypographybodyL“><li>——– ———–</li> </ul><ul class=„hckuitypographybodyL“><li>CH_PD 3.3V</li> </ul><ul class=„hckuitypographybodyL“><li>3.3V TXD</li> </ul><ul class=„hckuitypographybodyL“><li>RXD TX</li> </ul><p class=„hckuitypographybodyL“><em><strong>Note</strong></em>: If you are using an Arduino UNO you will need to set Arduino RST to GND. Please be careful with the VCC of the ESP8266, it works only with a 3.3V supply.</p> <h3 class=„hckuitypographyh3 title-with-anchor“ id=„toc-setup-the-arduino-ide-1“>Setup the Arduino IDE</h3> <ul class=„hckuitypographybodyL“><li>Open you IDE and click on <strong>„File -> Preferences“.</strong></li> </ul><ul class=„hckuitypographybodyL“><li>In  „Aditional Boards Manager URLs“ add this line and click on „OK“: <em><a href=„http://arduino.esp8266.com/stable/package_esp8266com_index.json%22“ class=„hckuitypographylinkBlue“ data-ha=„{"eventName":"Clicked link","customProps":{"value":"http://arduino.esp8266.com/stable/package_esp8266com_index.json","href":"http://arduino.esp8266.com/stable/package_esp8266com_index.json%22","type":"story","location":"story"},"clickOpts":{"delayRedirect":true}}“ rel=„nofollow“>http://arduino.esp8266.com/stable/package_esp8266com_index.json</a></em></li> </ul><ul class=„hckuitypographybodyL“><li>Go to <strong>„Tools -> Board -> Boards Manager“</strong>, type „ESP8266“ and install it.</li> </ul><ul class=„hckuitypographybodyL“><li>Go again to <strong>„Tools -> Board“</strong> and select „Generic ESP8266 Module“.</li> </ul><h3 class=„hckuitypographyh3 title-with-anchor“ id=„toc-flash-your-code-2“>Flash your code!</h3> <p class=„hckuitypographybodyL“>Now  you're ready to use your ESP8266 as a stand-alone module without needing an external micro-controller. Check out more ESP8266 resources <a href=„http://ubidots.com/docs/devices/nodeMCU.html#send-one-value-to-ubidots“ class=„hckuitypographylinkBlue“ data-ha=„{"eventName":"Clicked link","customProps":{"value":"here","href":"http://ubidots.com/docs/devices/nodeMCU.html#send-one-value-to-ubidots","type":"story","location":"story"},"clickOpts":{"delayRedirect":true}}“ rel=„nofollow“>here</a> to learn how to build IoT products and projects using this amazing module. </p> </div> <a class=„toggle-container hckuitypographytextCenter hckuilayouthiddenMedUp hckuitypographylink hckuitypographybodyS hckuitypographybold“ href=„javascript:void(0)“ onclick=„javascript:toggleContainer(".project-story", this);“>Read more</a></section> <section id=„team“><div class=„project-section-title“> <h2 class=„hckuitypographyh2 title-with-anchor“>Credits</h2> </div> </section> <section id=„comments“><div class=„project-section-title“> <h2 class=„hckuitypographyh2 title-with-anchor“>Comments</h2> </div> </section> </html>