<html> <p>This article series explains how to write a tiny 32-bit x86 operating system kernel. We won’t do very much other than print
Hello world!
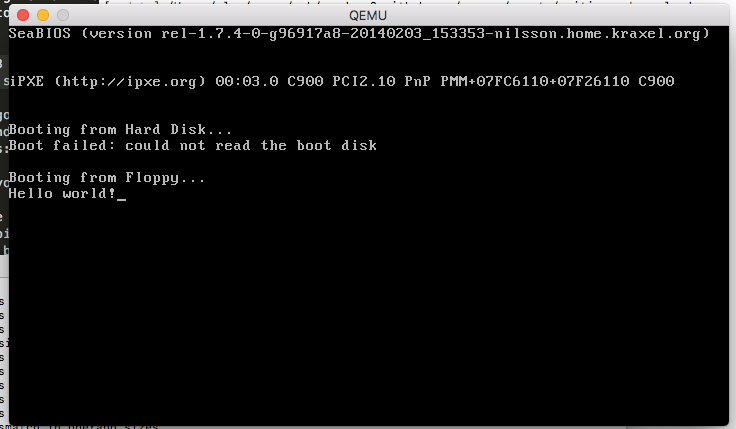
to the screen in increasingly complicated ways! We’ll start off in assembly and then build up to writing C++!</p> <p>A <a href=„http://3zanders.co.uk/2017/10/13/writing-a-bootloader/writingabootloader.pdf“>presentation</a> of this article series is also available.</p> <p>To follow along you’re going to need the NASM assembler and <a href=„https://www.qemu.org/“ target=„_blank“ rel=„external“>QEMU</a> to emulate a virtual machine for us. QEMU is great because you don’t have to worry about accidentally destroying your hardware with badly written OS code ;) You can install these on <a href=„https://msdn.microsoft.com/en-gb/commandline/wsl/install_guide“ target=„_blank“ rel=„external“>Windows Subsystem for Linux</a> or Ubuntu with this command:</p> <pre>sudo apt-get install nasm qemu </pre><p>On a mac you can use homebrew:</p> <pre>brew install nasm </pre><p>On Windows 10 you’ll also want to install <a href=„https://sourceforge.net/projects/xming/“ target=„_blank“ rel=„external“>an X Server</a> which allows QEMU to open a window from the linux subsystem.</p> <h2 id=„A-Hello-World-Bootloader“>A Hello World Bootloader</h2><p>We’re going to write a floppy disk bootloader because it doesn’t require us to mess about with file systems which helps keep things simple as possible.</p> <p><img src=„http://3zanders.co.uk/2017/10/13/writing-a-bootloader/floppy.jpg“ alt=„Cutting edge 1970s technology!“/></p> <p>When you press the power button the computer loads the BIOS from some flash memory stored on the motherboard. The BIOS initializes and self tests the hardware then loads the first 512 bytes into memory from the media device (i.e. the cdrom or floppy disk). If the last two bytes equal
0xAA55
then the BIOS will jump to location
0x7C00
effectively transferring control to the bootloader. </p> <p>At this point the CPU is running in 16 bit mode, meaning only the 16 bit registers are available. Also since the BIOS only loads the first 512 bytes this means our bootloader code has to stay below that limit, otherwise we’ll hit uninitialised memory!</p> <p>Let’s get hello world printing to the screen. To do this we’re going to use the ‘Write Character in TTY mode’ <a href=„https://en.wikipedia.org/wiki/BIOS_interrupt_call“ target=„_blank“ rel=„external“>BIOS Interrupt Call</a> and the load string byte instruction
lobsb
which loads byte at address
ds:si
into
al
. Here goes:</p> <pre>bits 16 ; tell NASM this is 16 bit code org 0x7c00 ; tell NASM to start outputting stuff at offset 0x7c00 boot:
  mov si,hello ; point si register to hello label memory location
  mov ah,0x0e ; 0x0e means 'Write Character in TTY mode'
.loop:
  lodsb
  or al,al ; is al == 0 ?
  jz halt  ; if (al == 0) jump to halt label
  int 0x10 ; runs BIOS interrupt 0x10 - Video Services
  jmp .loop
halt:
  cli ; clear interrupt flag
  hlt ; halt execution
hello: db „Hello world!“,0 times 510 - ($-$$) db 0 ; pad remaining 510 bytes with zeroes dw 0xaa55 ; magic bootloader magic - marks this 512 byte sector bootable! </pre><p>If you save this file as
boot1.asm
(or <a href=„http://3zanders.co.uk/2017/10/13/writing-a-bootloader/boot1.asm“>download it here</a>) we can now use
nasm
to compile it:</p> <pre>nasm -f bin boot1.asm -o boot1.bin </pre><p>If we run
hexdump boot1.bin
we can see that NASM created some code, padded some zeros then set the final two bytes to the magic number.</p> <pre>0000000 be 10 7c b4 0e ac 08 c0 74 04 cd 10 eb f7 fa f4 0000010 48 65 6c 6c 6f 20 77 6f 72 6c 64 21 00 00 00 00 0000020 00 00 00 00 00 00 00 00 00 00 00 00 00 00 00 00 * 00001f0 00 00 00 00 00 00 00 00 00 00 00 00 00 00 55 aa 0000200 </pre><p>We can now run this thing! You can tell QEMU to boot off a floppy disk using
qemu-system-x86_64 -fda boot1.bin
on Windows 10 you might need to stick
DISPLAY=:0
in front to open the window from WSL. You should get something like this!</p> <p><img src=„http://3zanders.co.uk/2017/10/13/writing-a-bootloader/boot1.png“ alt=„Our Hello World bootloader“/></p> <h2 id=„Next-Steps“>Next Steps</h2><p>Next we can start investigating getting into Protected Mode in <a href=„http://3zanders.co.uk/2017/10/16/writing-a-bootloader2/“>Part 2</a>!</p> </html>