Deep learning on the Raspberry Pi with OpenCV - PyImageSearch
<html> <div id=„main-sidebar-container“>
<!-- #main Starts -->
<section id="main"><article class="post-6352 post type-post status-publish format-standard hentry category-deep-learning-2 category-machine-learning-2 tag-classification tag-cnn tag-convolutional-neural-network tag-deep-learning tag-machine-learning tag-opencv"><div class="post-meta">By <a href="https://www.pyimagesearch.com/author/adrian/" title="Posts by Adrian Rosebrock" rel="author">Adrian Rosebrock</a> on <abbr class="date time published" title="2017-10-02T10:00:52-0400">October 2, 2017</abbr> in <a href="https://www.pyimagesearch.com/category/deep-learning-2/" title="View all items in Deep Learning">Deep Learning</a>, <a href="https://www.pyimagesearch.com/category/machine-learning-2/" title="View all items in Machine Learning">Machine Learning</a> </div>
<section class="entry"><div id="fsb-social-bar" class="fsb-social-bar" data-post-id="6352" data-socialite="true"><div class="fsb-share-twitter fsb-hide-count"><a href="https://twitter.com/share?original_referer=https%3A%2F%2Fwww.pyimagesearch.com%2F&source=tweetbutton&text=Deep+learning+on+the+Raspberry+Pi+with+OpenCV&url=https%3A%2F%2Fwww.pyimagesearch.com%2F2017%2F10%2F02%2Fdeep-learning-on-the-raspberry-pi-with-opencv%2F&via=pyimagesearch" class="socialite twitter fsb-twitter" data-fsb-service="twitter" rel="nofollow" target="_blank" title="Be the first one to tweet this article!">Twitter0</a></div><div class="fsb-share-facebook fsb-hide-count"><a href="http://www.facebook.com/sharer.php?u=https://www.pyimagesearch.com/2017/10/02/deep-learning-on-the-raspberry-pi-with-opencv/" class="socialite facebook fsb-facebook" data-fsb-service="facebook" data-href="https://www.pyimagesearch.com/2017/10/02/deep-learning-on-the-raspberry-pi-with-opencv/" data-send="false" data-layout="button_count" data-width="60" data-show-faces="false" rel="nofollow" target="_blank">Facebook0</a></div><div class="fsb-share-google fsb-hide-count"><a href="https://plus.google.com/share?url=https://www.pyimagesearch.com/2017/10/02/deep-learning-on-the-raspberry-pi-with-opencv/" class="socialite googleplus fsb-google" data-fsb-service="google" data-size="medium" data-href="https://www.pyimagesearch.com/2017/10/02/deep-learning-on-the-raspberry-pi-with-opencv/" rel="nofollow" target="_blank">Google+0</a></div><div class="fsb-share-linkedin"><a href="https://www.linkedin.com/cws/share?url=https://www.pyimagesearch.com/2017/10/02/deep-learning-on-the-raspberry-pi-with-opencv/" class="socialite linkedin fsb-linkedin" data-fsb-service="linkedin" data-size="medium" data-href="https://www.pyimagesearch.com/2017/10/02/deep-learning-on-the-raspberry-pi-with-opencv/" rel="nofollow" target="_blank">LinkedIn72</a></div></div><div class="fsb-clear"/><p><a href="https://www.pyimagesearch.com/wp-content/uploads/2017/09/raspberry_pi_deep_learning_header.jpg"><img class="aligncenter size-full wp-image-6364" src="https://www.pyimagesearch.com/wp-content/uploads/2017/09/raspberry_pi_deep_learning_header.jpg" alt="" width="600" height="326" srcset="https://www.pyimagesearch.com/wp-content/uploads/2017/09/raspberry_pi_deep_learning_header.jpg 600w, https://www.pyimagesearch.com/wp-content/uploads/2017/09/raspberry_pi_deep_learning_header-300x163.jpg 300w" sizes="(max-width: 600px) 100vw, 600px"/></a></p>
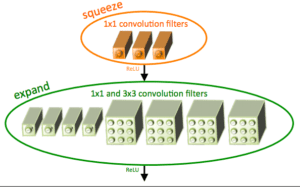
<p>I’ve received a number of emails from PyImageSearch readers who are interested in performing deep learning in their Raspberry Pi. Most of the questions go something like this:</p> <blockquote><p>Hey Adrian, thanks for all the tutorials on deep learning. You’ve really made deep learning accessible and easy to understand. I have a question: Can I do deep learning on the Raspberry Pi? What are the steps?</p></blockquote> <p>And almost always, I have the same response:</p> <blockquote><p>The question really depends on what you mean by “do”. You should never be training a neural network on the Raspberry Pi — it’s far too underpowered. You’re much better off training the network on your laptop, desktop, or even GPU (if you have one available).</p> <p>That said, you can deploy efficient, shallow neural networks to the Raspberry Pi and use them to classify input images.</p></blockquote> <p>Again, I cannot stress this point enough:</p> <p>You <em><strong>should not</strong></em> be training neural networks on the Raspberry Pi (unless you’re using the Pi to do the <em>“Hello, World”</em> equivalent of neural networks — but again, I would still argue that your laptop/desktop is a better fit).</p> <p>With the Raspberry Pi there just isn’t enough RAM.</p> <p>The processor is too slow.</p> <p>And in general it’s not the right hardware for heavy computational processes.</p> <p>Instead, you should first <em><strong>train</strong></em> your network on your laptop, desktop, or deep learning environment.</p> <p>Once the network is trained, you can then <em><strong>deploy</strong></em> the neural network to your Raspberry Pi.</p> <p>In the remainder of this blog post I’ll demonstrate how we can use the Raspberry Pi and pre- trained deep learning neural networks to classify input images.</p> <div style=„padding-top: 10px; padding-bottom: 15px; padding-right: 10px; height: 70px; background: url('https://www.pyimagesearch.com/wp-content/uploads/2014/02/download-code-icon.png'); background-size: 70px 70px; background-repeat: no-repeat;“> <p style=„margin-top: 1px; margin-left: 80px; font-weight: bold;“>Looking for the source code to this post?<br/><a id=„scroll_to_code“ href=„https://www.pyimagesearch.com/2017/10/02/deep-learning-on-the-raspberry-pi-with-opencv/#“>Jump right to the downloads section.</a></p> </div> <h2>Deep learning on the Raspberry Pi with OpenCV</h2> <p>When using the Raspberry Pi for deep learning we have two major pitfalls working against us:</p> <ol><li>Restricted memory (only 1GB on the Raspberry Pi 3).</li> <li>Limited processor speed.</li> </ol><p>This makes it near impossible to use larger, deeper neural networks.</p> <p>Instead, we need to use more computationally efficient networks with a smaller memory/processing footprint such as MobileNet and SqueezeNet. These networks are more appropriate for the Raspberry Pi; however, you need to set your expectations accordingly — you <em>should not</em> expect blazing fast speed.</p> <p>In this tutorial we’ll specifically be using SqueezeNet.</p> <h3>What is SqueezeNet?</h3> <div id=„attachment_5230“ style=„width: 510px“ class=„wp-caption aligncenter“><a href=„https://www.pyimagesearch.com/wp-content/uploads/2017/03/imagenet_squeezenet_fire.png“><img class=„wp-image-5230“ src=„https://www.pyimagesearch.com/wp-content/uploads/2017/03/imagenet_squeezenet_fire.png“ width=„500“ height=„311“ srcset=„https://www.pyimagesearch.com/wp-content/uploads/2017/03/imagenet_squeezenet_fire.png 594w, https://www.pyimagesearch.com/wp-content/uploads/2017/03/imagenet_squeezenet_fire-300x187.png 300w“ sizes=„(max-width: 500px) 100vw, 500px“/></a><p class=„wp-caption-text“><strong>Figure 1:</strong> The “fire” module in SqueezeNet, consisting of a “squeeze” and an “expand” (Iandola et al., 2016).</p></div> <p>SqueezeNet was first introduced by Iandola et al. in their 2016 paper, <a href=„https://github.com/DeepScale/SqueezeNet“ target=„_blank“><em>SqueezeNet: AlexNet-level accuracy with 50x few parameters and <0.5MB model size</em></a>.</p> <p>The title alone of this paper should pique your interest.</p> <p>State-of-the-art architectures such as ResNet have model sizes that are >100MB. VGGNet is over 550MB. AlexNet sits in the middle of this size range with a model size of ~250MB.</p> <p>In fact, one of the smaller Convolutional Neural Networks used for image classification is GoogLeNet at ~25-50MB (depending on which version of the architecture is implemented).</p> <p><strong>The real question is:</strong> <em>Can we go smaller?</em></p> <p>As the work of Iandola et al. demonstrates, the answer is: Yes, we can decrease model size by applying a novel usage of <em>1×1</em> and <em>3×3</em> convolutions, along with no fully-connected layers. The end result is a model weighing in at 4.9MB, which can be further reduced to < 0.5MB by model processing (also called “weight pruning” and “sparsifying a model”).</p> <p>In the remainder of this tutorial I’ll be demonstrating how SqueezeNet can classify images in approximately half the time of GoogLeNet, making it a reasonable choice when applying deep learning on your Raspberry Pi.</p> <h3>Interested in learning more about SqueezeNet?</h3> <div id=„attachment_5247“ style=„width: 610px“ class=„wp-caption aligncenter“><img class=„wp-image-5247 size-full“ src=„https://www.pyimagesearch.com/wp-content/uploads/2017/03/dl4cv_in_post.png“ width=„600“ height=„344“ srcset=„https://www.pyimagesearch.com/wp-content/uploads/2017/03/dl4cv_in_post.png 600w, https://www.pyimagesearch.com/wp-content/uploads/2017/03/dl4cv_in_post-300x172.png 300w“ sizes=„(max-width: 600px) 100vw, 600px“/><p class=„wp-caption-text“><strong>Figure 2:</strong> <a href=„https://www.pyimagesearch.com/deep-learning-computer-vision-python-book/“ target=„_blank“><em>Deep Learning for Computer Vision with Python</em></a> book</p></div> <p>If you’re interested in learning more about SqueezeNet, I would encourage you to take a look at my new book, <a href=„https://www.pyimagesearch.com/deep-learning-computer-vision-python-book/“ target=„_blank“><em>Deep Learning for Computer Vision with Python</em></a>.</p> <p>Inside the <em>ImageNet Bundle</em>, I:</p> <ol><li>Explain the inner workings of the SqueezeNet architecture.</li> <li>Demonstrate how to implement SqueezeNet by hand.</li> <li>Train SqueezeNet from scratch on the challenging ImageNet dataset and replicate the original results by Iandola et al.</li> </ol><p>Go ahead and <a href=„https://www.pyimagesearch.com/deep-learning-computer-vision-python-book/“ target=„_blank“>take a look</a> — I think you’ll agree with me when I say that this is the most complete deep learning + computer vision education you can find online.</p> <h3>Running a deep neural network on the Raspberry Pi</h3> <p>The source code from this blog post is heavily based on my previous post, <a href=„https://www.pyimagesearch.com/2017/08/21/deep-learning-with-opencv/“ target=„_blank“><em>Deep learning with OpenCV</em></a>.</p> <p>I’ll still review the code in its entirety here; however, I would like to refer you over to the <a href=„https://www.pyimagesearch.com/2017/08/21/deep-learning-with-opencv/“ target=„_blank“>previous post</a> for a complete and exhaustive review.</p> <p>To get started, create a new file named
pi_deep_learning.py , and insert the following source code:</p><!-- Crayon Syntax Highlighter v_2.7.2_beta -->
<div id="crayon-59d706c8547d6195539799" class="crayon-syntax crayon-theme-classic crayon-font-monaco crayon-os-pc print-yes notranslate" data-settings=" touchscreen minimize scroll-mouseover" style=" margin-top: 12px; margin-bottom: 12px; font-size: 12px !important; line-height: 15px !important;"> <div class="crayon-toolbar" data-settings=" show" style="font-size: 12px !important;height: 18px !important; line-height: 18px !important;">Deep learning on the Raspberry Pi with OpenCV <div class="crayon-tools" style="font-size: 12px !important;height: 18px !important; line-height: 18px !important;"><div class="crayon-button crayon-nums-button" title="Toggle Line Numbers"><div class="crayon-button-icon"/></div><div class="crayon-button crayon-plain-button" title="Toggle Plain Code"><div class="crayon-button-icon"/></div><div class="crayon-button crayon-wrap-button" title="Toggle Line Wrap"><div class="crayon-button-icon"/></div><div class="crayon-button crayon-expand-button" title="Expand Code"><div class="crayon-button-icon"/></div><div class="crayon-button crayon-popup-button" title="Open Code In New Window"><div class="crayon-button-icon"/></div>Python</div></div> <div class="crayon-info" style="min-height: 16.8px !important; line-height: 16.8px !important;"/> <div class="crayon-plain-wrap"><textarea wrap="soft" class="crayon-plain print-no" data-settings="" style="-moz-tab-size:4; -o-tab-size:4; -webkit-tab-size:4; tab-size:4; font-size: 12px !important; line-height: 15px !important;">
# import the necessary packages import numpy as np import argparse import time import cv2</textarea></div>
<div class="crayon-main" style=""> <table class="crayon-table"><tr class="crayon-row"><td class="crayon-nums " data-settings="show"> <div class="crayon-nums-content" style="font-size: 12px !important; line-height: 15px !important;"><div class="crayon-num" data-line="crayon-59d706c8547d6195539799-1">1</div><div class="crayon-num crayon-striped-num" data-line="crayon-59d706c8547d6195539799-2">2</div><div class="crayon-num" data-line="crayon-59d706c8547d6195539799-3">3</div><div class="crayon-num crayon-striped-num" data-line="crayon-59d706c8547d6195539799-4">4</div><div class="crayon-num" data-line="crayon-59d706c8547d6195539799-5">5</div></div> </td> <td class="crayon-code"><div class="crayon-pre" style="font-size: 12px !important; line-height: 15px !important; -moz-tab-size:4; -o-tab-size:4; -webkit-tab-size:4; tab-size:4;"><div class="crayon-line" id="crayon-59d706c8547d6195539799-1"># import the necessary packages</div><div class="crayon-line crayon-striped-line" id="crayon-59d706c8547d6195539799-2">import numpy as np</div><div class="crayon-line" id="crayon-59d706c8547d6195539799-3">import argparse</div><div class="crayon-line crayon-striped-line" id="crayon-59d706c8547d6195539799-4">import time</div><div class="crayon-line" id="crayon-59d706c8547d6195539799-5">import cv2</div></div></td> </tr></table></div> </div>
<!– [Format Time: 0.0011 seconds] –> <p><strong>Lines 2-5 </strong>simply import our required packages.</p> <p>From there, we need to parse our command line arguments:</p><!– Crayon Syntax Highlighter v_2.7.2_beta –>
<div id="crayon-59d706c8547db638703088" class="crayon-syntax crayon-theme-classic crayon-font-monaco crayon-os-pc print-yes notranslate" data-settings=" touchscreen minimize scroll-mouseover" style=" margin-top: 12px; margin-bottom: 12px; font-size: 12px !important; line-height: 15px !important;"> <div class="crayon-toolbar" data-settings=" show" style="font-size: 12px !important;height: 18px !important; line-height: 18px !important;">Deep learning on the Raspberry Pi with OpenCV <div class="crayon-tools" style="font-size: 12px !important;height: 18px !important; line-height: 18px !important;"><div class="crayon-button crayon-nums-button" title="Toggle Line Numbers"><div class="crayon-button-icon"/></div><div class="crayon-button crayon-plain-button" title="Toggle Plain Code"><div class="crayon-button-icon"/></div><div class="crayon-button crayon-wrap-button" title="Toggle Line Wrap"><div class="crayon-button-icon"/></div><div class="crayon-button crayon-expand-button" title="Expand Code"><div class="crayon-button-icon"/></div><div class="crayon-button crayon-popup-button" title="Open Code In New Window"><div class="crayon-button-icon"/></div>Python</div></div> <div class="crayon-info" style="min-height: 16.8px !important; line-height: 16.8px !important;"/> <div class="crayon-plain-wrap"><textarea wrap="soft" class="crayon-plain print-no" data-settings="" style="-moz-tab-size:4; -o-tab-size:4; -webkit-tab-size:4; tab-size:4; font-size: 12px !important; line-height: 15px !important;">
# construct the argument parse and parse the arguments ap = argparse.ArgumentParser() ap.add_argument(„-i“, „–image“, required=True,
help="path to input image")
ap.add_argument(„-p“, „–prototxt“, required=True,
help="path to Caffe 'deploy' prototxt file")
ap.add_argument(„-m“, „–model“, required=True,
help="path to Caffe pre-trained model")
ap.add_argument(„-l“, „–labels“, required=True,
help="path to ImageNet labels (i.e., syn-sets)")
args = vars(ap.parse_args())</textarea></div>
<div class="crayon-main" style="">
<table class="crayon-table"><tr class="crayon-row"><td class="crayon-nums " data-settings="show">
<div class="crayon-nums-content" style="font-size: 12px !important; line-height: 15px !important;"><div class="crayon-num" data-line="crayon-59d706c8547db638703088-7">7</div><div class="crayon-num crayon-striped-num" data-line="crayon-59d706c8547db638703088-8">8</div><div class="crayon-num" data-line="crayon-59d706c8547db638703088-9">9</div><div class="crayon-num crayon-striped-num" data-line="crayon-59d706c8547db638703088-10">10</div><div class="crayon-num" data-line="crayon-59d706c8547db638703088-11">11</div><div class="crayon-num crayon-striped-num" data-line="crayon-59d706c8547db638703088-12">12</div><div class="crayon-num" data-line="crayon-59d706c8547db638703088-13">13</div><div class="crayon-num crayon-striped-num" data-line="crayon-59d706c8547db638703088-14">14</div><div class="crayon-num" data-line="crayon-59d706c8547db638703088-15">15</div><div class="crayon-num crayon-striped-num" data-line="crayon-59d706c8547db638703088-16">16</div><div class="crayon-num" data-line="crayon-59d706c8547db638703088-17">17</div></div>
</td>
<td class="crayon-code"><div class="crayon-pre" style="font-size: 12px !important; line-height: 15px !important; -moz-tab-size:4; -o-tab-size:4; -webkit-tab-size:4; tab-size:4;"><div class="crayon-line" id="crayon-59d706c8547db638703088-7"># construct the argument parse and parse the arguments</div><div class="crayon-line crayon-striped-line" id="crayon-59d706c8547db638703088-8">ap = argparse.ArgumentParser()</div><div class="crayon-line" id="crayon-59d706c8547db638703088-9">ap.add_argument("-i", "--image", required=True,</div><div class="crayon-line crayon-striped-line" id="crayon-59d706c8547db638703088-10"> help="path to input image")</div><div class="crayon-line" id="crayon-59d706c8547db638703088-11">ap.add_argument("-p", "--prototxt", required=True,</div><div class="crayon-line crayon-striped-line" id="crayon-59d706c8547db638703088-12"> help="path to Caffe 'deploy' prototxt file")</div><div class="crayon-line" id="crayon-59d706c8547db638703088-13">ap.add_argument("-m", "--model", required=True,</div><div class="crayon-line crayon-striped-line" id="crayon-59d706c8547db638703088-14"> help="path to Caffe pre-trained model")</div><div class="crayon-line" id="crayon-59d706c8547db638703088-15">ap.add_argument("-l", "--labels", required=True,</div><div class="crayon-line crayon-striped-line" id="crayon-59d706c8547db638703088-16"> help="path to ImageNet labels (i.e., syn-sets)")</div><div class="crayon-line" id="crayon-59d706c8547db638703088-17">args = vars(ap.parse_args())</div></div></td>
</tr></table></div>
</div>
<!– [Format Time: 0.0024 seconds] –> <p>As is shown on <strong>Lines 9-16</strong> we have four <em>required</em> command line arguments:</p> <ul><li>
- -image : The path to the input image.</li>
<li>
- -prototxt: The path to a Caffe prototxt file which is essentially a plaintext configuration file following a JSON-like structure. I cover the anatomy of Caffe projects in my <a href=„https://www.pyimagesearch.com/pyimagesearch-gurus/“ target=„_blank“>PyImageSearch Gurus course.</a></li>
<li>
- -model : The path to a pre-trained Caffe model. As stated above, you’ll want to train your model on hardware which packs much more punch than the Raspberry Pi — we can, however, leverage a small, pre-existing model on the Pi.</li>
<li>
- -labels : The path to class labels, in this case ImageNet “syn-sets” labels.</li>
</ul><p>Next, we’ll load the class labels and input image from disk:</p><!– Crayon Syntax Highlighter v_2.7.2_beta –>
<div id="crayon-59d706c8547f4746123177" class="crayon-syntax crayon-theme-classic crayon-font-monaco crayon-os-pc print-yes notranslate" data-settings=" touchscreen minimize scroll-mouseover" style=" margin-top: 12px; margin-bottom: 12px; font-size: 12px !important; line-height: 15px !important;"> <div class="crayon-toolbar" data-settings=" show" style="font-size: 12px !important;height: 18px !important; line-height: 18px !important;">Deep learning on the Raspberry Pi with OpenCV <div class="crayon-tools" style="font-size: 12px !important;height: 18px !important; line-height: 18px !important;"><div class="crayon-button crayon-nums-button" title="Toggle Line Numbers"><div class="crayon-button-icon"/></div><div class="crayon-button crayon-plain-button" title="Toggle Plain Code"><div class="crayon-button-icon"/></div><div class="crayon-button crayon-wrap-button" title="Toggle Line Wrap"><div class="crayon-button-icon"/></div><div class="crayon-button crayon-expand-button" title="Expand Code"><div class="crayon-button-icon"/></div><div class="crayon-button crayon-popup-button" title="Open Code In New Window"><div class="crayon-button-icon"/></div>Python</div></div> <div class="crayon-info" style="min-height: 16.8px !important; line-height: 16.8px !important;"/> <div class="crayon-plain-wrap"><textarea wrap="soft" class="crayon-plain print-no" data-settings="" style="-moz-tab-size:4; -o-tab-size:4; -webkit-tab-size:4; tab-size:4; font-size: 12px !important; line-height: 15px !important;">
# load the class labels from disk rows = open(args[„labels“]).read().strip().split(„\n“) classes = [r[r.find(„ “) + 1:].split(„,“)[0] for r in rows] # load the input image from disk image = cv2.imread(args[„image“])</textarea></div>
<div class="crayon-main" style="">
<table class="crayon-table"><tr class="crayon-row"><td class="crayon-nums " data-settings="show">
<div class="crayon-nums-content" style="font-size: 12px !important; line-height: 15px !important;"><div class="crayon-num" data-line="crayon-59d706c8547f4746123177-19">19</div><div class="crayon-num crayon-striped-num" data-line="crayon-59d706c8547f4746123177-20">20</div><div class="crayon-num" data-line="crayon-59d706c8547f4746123177-21">21</div><div class="crayon-num crayon-striped-num" data-line="crayon-59d706c8547f4746123177-22">22</div><div class="crayon-num" data-line="crayon-59d706c8547f4746123177-23">23</div><div class="crayon-num crayon-striped-num" data-line="crayon-59d706c8547f4746123177-24">24</div></div>
</td>
<td class="crayon-code"><div class="crayon-pre" style="font-size: 12px !important; line-height: 15px !important; -moz-tab-size:4; -o-tab-size:4; -webkit-tab-size:4; tab-size:4;"><div class="crayon-line" id="crayon-59d706c8547f4746123177-19"># load the class labels from disk</div><div class="crayon-line crayon-striped-line" id="crayon-59d706c8547f4746123177-20">rows = open(args["labels"]).read().strip().split("\n")</div><div class="crayon-line" id="crayon-59d706c8547f4746123177-21">classes = [r[r.find(" ") + 1:].split(",")[0] for r in rows]</div><div class="crayon-line crayon-striped-line" id="crayon-59d706c8547f4746123177-22"> </div><div class="crayon-line" id="crayon-59d706c8547f4746123177-23"># load the input image from disk</div><div class="crayon-line crayon-striped-line" id="crayon-59d706c8547f4746123177-24">image = cv2.imread(args["image"])</div></div></td>
</tr></table></div>
</div>
<!– [Format Time: 0.0022 seconds] –> <p>Go ahead and open
synset_words.txt  found in the <em><strong>“Downloads”</strong></em> section of this post. You’ll see on each line/row there is an ID and class labels associated with it (separated by commas).</p>
<p><strong>Lines 20 and 21 </strong>simply read in the labels file line-by-line (
rows ) and extract the first relevant class label. The result is a classes  list containing our class labels.</p>
<p>Then, we utilize OpenCV to load the image on <strong>Line 24</strong>.</p> <p>Now we’ll make use of OpenCV 3.3’s Deep Neural Network (DNN) module to convert the
image  to a blob  as well as to load the model from disk:</p><!-- Crayon Syntax Highlighter v_2.7.2_beta -->
<div id="crayon-59d706c85480e003528450" class="crayon-syntax crayon-theme-classic crayon-font-monaco crayon-os-pc print-yes notranslate" data-settings=" touchscreen minimize scroll-mouseover" style=" margin-top: 12px; margin-bottom: 12px; font-size: 12px !important; line-height: 15px !important;"> <div class="crayon-toolbar" data-settings=" show" style="font-size: 12px !important;height: 18px !important; line-height: 18px !important;">Deep learning on the Raspberry Pi with OpenCV <div class="crayon-tools" style="font-size: 12px !important;height: 18px !important; line-height: 18px !important;"><div class="crayon-button crayon-nums-button" title="Toggle Line Numbers"><div class="crayon-button-icon"/></div><div class="crayon-button crayon-plain-button" title="Toggle Plain Code"><div class="crayon-button-icon"/></div><div class="crayon-button crayon-wrap-button" title="Toggle Line Wrap"><div class="crayon-button-icon"/></div><div class="crayon-button crayon-expand-button" title="Expand Code"><div class="crayon-button-icon"/></div><div class="crayon-button crayon-popup-button" title="Open Code In New Window"><div class="crayon-button-icon"/></div>Python</div></div> <div class="crayon-info" style="min-height: 16.8px !important; line-height: 16.8px !important;"/> <div class="crayon-plain-wrap"><textarea wrap="soft" class="crayon-plain print-no" data-settings="" style="-moz-tab-size:4; -o-tab-size:4; -webkit-tab-size:4; tab-size:4; font-size: 12px !important; line-height: 15px !important;">
# our CNN requires fixed spatial dimensions for our input image(s) # so we need to ensure it is resized to 227×227 pixels while # performing mean subtraction (104, 117, 123) to normalize the input; # after executing this command our „blob“ now has the shape: # (1, 3, 227, 227) blob = cv2.dnn.blobFromImage(image, 1, (227, 227), (104, 117, 123)) # load our serialized model from disk print(„[INFO] loading model…“) net = cv2.dnn.readNetFromCaffe(args[„prototxt“], args[„model“])</textarea></div>
<div class="crayon-main" style="">
<table class="crayon-table"><tr class="crayon-row"><td class="crayon-nums " data-settings="show">
<div class="crayon-nums-content" style="font-size: 12px !important; line-height: 15px !important;"><div class="crayon-num" data-line="crayon-59d706c85480e003528450-26">26</div><div class="crayon-num crayon-striped-num" data-line="crayon-59d706c85480e003528450-27">27</div><div class="crayon-num" data-line="crayon-59d706c85480e003528450-28">28</div><div class="crayon-num crayon-striped-num" data-line="crayon-59d706c85480e003528450-29">29</div><div class="crayon-num" data-line="crayon-59d706c85480e003528450-30">30</div><div class="crayon-num crayon-striped-num" data-line="crayon-59d706c85480e003528450-31">31</div><div class="crayon-num" data-line="crayon-59d706c85480e003528450-32">32</div><div class="crayon-num crayon-striped-num" data-line="crayon-59d706c85480e003528450-33">33</div><div class="crayon-num" data-line="crayon-59d706c85480e003528450-34">34</div><div class="crayon-num crayon-striped-num" data-line="crayon-59d706c85480e003528450-35">35</div></div>
</td>
<td class="crayon-code"><div class="crayon-pre" style="font-size: 12px !important; line-height: 15px !important; -moz-tab-size:4; -o-tab-size:4; -webkit-tab-size:4; tab-size:4;"><div class="crayon-line" id="crayon-59d706c85480e003528450-26"># our CNN requires fixed spatial dimensions for our input image(s)</div><div class="crayon-line crayon-striped-line" id="crayon-59d706c85480e003528450-27"># so we need to ensure it is resized to 227x227 pixels while</div><div class="crayon-line" id="crayon-59d706c85480e003528450-28"># performing mean subtraction (104, 117, 123) to normalize the input;</div><div class="crayon-line crayon-striped-line" id="crayon-59d706c85480e003528450-29"># after executing this command our "blob" now has the shape:</div><div class="crayon-line" id="crayon-59d706c85480e003528450-30"># (1, 3, 227, 227)</div><div class="crayon-line crayon-striped-line" id="crayon-59d706c85480e003528450-31">blob = cv2.dnn.blobFromImage(image, 1, (227, 227), (104, 117, 123))</div><div class="crayon-line" id="crayon-59d706c85480e003528450-32"> </div><div class="crayon-line crayon-striped-line" id="crayon-59d706c85480e003528450-33"># load our serialized model from disk</div><div class="crayon-line" id="crayon-59d706c85480e003528450-34">print("[INFO] loading model...")</div><div class="crayon-line crayon-striped-line" id="crayon-59d706c85480e003528450-35">net = cv2.dnn.readNetFromCaffe(args["prototxt"], args["model"])</div></div></td>
</tr></table></div>
</div>
<!– [Format Time: 0.0017 seconds] –> <p>Be sure to make note of the comment preceding our call to
cv2.dnn.blobFromImage  on <strong>Line 31 </strong>above.</p>
<p>Common choices for width and height image dimensions inputted to Convolutional Neural Networks include 32 × 32, 64 × 64, 224 × 224, 227 × 227, 256 × 256, and 299 × 299. In our case we are pre-processing (normalizing) the image to dimensions of 227 x 227 (which are the image dimensions SqueezeNet was trained on) and performing a scaling technique known as mean subtraction. I discuss the importance of these steps <a href=„https://www.pyimagesearch.com/deep-learning-computer-vision-python-book/“ target=„_blank“>in my book</a>.</p> <p><em><strong>Note:</strong> You’ll want to use 224 x 224 for the blob size when using <strong>SqueezeNet </strong>and 227 x 227 for <strong>GoogLeNet </strong>to be consistent with the prototxt definitions.</em></p> <p>We then load the network from disk on <strong>Line 35</strong> by utilizing our
prototxt  and model  file path references.</p>
<p>In case you missed it above, it is worth noting here that we are loading a <em>pre-trained</em> model. The training step has already been performed on a more powerful machine and is outside the scope of this blog post (but covered in detail in both <a href=„https://www.pyimagesearch.com/pyimagesearch-gurus/“ target=„_blank“>PyImageSearch Gurus</a> and <a href=„https://www.pyimagesearch.com/deep-learning-computer-vision-python-book/“ target=„_blank“><em>Deep Learning for Computer Vision with Python</em></a>).</p> <p>Now we’re ready to pass the image through the network and look at the predictions:</p><!– Crayon Syntax Highlighter v_2.7.2_beta –>
<div id="crayon-59d706c854825277220704" class="crayon-syntax crayon-theme-classic crayon-font-monaco crayon-os-pc print-yes notranslate" data-settings=" touchscreen minimize scroll-mouseover" style=" margin-top: 12px; margin-bottom: 12px; font-size: 12px !important; line-height: 15px !important;"> <div class="crayon-toolbar" data-settings=" show" style="font-size: 12px !important;height: 18px !important; line-height: 18px !important;">Deep learning on the Raspberry Pi with OpenCV <div class="crayon-tools" style="font-size: 12px !important;height: 18px !important; line-height: 18px !important;"><div class="crayon-button crayon-nums-button" title="Toggle Line Numbers"><div class="crayon-button-icon"/></div><div class="crayon-button crayon-plain-button" title="Toggle Plain Code"><div class="crayon-button-icon"/></div><div class="crayon-button crayon-wrap-button" title="Toggle Line Wrap"><div class="crayon-button-icon"/></div><div class="crayon-button crayon-expand-button" title="Expand Code"><div class="crayon-button-icon"/></div><div class="crayon-button crayon-popup-button" title="Open Code In New Window"><div class="crayon-button-icon"/></div>Python</div></div> <div class="crayon-info" style="min-height: 16.8px !important; line-height: 16.8px !important;"/> <div class="crayon-plain-wrap"><textarea wrap="soft" class="crayon-plain print-no" data-settings="" style="-moz-tab-size:4; -o-tab-size:4; -webkit-tab-size:4; tab-size:4; font-size: 12px !important; line-height: 15px !important;">
# set the blob as input to the network and perform a forward-pass to # obtain our output classification net.setInput(blob) start = time.time() preds = net.forward() end = time.time() print(„[INFO] classification took {:.5} seconds“.format(end - start)) # sort the indexes of the probabilities in descending order (higher # probabilitiy first) and grab the top-5 predictions preds = preds.reshape1)) idxs = np.argsort(preds[0])[::-1][:5]</textarea></div>
<div class="crayon-main" style="">
<table class="crayon-table"><tr class="crayon-row"><td class="crayon-nums " data-settings="show">
<div class="crayon-nums-content" style="font-size: 12px !important; line-height: 15px !important;"><div class="crayon-num" data-line="crayon-59d706c854825277220704-37">37</div><div class="crayon-num crayon-striped-num" data-line="crayon-59d706c854825277220704-38">38</div><div class="crayon-num" data-line="crayon-59d706c854825277220704-39">39</div><div class="crayon-num crayon-striped-num" data-line="crayon-59d706c854825277220704-40">40</div><div class="crayon-num" data-line="crayon-59d706c854825277220704-41">41</div><div class="crayon-num crayon-striped-num" data-line="crayon-59d706c854825277220704-42">42</div><div class="crayon-num" data-line="crayon-59d706c854825277220704-43">43</div><div class="crayon-num crayon-striped-num" data-line="crayon-59d706c854825277220704-44">44</div><div class="crayon-num" data-line="crayon-59d706c854825277220704-45">45</div><div class="crayon-num crayon-striped-num" data-line="crayon-59d706c854825277220704-46">46</div><div class="crayon-num" data-line="crayon-59d706c854825277220704-47">47</div><div class="crayon-num crayon-striped-num" data-line="crayon-59d706c854825277220704-48">48</div></div>
</td>
<td class="crayon-code"><div class="crayon-pre" style="font-size: 12px !important; line-height: 15px !important; -moz-tab-size:4; -o-tab-size:4; -webkit-tab-size:4; tab-size:4;"><div class="crayon-line" id="crayon-59d706c854825277220704-37"># set the blob as input to the network and perform a forward-pass to</div><div class="crayon-line crayon-striped-line" id="crayon-59d706c854825277220704-38"># obtain our output classification</div><div class="crayon-line" id="crayon-59d706c854825277220704-39">net.setInput(blob)</div><div class="crayon-line crayon-striped-line" id="crayon-59d706c854825277220704-40">start = time.time()</div><div class="crayon-line" id="crayon-59d706c854825277220704-41">preds = net.forward()</div><div class="crayon-line crayon-striped-line" id="crayon-59d706c854825277220704-42">end = time.time()</div><div class="crayon-line" id="crayon-59d706c854825277220704-43">print("[INFO] classification took {:.5} seconds".format(end - start))</div><div class="crayon-line crayon-striped-line" id="crayon-59d706c854825277220704-44"> </div><div class="crayon-line" id="crayon-59d706c854825277220704-45"># sort the indexes of the probabilities in descending order (higher</div><div class="crayon-line crayon-striped-line" id="crayon-59d706c854825277220704-46"># probabilitiy first) and grab the top-5 predictions</div><div class="crayon-line" id="crayon-59d706c854825277220704-47">preds = preds.reshape((1, len(classes)))</div><div class="crayon-line crayon-striped-line" id="crayon-59d706c854825277220704-48">idxs = np.argsort(preds[0])[::-1][:5]</div></div></td>
</tr></table></div>
</div>
<!– [Format Time: 0.0026 seconds] –> <p>To classify the query
blob , we pass it forward through the network (<strong>Lines 39-42</strong>) and print out the amount of time it took to classify the input image (<strong>Line 43</strong>).</p>
<p>We can then sort the probabilities from highest to lowest (<strong>Line 47</strong>) while grabbing the top five
predictions  (<strong>Line 48</strong>).</p>
<p>The remaining lines (1) draw the highest predicted class label and corresponding probability on the image, (2) print the top five results and probabilities to the terminal, and (3) display the image to the screen:</p><!– Crayon Syntax Highlighter v_2.7.2_beta –>
<div id="crayon-59d706c854833095548135" class="crayon-syntax crayon-theme-classic crayon-font-monaco crayon-os-pc print-yes notranslate" data-settings=" touchscreen minimize scroll-mouseover" style=" margin-top: 12px; margin-bottom: 12px; font-size: 12px !important; line-height: 15px !important;"> <div class="crayon-toolbar" data-settings=" show" style="font-size: 12px !important;height: 18px !important; line-height: 18px !important;">Deep learning on the Raspberry Pi with OpenCV <div class="crayon-tools" style="font-size: 12px !important;height: 18px !important; line-height: 18px !important;"><div class="crayon-button crayon-nums-button" title="Toggle Line Numbers"><div class="crayon-button-icon"/></div><div class="crayon-button crayon-plain-button" title="Toggle Plain Code"><div class="crayon-button-icon"/></div><div class="crayon-button crayon-wrap-button" title="Toggle Line Wrap"><div class="crayon-button-icon"/></div><div class="crayon-button crayon-expand-button" title="Expand Code"><div class="crayon-button-icon"/></div><div class="crayon-button crayon-popup-button" title="Open Code In New Window"><div class="crayon-button-icon"/></div>Python</div></div> <div class="crayon-info" style="min-height: 16.8px !important; line-height: 16.8px !important;"/> <div class="crayon-plain-wrap"><textarea wrap="soft" class="crayon-plain print-no" data-settings="" style="-moz-tab-size:4; -o-tab-size:4; -webkit-tab-size:4; tab-size:4; font-size: 12px !important; line-height: 15px !important;">
# loop over the top-5 predictions and display them for (i, idx) in enumerate(idxs):
# draw the top prediction on the input image
if i == 0:
	text = "Label: {}, {:.2f}%".format(classes[idx],
		preds[0][idx] * 100)
	cv2.putText(image, text, (5, 25), cv2.FONT_HERSHEY_SIMPLEX,
		0.7, (0, 0, 255), 2)
# display the predicted label + associated probability to the
# console
print("[INFO] {}. label: {}, probability: {:.5}".format(i + 1,
	classes[idx], preds[0][idx]))
# display the output image cv2.imshow(„Image“, image) cv2.waitKey(0)</textarea></div>
<div class="crayon-main" style="">
<table class="crayon-table"><tr class="crayon-row"><td class="crayon-nums " data-settings="show">
<div class="crayon-nums-content" style="font-size: 12px !important; line-height: 15px !important;"><div class="crayon-num" data-line="crayon-59d706c854833095548135-50">50</div><div class="crayon-num crayon-striped-num" data-line="crayon-59d706c854833095548135-51">51</div><div class="crayon-num" data-line="crayon-59d706c854833095548135-52">52</div><div class="crayon-num crayon-striped-num" data-line="crayon-59d706c854833095548135-53">53</div><div class="crayon-num" data-line="crayon-59d706c854833095548135-54">54</div><div class="crayon-num crayon-striped-num" data-line="crayon-59d706c854833095548135-55">55</div><div class="crayon-num" data-line="crayon-59d706c854833095548135-56">56</div><div class="crayon-num crayon-striped-num" data-line="crayon-59d706c854833095548135-57">57</div><div class="crayon-num" data-line="crayon-59d706c854833095548135-58">58</div><div class="crayon-num crayon-striped-num" data-line="crayon-59d706c854833095548135-59">59</div><div class="crayon-num" data-line="crayon-59d706c854833095548135-60">60</div><div class="crayon-num crayon-striped-num" data-line="crayon-59d706c854833095548135-61">61</div><div class="crayon-num" data-line="crayon-59d706c854833095548135-62">62</div><div class="crayon-num crayon-striped-num" data-line="crayon-59d706c854833095548135-63">63</div><div class="crayon-num" data-line="crayon-59d706c854833095548135-64">64</div><div class="crayon-num crayon-striped-num" data-line="crayon-59d706c854833095548135-65">65</div><div class="crayon-num" data-line="crayon-59d706c854833095548135-66">66</div></div>
</td>
<td class="crayon-code"><div class="crayon-pre" style="font-size: 12px !important; line-height: 15px !important; -moz-tab-size:4; -o-tab-size:4; -webkit-tab-size:4; tab-size:4;"><div class="crayon-line" id="crayon-59d706c854833095548135-50"># loop over the top-5 predictions and display them</div><div class="crayon-line crayon-striped-line" id="crayon-59d706c854833095548135-51">for (i, idx) in enumerate(idxs):</div><div class="crayon-line" id="crayon-59d706c854833095548135-52"> # draw the top prediction on the input image</div><div class="crayon-line crayon-striped-line" id="crayon-59d706c854833095548135-53"> if i == 0:</div><div class="crayon-line" id="crayon-59d706c854833095548135-54"> text = "Label: {}, {:.2f}%".format(classes[idx],</div><div class="crayon-line crayon-striped-line" id="crayon-59d706c854833095548135-55"> preds[0][idx] * 100)</div><div class="crayon-line" id="crayon-59d706c854833095548135-56"> cv2.putText(image, text, (5, 25), cv2.FONT_HERSHEY_SIMPLEX,</div><div class="crayon-line crayon-striped-line" id="crayon-59d706c854833095548135-57"> 0.7, (0, 0, 255), 2)</div><div class="crayon-line" id="crayon-59d706c854833095548135-58"> </div><div class="crayon-line crayon-striped-line" id="crayon-59d706c854833095548135-59"> # display the predicted label + associated probability to the</div><div class="crayon-line" id="crayon-59d706c854833095548135-60"> # console </div><div class="crayon-line crayon-striped-line" id="crayon-59d706c854833095548135-61"> print("[INFO] {}. label: {}, probability: {:.5}".format(i + 1,</div><div class="crayon-line" id="crayon-59d706c854833095548135-62"> classes[idx], preds[0][idx]))</div><div class="crayon-line crayon-striped-line" id="crayon-59d706c854833095548135-63"> </div><div class="crayon-line" id="crayon-59d706c854833095548135-64"># display the output image</div><div class="crayon-line crayon-striped-line" id="crayon-59d706c854833095548135-65">cv2.imshow("Image", image)</div><div class="crayon-line" id="crayon-59d706c854833095548135-66">cv2.waitKey(0)</div></div></td>
</tr></table></div>
</div>
<!– [Format Time: 0.0041 seconds] –> <p>We draw the top prediction and probability on the top of the image (<strong>Lines 53-57</strong>) and display the top-5 predictions + probabilities on the terminal (<strong>Lines 61 and 62</strong>).</p> <p>Finally, we display the output image on the screen (<strong>Lines 65 and 66</strong>). If you are using SSH to connect with your Raspberry Pi this will only work if you supply the
- X  flag for X11 forwarding when SSH’ing into your Pi.</p>
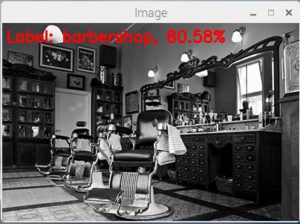
<p>To see the results of applying deep learning on the Raspberry Pi using OpenCV and Python, proceed to the next section.</p> <h3>Raspberry Pi and deep learning results</h3> <p>We’ll be benchmarking our Raspberry Pi for deep learning against two pre-trained deep neural networks:</p> <ul><li>GoogLeNet</li> <li>SqueezeNet</li> </ul><p>As we’ll see, SqueezeNet is much smaller than GoogLeNet (5MB vs. 25MB, respectively) and will enable us to classify images substantially faster on the Raspberry Pi.</p> <p>To run pre-trained Convolutional Neural Networks on the Raspberry Pi use the <em><strong>“Downloads”</strong></em> section of this blog post to download the source code + pre-trained neural networks + example images.</p> <p>From there, let’s first benchmark GoogLeNet against this input image:</p> <div id=„attachment_6361“ style=„width: 414px“ class=„wp-caption aligncenter“><a href=„https://www.pyimagesearch.com/wp-content/uploads/2017/09/raspberry_pi_deep_learning_barbershop.jpg“><img class=„wp-image-6361 size-full“ src=„https://www.pyimagesearch.com/wp-content/uploads/2017/09/raspberry_pi_deep_learning_barbershop.jpg“ width=„404“ height=„302“ srcset=„https://www.pyimagesearch.com/wp-content/uploads/2017/09/raspberry_pi_deep_learning_barbershop.jpg 404w, https://www.pyimagesearch.com/wp-content/uploads/2017/09/raspberry_pi_deep_learning_barbershop-300x224.jpg 300w“ sizes=„(max-width: 404px) 100vw, 404px“/></a><p class=„wp-caption-text“><strong>Figure 3:</strong> A <em>“barbershop”</em> is correctly classified by both GoogLeNet and Squeezenet using deep learning and OpenCV.</p></div> <p>As we can see from the output, GoogLeNet correctly classified the image as <em>“barbershop</em>” in <strong>1.7 seconds</strong>:</p><!– Crayon Syntax Highlighter v_2.7.2_beta –>
<div id="crayon-59d706c854843474317073" class="crayon-syntax crayon-theme-classic crayon-font-monaco crayon-os-pc print-yes notranslate" data-settings=" touchscreen minimize scroll-mouseover" style=" margin-top: 12px; margin-bottom: 12px; font-size: 12px !important; line-height: 15px !important;"> <div class="crayon-toolbar" data-settings=" show" style="font-size: 12px !important;height: 18px !important; line-height: 18px !important;">Deep learning on the Raspberry Pi with OpenCV <div class="crayon-tools" style="font-size: 12px !important;height: 18px !important; line-height: 18px !important;"><div class="crayon-button crayon-nums-button" title="Toggle Line Numbers"><div class="crayon-button-icon"/></div><div class="crayon-button crayon-plain-button" title="Toggle Plain Code"><div class="crayon-button-icon"/></div><div class="crayon-button crayon-wrap-button" title="Toggle Line Wrap"><div class="crayon-button-icon"/></div><div class="crayon-button crayon-expand-button" title="Expand Code"><div class="crayon-button-icon"/></div><div class="crayon-button crayon-popup-button" title="Open Code In New Window"><div class="crayon-button-icon"/></div>Shell</div></div> <div class="crayon-info" style="min-height: 16.8px !important; line-height: 16.8px !important;"/> <div class="crayon-plain-wrap"><textarea wrap="soft" class="crayon-plain print-no" data-settings="" style="-moz-tab-size:4; -o-tab-size:4; -webkit-tab-size:4; tab-size:4; font-size: 12px !important; line-height: 15px !important;">
$ python pi_deep_learning.py –prototxt models/bvlc_googlenet.prototxt \
- -model models/bvlc_googlenet.caffemodel –labels synset_words.txt \
- -image images/barbershop.png
[INFO] loading model… [INFO] classification took 1.7304 seconds [INFO] 1. label: barbershop, probability: 0.70508 [INFO] 2. label: barber chair, probability: 0.29491 [INFO] 3. label: restaurant, probability: 2.9732e-06 [INFO] 4. label: desk, probability: 2.06e-06 [INFO] 5. label: rocking chair, probability: 1.7565e-06</textarea></div>
<div class="crayon-main" style=""> <table class="crayon-table"><tr class="crayon-row"><td class="crayon-nums " data-settings="show"> <div class="crayon-nums-content" style="font-size: 12px !important; line-height: 15px !important;"><div class="crayon-num" data-line="crayon-59d706c854843474317073-1">1</div><div class="crayon-num crayon-striped-num" data-line="crayon-59d706c854843474317073-2">2</div><div class="crayon-num" data-line="crayon-59d706c854843474317073-3">3</div><div class="crayon-num crayon-striped-num" data-line="crayon-59d706c854843474317073-4">4</div><div class="crayon-num" data-line="crayon-59d706c854843474317073-5">5</div><div class="crayon-num crayon-striped-num" data-line="crayon-59d706c854843474317073-6">6</div><div class="crayon-num" data-line="crayon-59d706c854843474317073-7">7</div><div class="crayon-num crayon-striped-num" data-line="crayon-59d706c854843474317073-8">8</div><div class="crayon-num" data-line="crayon-59d706c854843474317073-9">9</div><div class="crayon-num crayon-striped-num" data-line="crayon-59d706c854843474317073-10">10</div></div> </td> <td class="crayon-code"><div class="crayon-pre" style="font-size: 12px !important; line-height: 15px !important; -moz-tab-size:4; -o-tab-size:4; -webkit-tab-size:4; tab-size:4;"><div class="crayon-line" id="crayon-59d706c854843474317073-1">$ python pi_deep_learning.py --prototxt models/bvlc_googlenet.prototxt \</div><div class="crayon-line crayon-striped-line" id="crayon-59d706c854843474317073-2"> --model models/bvlc_googlenet.caffemodel --labels synset_words.txt \</div><div class="crayon-line" id="crayon-59d706c854843474317073-3"> --image images/barbershop.png</div><div class="crayon-line crayon-striped-line" id="crayon-59d706c854843474317073-4">[INFO] loading model...</div><div class="crayon-line" id="crayon-59d706c854843474317073-5">[INFO] classification took 1.7304 seconds</div><div class="crayon-line crayon-striped-line" id="crayon-59d706c854843474317073-6">[INFO] 1. label: barbershop, probability: 0.70508</div><div class="crayon-line" id="crayon-59d706c854843474317073-7">[INFO] 2. label: barber chair, probability: 0.29491</div><div class="crayon-line crayon-striped-line" id="crayon-59d706c854843474317073-8">[INFO] 3. label: restaurant, probability: 2.9732e-06</div><div class="crayon-line" id="crayon-59d706c854843474317073-9">[INFO] 4. label: desk, probability: 2.06e-06</div><div class="crayon-line crayon-striped-line" id="crayon-59d706c854843474317073-10">[INFO] 5. label: rocking chair, probability: 1.7565e-06</div></div></td> </tr></table></div> </div>
<!– [Format Time: 0.0026 seconds] –> <p>Let’s give SqueezeNet a try:</p><!– Crayon Syntax Highlighter v_2.7.2_beta –>
<div id="crayon-59d706c854848309345716" class="crayon-syntax crayon-theme-classic crayon-font-monaco crayon-os-pc print-yes notranslate" data-settings=" touchscreen minimize scroll-mouseover" style=" margin-top: 12px; margin-bottom: 12px; font-size: 12px !important; line-height: 15px !important;"> <div class="crayon-toolbar" data-settings=" show" style="font-size: 12px !important;height: 18px !important; line-height: 18px !important;">Deep learning on the Raspberry Pi with OpenCV <div class="crayon-tools" style="font-size: 12px !important;height: 18px !important; line-height: 18px !important;"><div class="crayon-button crayon-nums-button" title="Toggle Line Numbers"><div class="crayon-button-icon"/></div><div class="crayon-button crayon-plain-button" title="Toggle Plain Code"><div class="crayon-button-icon"/></div><div class="crayon-button crayon-wrap-button" title="Toggle Line Wrap"><div class="crayon-button-icon"/></div><div class="crayon-button crayon-expand-button" title="Expand Code"><div class="crayon-button-icon"/></div><div class="crayon-button crayon-popup-button" title="Open Code In New Window"><div class="crayon-button-icon"/></div>Shell</div></div> <div class="crayon-info" style="min-height: 16.8px !important; line-height: 16.8px !important;"/> <div class="crayon-plain-wrap"><textarea wrap="soft" class="crayon-plain print-no" data-settings="" style="-moz-tab-size:4; -o-tab-size:4; -webkit-tab-size:4; tab-size:4; font-size: 12px !important; line-height: 15px !important;">
$ python pi_deep_learning.py –prototxt models/squeezenet_v1.0.prototxt \
- -model models/squeezenet_v1.0.caffemodel –labels synset_words.txt \
- -image images/barbershop.png
[INFO] loading model… [INFO] classification took 0.92073 seconds [INFO] 1. label: barbershop, probability: 0.80578 [INFO] 2. label: barber chair, probability: 0.15124 [INFO] 3. label: half track, probability: 0.0052873 [INFO] 4. label: restaurant, probability: 0.0040124 [INFO] 5. label: desktop computer, probability: 0.0033352</textarea></div>
<div class="crayon-main" style=""> <table class="crayon-table"><tr class="crayon-row"><td class="crayon-nums " data-settings="show"> <div class="crayon-nums-content" style="font-size: 12px !important; line-height: 15px !important;"><div class="crayon-num" data-line="crayon-59d706c854848309345716-1">1</div><div class="crayon-num crayon-striped-num" data-line="crayon-59d706c854848309345716-2">2</div><div class="crayon-num" data-line="crayon-59d706c854848309345716-3">3</div><div class="crayon-num crayon-striped-num" data-line="crayon-59d706c854848309345716-4">4</div><div class="crayon-num" data-line="crayon-59d706c854848309345716-5">5</div><div class="crayon-num crayon-striped-num" data-line="crayon-59d706c854848309345716-6">6</div><div class="crayon-num" data-line="crayon-59d706c854848309345716-7">7</div><div class="crayon-num crayon-striped-num" data-line="crayon-59d706c854848309345716-8">8</div><div class="crayon-num" data-line="crayon-59d706c854848309345716-9">9</div><div class="crayon-num crayon-striped-num" data-line="crayon-59d706c854848309345716-10">10</div></div> </td> <td class="crayon-code"><div class="crayon-pre" style="font-size: 12px !important; line-height: 15px !important; -moz-tab-size:4; -o-tab-size:4; -webkit-tab-size:4; tab-size:4;"><div class="crayon-line" id="crayon-59d706c854848309345716-1">$ python pi_deep_learning.py --prototxt models/squeezenet_v1.0.prototxt \</div><div class="crayon-line crayon-striped-line" id="crayon-59d706c854848309345716-2"> --model models/squeezenet_v1.0.caffemodel --labels synset_words.txt \</div><div class="crayon-line" id="crayon-59d706c854848309345716-3"> --image images/barbershop.png </div><div class="crayon-line crayon-striped-line" id="crayon-59d706c854848309345716-4">[INFO] loading model...</div><div class="crayon-line" id="crayon-59d706c854848309345716-5">[INFO] classification took 0.92073 seconds</div><div class="crayon-line crayon-striped-line" id="crayon-59d706c854848309345716-6">[INFO] 1. label: barbershop, probability: 0.80578</div><div class="crayon-line" id="crayon-59d706c854848309345716-7">[INFO] 2. label: barber chair, probability: 0.15124</div><div class="crayon-line crayon-striped-line" id="crayon-59d706c854848309345716-8">[INFO] 3. label: half track, probability: 0.0052873</div><div class="crayon-line" id="crayon-59d706c854848309345716-9">[INFO] 4. label: restaurant, probability: 0.0040124</div><div class="crayon-line crayon-striped-line" id="crayon-59d706c854848309345716-10">[INFO] 5. label: desktop computer, probability: 0.0033352</div></div></td> </tr></table></div> </div>
<!– [Format Time: 0.0035 seconds] –> <p>SqueezeNet also correctly classified the image as <em>“barbershop”</em>…</p> <p><em><strong>…but in only 0.9 seconds!</strong></em></p> <p>As we can see, SqueezeNet is significantly faster than GoogLeNet — which is extremely important since we are applying deep learning to the resource constrained Raspberry Pi.</p> <p>Let’s try another example with SqueezeNet:</p><!– Crayon Syntax Highlighter v_2.7.2_beta –>
<div id="crayon-59d706c85484e353162786" class="crayon-syntax crayon-theme-classic crayon-font-monaco crayon-os-pc print-yes notranslate" data-settings=" touchscreen minimize scroll-mouseover" style=" margin-top: 12px; margin-bottom: 12px; font-size: 12px !important; line-height: 15px !important;"> <div class="crayon-toolbar" data-settings=" show" style="font-size: 12px !important;height: 18px !important; line-height: 18px !important;">Deep learning on the Raspberry Pi with OpenCV <div class="crayon-tools" style="font-size: 12px !important;height: 18px !important; line-height: 18px !important;"><div class="crayon-button crayon-nums-button" title="Toggle Line Numbers"><div class="crayon-button-icon"/></div><div class="crayon-button crayon-plain-button" title="Toggle Plain Code"><div class="crayon-button-icon"/></div><div class="crayon-button crayon-wrap-button" title="Toggle Line Wrap"><div class="crayon-button-icon"/></div><div class="crayon-button crayon-expand-button" title="Expand Code"><div class="crayon-button-icon"/></div><div class="crayon-button crayon-popup-button" title="Open Code In New Window"><div class="crayon-button-icon"/></div>Shell</div></div> <div class="crayon-info" style="min-height: 16.8px !important; line-height: 16.8px !important;"/> <div class="crayon-plain-wrap"><textarea wrap="soft" class="crayon-plain print-no" data-settings="" style="-moz-tab-size:4; -o-tab-size:4; -webkit-tab-size:4; tab-size:4; font-size: 12px !important; line-height: 15px !important;">
$ python pi_deep_learning.py –prototxt models/squeezenet_v1.0.prototxt \
- -model models/squeezenet_v1.0.caffemodel –labels synset_words.txt \
- -image images/cobra.png
[INFO] loading model… [INFO] classification took 0.91687 seconds [INFO] 1. label: Indian cobra, probability: 0.47972 [INFO] 2. label: leatherback turtle, probability: 0.16858 [INFO] 3. label: water snake, probability: 0.10558 [INFO] 4. label: common iguana, probability: 0.059227 [INFO] 5. label: sea snake, probability: 0.046393</textarea></div>
<div class="crayon-main" style=""> <table class="crayon-table"><tr class="crayon-row"><td class="crayon-nums " data-settings="show"> <div class="crayon-nums-content" style="font-size: 12px !important; line-height: 15px !important;"><div class="crayon-num" data-line="crayon-59d706c85484e353162786-1">1</div><div class="crayon-num crayon-striped-num" data-line="crayon-59d706c85484e353162786-2">2</div><div class="crayon-num" data-line="crayon-59d706c85484e353162786-3">3</div><div class="crayon-num crayon-striped-num" data-line="crayon-59d706c85484e353162786-4">4</div><div class="crayon-num" data-line="crayon-59d706c85484e353162786-5">5</div><div class="crayon-num crayon-striped-num" data-line="crayon-59d706c85484e353162786-6">6</div><div class="crayon-num" data-line="crayon-59d706c85484e353162786-7">7</div><div class="crayon-num crayon-striped-num" data-line="crayon-59d706c85484e353162786-8">8</div><div class="crayon-num" data-line="crayon-59d706c85484e353162786-9">9</div><div class="crayon-num crayon-striped-num" data-line="crayon-59d706c85484e353162786-10">10</div></div> </td> <td class="crayon-code"><div class="crayon-pre" style="font-size: 12px !important; line-height: 15px !important; -moz-tab-size:4; -o-tab-size:4; -webkit-tab-size:4; tab-size:4;"><div class="crayon-line" id="crayon-59d706c85484e353162786-1">$ python pi_deep_learning.py --prototxt models/squeezenet_v1.0.prototxt \</div><div class="crayon-line crayon-striped-line" id="crayon-59d706c85484e353162786-2"> --model models/squeezenet_v1.0.caffemodel --labels synset_words.txt \</div><div class="crayon-line" id="crayon-59d706c85484e353162786-3"> --image images/cobra.png </div><div class="crayon-line crayon-striped-line" id="crayon-59d706c85484e353162786-4">[INFO] loading model...</div><div class="crayon-line" id="crayon-59d706c85484e353162786-5">[INFO] classification took 0.91687 seconds</div><div class="crayon-line crayon-striped-line" id="crayon-59d706c85484e353162786-6">[INFO] 1. label: Indian cobra, probability: 0.47972</div><div class="crayon-line" id="crayon-59d706c85484e353162786-7">[INFO] 2. label: leatherback turtle, probability: 0.16858</div><div class="crayon-line crayon-striped-line" id="crayon-59d706c85484e353162786-8">[INFO] 3. label: water snake, probability: 0.10558</div><div class="crayon-line" id="crayon-59d706c85484e353162786-9">[INFO] 4. label: common iguana, probability: 0.059227</div><div class="crayon-line crayon-striped-line" id="crayon-59d706c85484e353162786-10">[INFO] 5. label: sea snake, probability: 0.046393</div></div></td> </tr></table></div> </div>
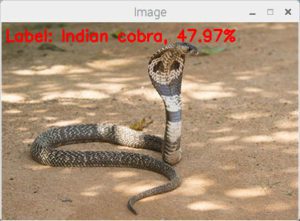
<!– [Format Time: 0.0027 seconds] –> <p/><div id=„attachment_6362“ style=„width: 414px“ class=„wp-caption aligncenter“><a href=„https://www.pyimagesearch.com/wp-content/uploads/2017/09/raspberry_pi_deep_learning_cobra.jpg“><img class=„wp-image-6362 size-full“ src=„https://www.pyimagesearch.com/wp-content/uploads/2017/09/raspberry_pi_deep_learning_cobra.jpg“ width=„404“ height=„298“ srcset=„https://www.pyimagesearch.com/wp-content/uploads/2017/09/raspberry_pi_deep_learning_cobra.jpg 404w, https://www.pyimagesearch.com/wp-content/uploads/2017/09/raspberry_pi_deep_learning_cobra-300x221.jpg 300w“ sizes=„(max-width: 404px) 100vw, 404px“/></a><p class=„wp-caption-text“><strong>Figure 4:</strong> SqueezeNet correctly classifies an image of a cobra using deep learning and OpenCV on the Raspberry Pi.</p></div> <p>However, while SqueezeNet is significantly faster, it’s less accurate than GoogLeNet:</p><!– Crayon Syntax Highlighter v_2.7.2_beta –>
<div id="crayon-59d706c854855033584396" class="crayon-syntax crayon-theme-classic crayon-font-monaco crayon-os-pc print-yes notranslate" data-settings=" touchscreen minimize scroll-mouseover" style=" margin-top: 12px; margin-bottom: 12px; font-size: 12px !important; line-height: 15px !important;"> <div class="crayon-toolbar" data-settings=" show" style="font-size: 12px !important;height: 18px !important; line-height: 18px !important;">Deep learning on the Raspberry Pi with OpenCV <div class="crayon-tools" style="font-size: 12px !important;height: 18px !important; line-height: 18px !important;"><div class="crayon-button crayon-nums-button" title="Toggle Line Numbers"><div class="crayon-button-icon"/></div><div class="crayon-button crayon-plain-button" title="Toggle Plain Code"><div class="crayon-button-icon"/></div><div class="crayon-button crayon-wrap-button" title="Toggle Line Wrap"><div class="crayon-button-icon"/></div><div class="crayon-button crayon-expand-button" title="Expand Code"><div class="crayon-button-icon"/></div><div class="crayon-button crayon-popup-button" title="Open Code In New Window"><div class="crayon-button-icon"/></div>Shell</div></div> <div class="crayon-info" style="min-height: 16.8px !important; line-height: 16.8px !important;"/> <div class="crayon-plain-wrap"><textarea wrap="soft" class="crayon-plain print-no" data-settings="" style="-moz-tab-size:4; -o-tab-size:4; -webkit-tab-size:4; tab-size:4; font-size: 12px !important; line-height: 15px !important;">
$ python pi_deep_learning.py –prototxt models/squeezenet_v1.0.prototxt \
- -model models/squeezenet_v1.0.caffemodel –labels synset_words.txt \
- -image images/jellyfish.png
[INFO] loading model… [INFO] classification took 0.92117 seconds [INFO] 1. label: bubble, probability: 0.59491 [INFO] 2. label: jellyfish, probability: 0.23758 [INFO] 3. label: Petri dish, probability: 0.13345 [INFO] 4. label: lemon, probability: 0.012629 [INFO] 5. label: dough, probability: 0.0025394</textarea></div>
<div class="crayon-main" style=""> <table class="crayon-table"><tr class="crayon-row"><td class="crayon-nums " data-settings="show"> <div class="crayon-nums-content" style="font-size: 12px !important; line-height: 15px !important;"><div class="crayon-num" data-line="crayon-59d706c854855033584396-1">1</div><div class="crayon-num crayon-striped-num" data-line="crayon-59d706c854855033584396-2">2</div><div class="crayon-num" data-line="crayon-59d706c854855033584396-3">3</div><div class="crayon-num crayon-striped-num" data-line="crayon-59d706c854855033584396-4">4</div><div class="crayon-num" data-line="crayon-59d706c854855033584396-5">5</div><div class="crayon-num crayon-striped-num" data-line="crayon-59d706c854855033584396-6">6</div><div class="crayon-num" data-line="crayon-59d706c854855033584396-7">7</div><div class="crayon-num crayon-striped-num" data-line="crayon-59d706c854855033584396-8">8</div><div class="crayon-num" data-line="crayon-59d706c854855033584396-9">9</div><div class="crayon-num crayon-striped-num" data-line="crayon-59d706c854855033584396-10">10</div></div> </td> <td class="crayon-code"><div class="crayon-pre" style="font-size: 12px !important; line-height: 15px !important; -moz-tab-size:4; -o-tab-size:4; -webkit-tab-size:4; tab-size:4;"><div class="crayon-line" id="crayon-59d706c854855033584396-1">$ python pi_deep_learning.py --prototxt models/squeezenet_v1.0.prototxt \</div><div class="crayon-line crayon-striped-line" id="crayon-59d706c854855033584396-2"> --model models/squeezenet_v1.0.caffemodel --labels synset_words.txt \</div><div class="crayon-line" id="crayon-59d706c854855033584396-3"> --image images/jellyfish.png </div><div class="crayon-line crayon-striped-line" id="crayon-59d706c854855033584396-4">[INFO] loading model...</div><div class="crayon-line" id="crayon-59d706c854855033584396-5">[INFO] classification took 0.92117 seconds</div><div class="crayon-line crayon-striped-line" id="crayon-59d706c854855033584396-6">[INFO] 1. label: bubble, probability: 0.59491</div><div class="crayon-line" id="crayon-59d706c854855033584396-7">[INFO] 2. label: jellyfish, probability: 0.23758</div><div class="crayon-line crayon-striped-line" id="crayon-59d706c854855033584396-8">[INFO] 3. label: Petri dish, probability: 0.13345</div><div class="crayon-line" id="crayon-59d706c854855033584396-9">[INFO] 4. label: lemon, probability: 0.012629</div><div class="crayon-line crayon-striped-line" id="crayon-59d706c854855033584396-10">[INFO] 5. label: dough, probability: 0.0025394</div></div></td> </tr></table></div> </div>
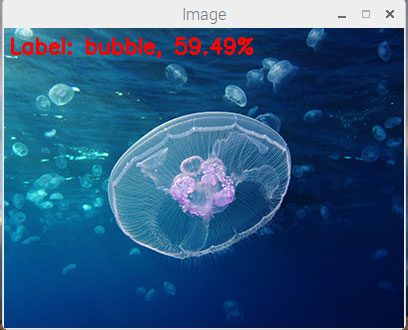
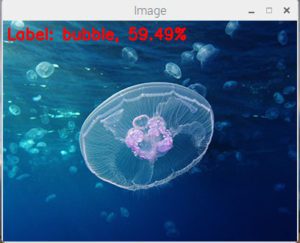
<!– [Format Time: 0.0025 seconds] –> <p/><div id=„attachment_6363“ style=„width: 418px“ class=„wp-caption aligncenter“><a href=„https://www.pyimagesearch.com/wp-content/uploads/2017/09/raspberry_pi_deep_learning_jellyfish.jpg“><img class=„wp-image-6363 size-full“ src=„https://www.pyimagesearch.com/wp-content/uploads/2017/09/raspberry_pi_deep_learning_jellyfish.jpg“ width=„408“ height=„330“ srcset=„https://www.pyimagesearch.com/wp-content/uploads/2017/09/raspberry_pi_deep_learning_jellyfish.jpg 408w, https://www.pyimagesearch.com/wp-content/uploads/2017/09/raspberry_pi_deep_learning_jellyfish-300x243.jpg 300w“ sizes=„(max-width: 408px) 100vw, 408px“/></a><p class=„wp-caption-text“><strong>Figure 5:</strong> A jellyfish is incorrectly classified by SqueezNet as a bubble.</p></div> <p>Here we see the top prediction by SqueezeNet is <em>“bubble”</em>. While the image may appear to have bubble-like characteristics, the image is actually of a <em>“jellyfish”</em> (which is the #2 prediction from SqueezeNet).</p> <p>GoogLeNet on the other hand correctly reports <em>“jellyfish</em>” as the #1 prediction (with the sacrifice of processing time):</p><!– Crayon Syntax Highlighter v_2.7.2_beta –>
<div id="crayon-59d706c85485f399548351" class="crayon-syntax crayon-theme-classic crayon-font-monaco crayon-os-pc print-yes notranslate" data-settings=" touchscreen minimize scroll-mouseover" style=" margin-top: 12px; margin-bottom: 12px; font-size: 12px !important; line-height: 15px !important;"> <div class="crayon-toolbar" data-settings=" show" style="font-size: 12px !important;height: 18px !important; line-height: 18px !important;">Deep learning on the Raspberry Pi with OpenCV <div class="crayon-tools" style="font-size: 12px !important;height: 18px !important; line-height: 18px !important;"><div class="crayon-button crayon-nums-button" title="Toggle Line Numbers"><div class="crayon-button-icon"/></div><div class="crayon-button crayon-plain-button" title="Toggle Plain Code"><div class="crayon-button-icon"/></div><div class="crayon-button crayon-wrap-button" title="Toggle Line Wrap"><div class="crayon-button-icon"/></div><div class="crayon-button crayon-expand-button" title="Expand Code"><div class="crayon-button-icon"/></div><div class="crayon-button crayon-popup-button" title="Open Code In New Window"><div class="crayon-button-icon"/></div>Shell</div></div> <div class="crayon-info" style="min-height: 16.8px !important; line-height: 16.8px !important;"/> <div class="crayon-plain-wrap"><textarea wrap="soft" class="crayon-plain print-no" data-settings="" style="-moz-tab-size:4; -o-tab-size:4; -webkit-tab-size:4; tab-size:4; font-size: 12px !important; line-height: 15px !important;">
$ python pi_deep_learning.py –prototxt models/bvlc_googlenet.prototxt \
- -model models/bvlc_googlenet.caffemodel –labels synset_words.txt \
- -image images/jellyfish.png
[INFO] loading model… [INFO] classification took 1.7824 seconds [INFO] 1. label: jellyfish, probability: 0.53186 [INFO] 2. label: bubble, probability: 0.33562 [INFO] 3. label: tray, probability: 0.050089 [INFO] 4. label: shower cap, probability: 0.022811 [INFO] 5. label: Petri dish, probability: 0.013176</textarea></div>
<div class="crayon-main" style=""> <table class="crayon-table"><tr class="crayon-row"><td class="crayon-nums " data-settings="show"> <div class="crayon-nums-content" style="font-size: 12px !important; line-height: 15px !important;"><div class="crayon-num" data-line="crayon-59d706c85485f399548351-1">1</div><div class="crayon-num crayon-striped-num" data-line="crayon-59d706c85485f399548351-2">2</div><div class="crayon-num" data-line="crayon-59d706c85485f399548351-3">3</div><div class="crayon-num crayon-striped-num" data-line="crayon-59d706c85485f399548351-4">4</div><div class="crayon-num" data-line="crayon-59d706c85485f399548351-5">5</div><div class="crayon-num crayon-striped-num" data-line="crayon-59d706c85485f399548351-6">6</div><div class="crayon-num" data-line="crayon-59d706c85485f399548351-7">7</div><div class="crayon-num crayon-striped-num" data-line="crayon-59d706c85485f399548351-8">8</div><div class="crayon-num" data-line="crayon-59d706c85485f399548351-9">9</div><div class="crayon-num crayon-striped-num" data-line="crayon-59d706c85485f399548351-10">10</div></div> </td> <td class="crayon-code"><div class="crayon-pre" style="font-size: 12px !important; line-height: 15px !important; -moz-tab-size:4; -o-tab-size:4; -webkit-tab-size:4; tab-size:4;"><div class="crayon-line" id="crayon-59d706c85485f399548351-1">$ python pi_deep_learning.py --prototxt models/bvlc_googlenet.prototxt \</div><div class="crayon-line crayon-striped-line" id="crayon-59d706c85485f399548351-2"> --model models/bvlc_googlenet.caffemodel --labels synset_words.txt \</div><div class="crayon-line" id="crayon-59d706c85485f399548351-3"> --image images/jellyfish.png</div><div class="crayon-line crayon-striped-line" id="crayon-59d706c85485f399548351-4">[INFO] loading model...</div><div class="crayon-line" id="crayon-59d706c85485f399548351-5">[INFO] classification took 1.7824 seconds</div><div class="crayon-line crayon-striped-line" id="crayon-59d706c85485f399548351-6">[INFO] 1. label: jellyfish, probability: 0.53186</div><div class="crayon-line" id="crayon-59d706c85485f399548351-7">[INFO] 2. label: bubble, probability: 0.33562</div><div class="crayon-line crayon-striped-line" id="crayon-59d706c85485f399548351-8">[INFO] 3. label: tray, probability: 0.050089</div><div class="crayon-line" id="crayon-59d706c85485f399548351-9">[INFO] 4. label: shower cap, probability: 0.022811</div><div class="crayon-line crayon-striped-line" id="crayon-59d706c85485f399548351-10">[INFO] 5. label: Petri dish, probability: 0.013176</div></div></td> </tr></table></div> </div>
<!– [Format Time: 0.0027 seconds] –> <p/> <h2>Summary</h2> <p>Today, we learned how to apply deep learning on the Raspberry Pi using Python and OpenCV.</p> <p>In general, you should:</p> <ol><li>Never use your Raspberry Pi to <em>train</em> a neural network.</li> <li>Only use your Raspberry Pi to <em>deploy</em> a pre-trained deep learning network.</li> </ol><p>The Raspberry Pi does not have enough memory or CPU power to train these types of deep, complex neural networks from scratch.</p> <p>In fact, the Raspberry Pi <em>barely</em> has enough processing power to run them — as we’ll find out in next week’s blog post you’ll struggle to get a reasonable frames per second for video processing applications.</p> <p>If you’re interested in embedded deep learning on low cost hardware, I’d consider looking at optimized devices such as NVIDIA’s Jetson TX1 and TX2. These boards are designed to execute neural networks on the GPU and provide real-time (or as close to real-time as possible) classification speed.</p> <p>In next week’s blog post, I’ll be discussing how to optimize OpenCV on the Raspberry Pi to obtain performance gains by <em><strong>upwards of 100%</strong></em> for object detection using deep learning.</p> <p><strong>To be notified when this blog post is published, <em>just enter your email address in the form below!</em></strong></p> <h2 id=„post_downloads“>Downloads:</h2> <div id=„mc4wp-form-1“ class=„form mc4wp-form mc4wp-form-761“><form action=„https://www.getdrip.com/forms/353154548/submissions“ method=„post“ target=„blank“ data-drip-embedded-form=„353154548“><img style=„padding-right: 10px; width: 115px; border: none; float: left;“ src=„https://www.pyimagesearch.com/wp-content/uploads/2014/02/download-code-icon.png“ alt=„“/>If you would like to download the code and images used in this post, please enter your email address in the form below. Not only will you get a .zip of the code, I’ll also send you a <strong>FREE 11-page Resource Guide</strong> on Computer Vision and Image Search Engines, including <strong>exclusive techniques</strong> that I don’t post on this blog! Sound good? If so, enter your email address and I’ll send you the code immediately! <p style=„margin-left: 130px;“><label for=„fields[email]“>Email address:</label><input name=„fields[email]“ type=„email“ value=„“ placeholder=„Your email address“/></p> <p style=„margin-left: 130px;“><input type=„submit“ value=„Download the code!“/></p> </form></div>
</section><!-- /.entry --><div class="fix"/> <aside id="connect"><h3>Resource Guide (it’s totally free).</h3>
<div> <p><img title="Get your FREE 11-page Image Search Engine Resource Guide PDF" src="https://www.pyimagesearch.com/wp-content/uploads/2014/01/imagesearchengine-resourceguide-cover.png" style="padding-right: 10px;float: left"/></p><div style="padding-top: 35px">
Enter your email address below to get my <strong>free 11-page Image Search Engine Resource Guide PDF</strong>. Uncover <strong>exclusive techniques</strong> that I don't publish on this blog and start building image search engines of your own!</div>
<form action="https://www.getdrip.com/forms/1113813/submissions" method="post" target="_blank" data-drip-embedded-form="1295"> <div> <input type="email" name="fields[email]" class="required email" value="" placeholder="Your email address" style="width: 50%;"/></div> <div> <input id="mc-embedded-subscribe" type="submit" name="submit" class="btn submit button" value="Download the Guide!" data-drip-attribute="sign-up-button"/></div> </form> <div class="social"> </div> </div><!-- col-left -->
<div class="fix"/>
</aside><div class="post-utility"><p class="tags"><i class="icon-tag"/> <a href="https://www.pyimagesearch.com/tag/classification/" rel="tag">classification</a>, <a href="https://www.pyimagesearch.com/tag/cnn/" rel="tag">cnn</a>, <a href="https://www.pyimagesearch.com/tag/convolutional-neural-network/" rel="tag">convolutional neural network</a>, <a href="https://www.pyimagesearch.com/tag/deep-learning/" rel="tag">deep learning</a>, <a href="https://www.pyimagesearch.com/tag/machine-learning/" rel="tag">machine learning</a>, <a href="https://www.pyimagesearch.com/tag/opencv/" rel="tag">opencv</a></p> </div>
</article><!– /.post –><div class=„post-entries“>
<div class="nav-prev fl"><a href="https://www.pyimagesearch.com/2017/09/29/macos-for-deep-learning-with-python-tensorflow-and-keras/" rel="prev"><i class="icon-angle-left"/> macOS for deep learning with Python, TensorFlow, and Keras</a></div>
<div class="nav-next fr"/>
<div class="fix"/>
</div>
<!-- #respond -->
</section><!-- /#main --><aside id="sidebar"><div id="text-7" class="widget widget_text"><h3>Resource Guide (it’s totally free).</h3> <div class="textwidget"><img title="Get your FREE 11-page Image Search Engine Resource Guide PDF" src="https://www.pyimagesearch.com/wp-content/uploads/2014/01/imagesearchengine-resourceguide-cover.png" style="padding-right: 10px; width: 100px; float: left;"/><p>
Click the button below to get my <strong>free 11-page Image Search Engine Resource Guide PDF</strong>. Uncover <strong>exclusive techniques</strong> that I don't publish on this blog and start building image search engines of your own. </p> <div style=„clear: left;“/> <center><a href=„https://www.pyimagesearch.com/2017/10/02/deep-learning-on-the-raspberry-pi-with-opencv/#“ class=„manual-optin-trigger“ data-optin-slug=„rxgemdcavzehuzpr“ style=„color: rgb(255, 255, 255); text-decoration: none; font-family: Helvetica, Arial, sans-serif; font-weight: bold; font-size: 16px; line-height: 20px; padding: 10px; display: inline-block; max-width: 300px; border-radius: 5px; text-shadow: rgba(0, 0, 0, 0.247059) 0px -1px 1px; box-shadow: rgba(255, 255, 255, 0.498039) 0px 1px 3px inset, rgba(0, 0, 0, 0.498039) 0px 1px 3px; background: #DF4B4B;“>Download for Free!</a></center></div>
</div><div id="text-9" class="widget widget_text"><h3>Deep Learning for Computer Vision with Python Book</h3> <div class="textwidget"><a target="blank" href="https://www.pyimagesearch.com/deep-learning-computer-vision-python-book/"><img title="Deep Learning with Computer Vision and Python Kickstarter" src="https://www.pyimagesearch.com/static/templates/deep-learning-for-computer-vision/images/dl_for_cv_cover.png" style="padding-bottom: 5px; width: 250px;" onclick="document.location='https://www.pyimagesearch.com/deep-learning-computer-vision-python-book/'; return false;"/></a>
<p>You're interested in deep learning and computer vision, <em>but you don't know how to get started.</em> Let me help. <strong><a target=„blank“ href=„https://www.pyimagesearch.com/deep-learning-computer-vision-python-book/“>My new book will teach you all you need to know about deep learning.</a></strong></p> <p><input type=„submit“ value=„Click here to pre-order my new book“ style=„background-color: #DF4B4B;“ onclick=„document.location='https://www.pyimagesearch.com/deep-learning-computer-vision-python-book/'; return false;“/></p></div>
</div><div id="text-5" class="widget widget_text"><h3>You can detect faces in images & video.</h3> <div class="textwidget"><a href="https://www.pyimagesearch.com/practical-python-opencv/?src=sidebar-face-detection" title="Practical Python and OpenCV"><img title="Learn how to detect faces in images and video" src="https://www.pyimagesearch.com/wp-content/uploads/2014/12/adrian_face_detection_sidebar.png" style="padding-bottom: 5px; width: 300px;" onclick="document.location='https://www.pyimagesearch.com/practical-python-opencv/?src=sidebar-face-detection'; return false;"/></a>
<p> Are you interested in <strong>detecting faces in images & video?</strong> But <strong>tired of Googling for tutorials</strong> that <em>never work?</em> Then let me help! I guarantee that my new book will turn you into a <strong>face detection ninja</strong> by the end of this weekend. <a href=„https://www.pyimagesearch.com/practical-python-opencv/?src=sidebar-face-detection“ title=„Practical Python and OpenCV“ onclick=„document.location='https://www.pyimagesearch.com/practical-python-opencv/?src=sidebar-face-detection'; return false;“>Click here to give it a shot yourself.</a> </p> <p><input type=„submit“ value=„Click here to master face detection“ style=„background-color: #DF4B4B;“ onclick=„document.location='https://www.pyimagesearch.com/practical-python-opencv/?src=sidebar-face-detection'; return false;“/></p></div>
</div><div id="text-8" class="widget widget_text"><h3>PyImageSearch Gurus: NOW ENROLLING!</h3> <div class="textwidget"><div id="pyimg_gurus_carousel_container" style="width: 300px; height: 310px; cursor: pointer;" onclick="document.location='https://www.pyimagesearch.com/pyimagesearch-gurus/?src=sidebar'; return false;">
<div id="pyimg_gurus_carousel" style="width: 300px; height: 300px; background: url('https://www.pyimagesearch.com/static/templates/pyimagesearch-gurus/images/gurus_carousel.jpg') no-repeat; background-position: 0px 0px;"/>
</div> <p style=„margin-bottom: 8px;“><strong>The PyImageSearch Gurus course is <em>now enrolling!</em></strong> Inside the course you'll learn how to perform:</p> <ul style=„margin-bottom: 8px;“><li>Automatic License Plate Recognition (ANPR)</li>
<li>Deep Learning</li> <li>Face Recognition</li> <li><em>and much more!</em></li>
</ul><p><strong>Click the button below to learn more about the course, take a tour, and get 10 (FREE) sample lessons</strong>.</p> <p><input type=„submit“ value=„Take a tour & get 10 (free) lessons“ style=„background-color: #DF4B4B;“ onclick=„document.location='https://www.pyimagesearch.com/pyimagesearch-gurus/?src=sidebar'; return false;“/></p></div>
</div><div id="woo_blogauthorinfo-2" class="widget widget_woo_blogauthorinfo"><h3>Hello! I’m Adrian Rosebrock.</h3><img alt="" src="https://secure.gravatar.com/avatar/02743529311d3b8babbaf6935670ec9c?s=90&d=mm&r=g" srcset="https://secure.gravatar.com/avatar/02743529311d3b8babbaf6935670ec9c?s=180&d=mm&r=g 2x" class="avatar avatar-90 photo" height="90" width="90"/><p>I'm an entrepreneur and Ph.D who has launched two successful image search engines, <a target="blank" href="http://www.idmypill.com">ID My Pill</a> and <a target="blank" href="http://www.chicengine.com">Chic Engine</a>. I'm here to share my tips, tricks, and hacks I've learned along the way.</p>
<div class=„fix“/> </div><div id=„text-4“ class=„widget widget_text“><h3>Learn computer vision in a single weekend.</h3> <div class=„textwidget“><a href=„https://www.pyimagesearch.com/practical-python-opencv/?src=sidebar-single-weekend“ title=„Practical Python and OpenCV“><img title=„Become an OpenCV guru“ src=„https://www.pyimagesearch.com/static/templates/practical-python-and-opencv/images/practical_python_and_opencv_2nd_cover.png“ style=„margin-left: 35px; padding-bottom: 15px; width: 215px;“/></a> <p>Want to learn computer vision & OpenCV? I can teach you in a <strong>single weekend</strong>. I know. It sounds crazy, but it’s no joke. My new book is your <strong>guaranteed, quick-start guide</strong> to becoming an OpenCV Ninja. So why not give it a try? <a href=„https://www.pyimagesearch.com/practical-python-opencv/?src=sidebar-single-weekend“ title=„Practical Python and OpenCV“>Click here to become a computer vision ninja.</a></p> <p><input type=„submit“ value=„Click here to become an OpenCV ninja“ style=„background-color: #DF4B4B;“ onclick=„document.location='https://www.pyimagesearch.com/practical-python-opencv/?src=sidebar-single-weekend'; return false;“/></p></div>
</div><div id="text-3" class="widget widget_text"><h3>Subscribe via RSS</h3> <div class="textwidget"><a target="blank" href="http://feeds.feedburner.com/Pyimagesearch"><img title="PyImageSearch RSS Feed" src="https://www.pyimagesearch.com/wp-content/uploads/2014/01/rss-icon.png" style="padding-right: 10px; float: left;"/></a>
<p><strong>Never miss a post!</strong> Subscribe to the PyImageSearch RSS Feed and keep up to date with my image search engine tutorials, tips, and tricks</p></div>
</div> <div id="woo_tabs-2" class="widget widget_woo_tabs"> <div id="tabs">
<ul class="wooTabs"><li class="popular"><a href="https://www.pyimagesearch.com/2017/10/02/deep-learning-on-the-raspberry-pi-with-opencv/#tab-pop">Popular</a></li> </ul><div class="clear"/>
<div class="boxes box inside">
<ul id="tab-pop" class="list"><li>
<a title="Install OpenCV and Python on your Raspberry Pi 2 and B+" href="https://www.pyimagesearch.com/2015/02/23/install-opencv-and-python-on-your-raspberry-pi-2-and-b/">Install OpenCV and Python on your Raspberry Pi 2 and B+</a>
February 23, 2015
<div class="fix"/>
</li>
<li>
<a title="Home surveillance and motion detection with the Raspberry Pi, Python, OpenCV, and Dropbox" href="https://www.pyimagesearch.com/2015/06/01/home-surveillance-and-motion-detection-with-the-raspberry-pi-python-and-opencv/">Home surveillance and motion detection with the Raspberry Pi, Python, OpenCV, and Dropbox</a>
June 1, 2015
<div class="fix"/>
</li>
<li>
<a title="Install guide: Raspberry Pi 3 + Raspbian Jessie + OpenCV 3" href="https://www.pyimagesearch.com/2016/04/18/install-guide-raspberry-pi-3-raspbian-jessie-opencv-3/">Install guide: Raspberry Pi 3 + Raspbian Jessie + OpenCV 3</a>
April 18, 2016
<div class="fix"/>
</li>
<li>
<a title="How to install OpenCV 3 on Raspbian Jessie" href="https://www.pyimagesearch.com/2015/10/26/how-to-install-opencv-3-on-raspbian-jessie/">How to install OpenCV 3 on Raspbian Jessie</a>
October 26, 2015
<div class="fix"/>
</li>
<li>
<a title="Basic motion detection and tracking with Python and OpenCV" href="https://www.pyimagesearch.com/2015/05/25/basic-motion-detection-and-tracking-with-python-and-opencv/">Basic motion detection and tracking with Python and OpenCV</a>
May 25, 2015
<div class="fix"/>
</li>
<li>
<a title="Accessing the Raspberry Pi Camera with OpenCV and Python" href="https://www.pyimagesearch.com/2015/03/30/accessing-the-raspberry-pi-camera-with-opencv-and-python/">Accessing the Raspberry Pi Camera with OpenCV and Python</a>
March 30, 2015
<div class="fix"/>
</li>
<li>
<a title="Ubuntu 16.04: How to install OpenCV" href="https://www.pyimagesearch.com/2016/10/24/ubuntu-16-04-how-to-install-opencv/">Ubuntu 16.04: How to install OpenCV</a>
October 24, 2016
<div class="fix"/>
</li>
</ul></div><!-- /.boxes -->
</div><!-- /wooTabs -->
</div> <div id="woo_search-2" class="widget widget_woo_search"><h3>Search</h3><div class="search_main">
<form method="get" class="searchform" action="https://www.pyimagesearch.com/">
<input type="text" class="field s" name="s" value="Search..." onfocus="if (this.value == 'Search...') {this.value = '';}" onblur="if (this.value == '') {this.value = 'Search...';}"/><button type="submit" class="icon-search submit" name="submit" value="Search"/>
</form>
<div class="fix"/>
</div> </div></aside><!– /#sidebar –></div><!– /#main-sidebar-container –>
</html>