Diskstation - DNS Server - a sample walkthrough
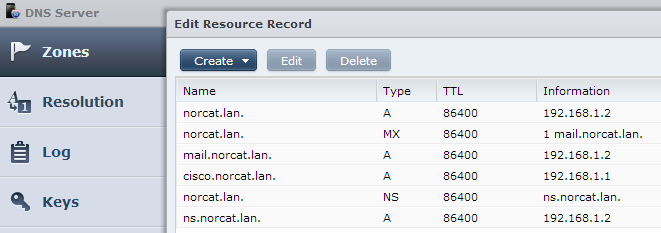
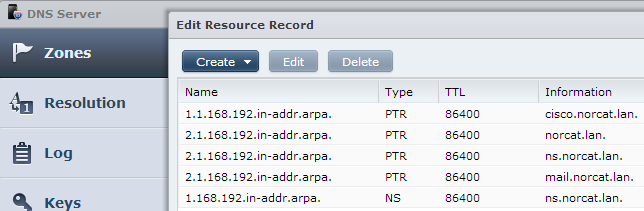
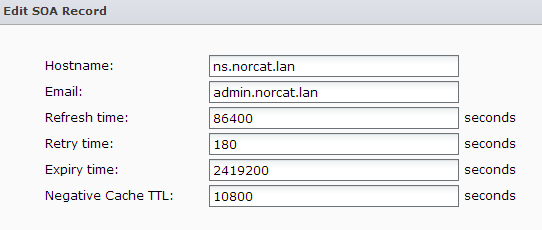
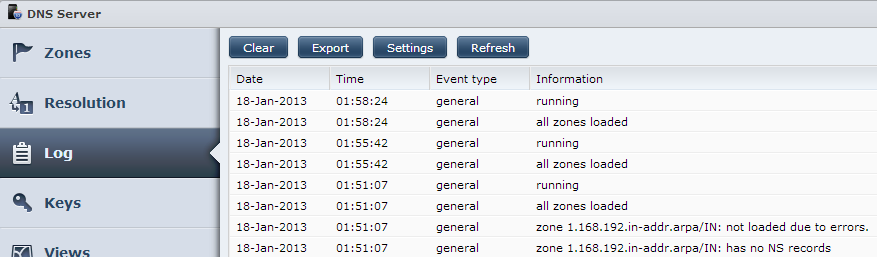
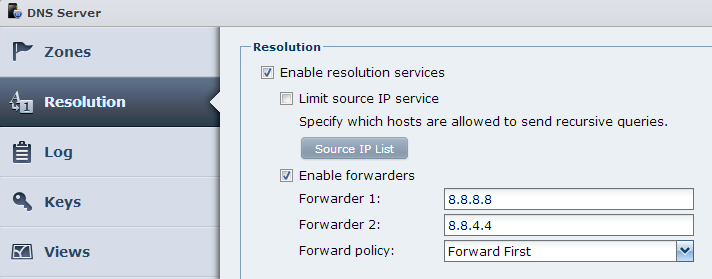
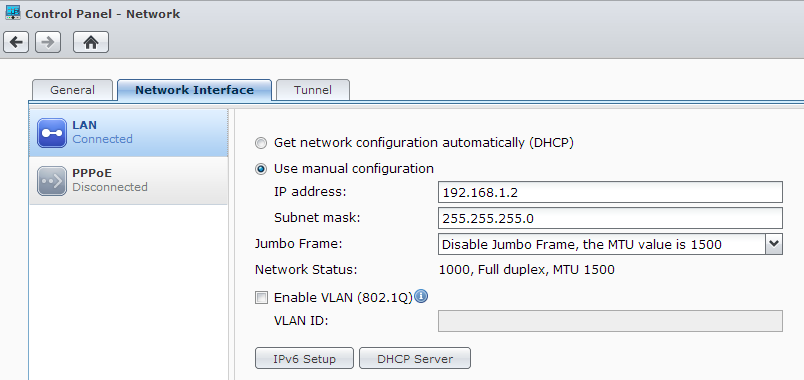
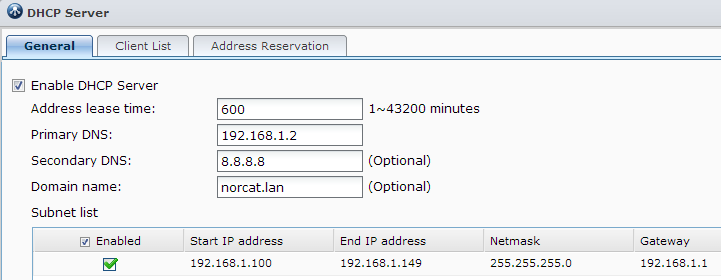
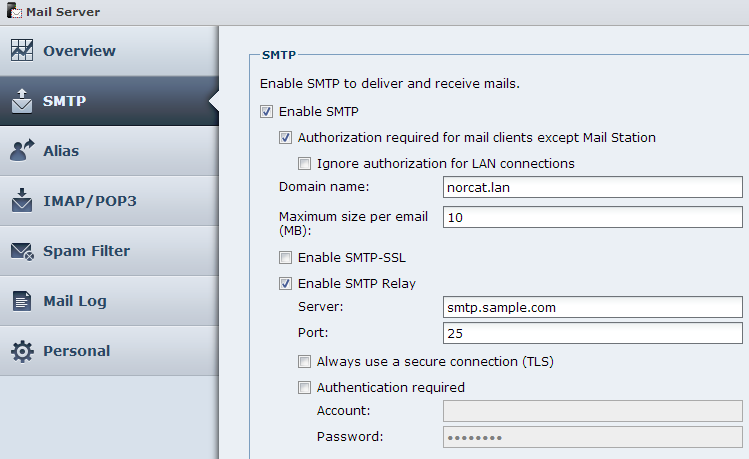
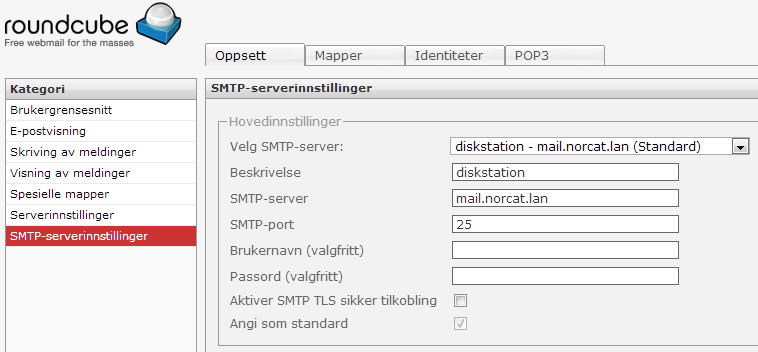
<html> <br/> I just had a go with the new DNS Server (Beta) in my <a class=„g-profile“ href=„http://plus.google.com/108974354568233793430“ target=„_blank“>+Synology</a> DiskStation DS111 NAS (DSM 4.1), and thought I would post a sample on how this can be set up for private use in a LAN with a private domain of your own choice. I've expanded this to include how it can interact with Mail Server/Mail Station, VPN Server and DHCP Server - these are all packages available for free in Diskstation! Reasons to set up a local DNS Server can be because you want to, because it may increase browsing performance (not much that), to learn, and to make name resolution easier to maintain both for local network and for remote VPN connections.<p>Screenshots is used to show what settings has been made in DSM and packages, I will try to keep this as brief as possible and hopefully the screens will explain more than words. Seeing how this is set up you can make your own experiments and do some research in help documents and on web.<br/></p><h2> <b>DNS Server</b></h2> The domain name I choose is <b>norcat.lan</b>, and seen here is the two master zones I created, one Forward zone and one Reverse zone:<br/><div class=„separator“ style=„clear: both; text-align: center;“> <a href=„http://3.bp.blogspot.com/-kAN0ykPj654/UPrxowNVAbI/AAAAAAAAABI/WI3E5Hsjguk/s1600/dns+server+-+zones.png“ imageanchor=„1“ style=„margin-left: 1em; margin-right: 1em;“><img border=„0“ src=„http://3.bp.blogspot.com/-kAN0ykPj654/UPrxowNVAbI/AAAAAAAAABI/WI3E5Hsjguk/s1600/dns+server+-+zones.png“/></a></div><br/> Here are the resource records for those:<br/><div class=„separator“ style=„clear: both; text-align: center;“> </div> <div class=„separator“ style=„clear: both; text-align: center;“> <a href=„http://1.bp.blogspot.com/-W8FHNsYNMcg/UPrxnCNNLQI/AAAAAAAAAA0/7aEciKRVAIo/s1600/dns+server+-+forward+zone.png“ imageanchor=„1“ style=„margin-left: 1em; margin-right: 1em;“><img border=„0“ src=„http://1.bp.blogspot.com/-W8FHNsYNMcg/UPrxnCNNLQI/AAAAAAAAAA0/7aEciKRVAIo/s1600/dns+server+-+forward+zone.png“/></a></div> <div class=„separator“ style=„clear: both; text-align: center;“> </div> <br/><div class=„separator“ style=„clear: both; text-align: center;“> <a href=„http://2.bp.blogspot.com/-9BVXfDADJu8/UjuabEnp3oI/AAAAAAAAAVw/LHY8wW9y2_4/s1600/dns+server+-+reverse+zone.png“ imageanchor=„1“ style=„margin-left: 1em; margin-right: 1em;“><img border=„0“ src=„http://2.bp.blogspot.com/-9BVXfDADJu8/UjuabEnp3oI/AAAAAAAAAVw/LHY8wW9y2_4/s1600/dns+server+-+reverse+zone.png“/></a></div> <br/> Each zone must have a NS record that points to name server, each address that can be used have one A record that maps the IP. The MX record identifies the domains mail server. Apart from the nameserver A record I added one for mail server, one for the router, and one for the web server (root domain). In reverse zone there is one PTR record for each forward zone A record, that does reverse lookup for IP to name.<p>It is possible to define CNAME records as aliases, and there are three A records here for same IP, but from what I can tell neither NS or MX records should point to CNAME records. If FTP was in use I would add a CNAME for ftp.norcat.lan.</p><p>Each zone must also have SOA record, it is available when you select zone and click Edit button. It appears the information here is same for both zones. I don't think it is very important for a private LAN zone, but here is the screen for that also:<br/></p><div class=„separator“ style=„clear: both; text-align: center;“> <a href=„http://4.bp.blogspot.com/-cxiNrvQ25Bc/UPrxnKTyYuI/AAAAAAAAAAw/vLZ8zfDRPG8/s1600/dns+server+-+forward+zone+-+soa.png“ imageanchor=„1“ style=„margin-left: 1em; margin-right: 1em;“><img border=„0“ src=„http://4.bp.blogspot.com/-cxiNrvQ25Bc/UPrxnKTyYuI/AAAAAAAAAAw/vLZ8zfDRPG8/s1600/dns+server+-+forward+zone+-+soa.png“/></a></div> <div class=„separator“ style=„clear: both; text-align: center;“> </div> <p>Remember to check the log to see that zones are loaded properly:<br/></p><div class=„separator“ style=„clear: both; text-align: center;“> <a href=„http://4.bp.blogspot.com/-jBnXq9clvQo/UPrxnRtbbZI/AAAAAAAAAAs/sVhjrdtR5vw/s1600/dns+server+-+log.png“ imageanchor=„1“ style=„margin-left: 1em; margin-right: 1em;“><img border=„0“ src=„http://4.bp.blogspot.com/-jBnXq9clvQo/UPrxnRtbbZI/AAAAAAAAAAs/sVhjrdtR5vw/s1600/dns+server+-+log.png“/></a></div> <br/> In resolution tab enable resolution to allow DNS server to query other DNS servers when it can't resolve a name. A local machine caches DNS tables so that it doesn't have to query a DNS server for each request to a resource URL when browsing internet etc. I believe this is the service that caches DNS tables in DiskStation and may make browsing from several clients in local network a bit faster. Forwarders is public DNS servers used to resolve other addresses, the IPs used here is for the public Google DNS servers.<br/><div class=„separator“ style=„clear: both; text-align: center;“> <a href=„http://3.bp.blogspot.com/-6cJpT-m_4vU/UPrxoVgpfBI/AAAAAAAAAA8/USlYTFgLUD0/s1600/dns+server+-+resolution.png“ imageanchor=„1“ style=„margin-left: 1em; margin-right: 1em;“><img border=„0“ src=„http://3.bp.blogspot.com/-6cJpT-m_4vU/UPrxoVgpfBI/AAAAAAAAAA8/USlYTFgLUD0/s1600/dns+server+-+resolution.png“/></a></div> <div style=„text-align: center;“> *</div> With DNS set up it's time to add usage for it in other packages.<br/> In control panel Network you can now set DNS server to DiskStations own IP (optional I guess):<br/><div class=„separator“ style=„clear: both; text-align: center;“> <a href=„http://1.bp.blogspot.com/-zym9xcq9iMA/UPrxmK78uPI/AAAAAAAAAAc/TE7gQBPkBeI/s1600/control+panel+-+network+-+dns.png“ imageanchor=„1“ style=„margin-left: 1em; margin-right: 1em;“><img border=„0“ src=„http://1.bp.blogspot.com/-zym9xcq9iMA/UPrxmK78uPI/AAAAAAAAAAc/TE7gQBPkBeI/s1600/control+panel+-+network+-+dns.png“/></a></div> <div class=„separator“ style=„clear: both; text-align: center;“> <br/></div> <h2> <b>DHCP server</b></h2> When DHCP Server is installed it is available from Interface tab:<br/><div class=„separator“ style=„clear: both; text-align: center;“> <a href=„http://2.bp.blogspot.com/-xJlZaS4m8S4/UPrxmPZuVgI/AAAAAAAAAAg/83Ii8g_tUWc/s1600/control+panel+-+network+-+interface.png“ imageanchor=„1“ style=„margin-left: 1em; margin-right: 1em;“><img border=„0“ src=„http://2.bp.blogspot.com/-xJlZaS4m8S4/UPrxmPZuVgI/AAAAAAAAAAg/83Ii8g_tUWc/s1600/control+panel+-+network+-+interface.png“/></a></div> <br/> In DHCP server you can set DNS IP that is pushed to clients. Domain name can be set, but it appears currently clients does not register dynamically in DNS server (with dynamic A/PTR records).<br/><div class=„separator“ style=„clear: both; text-align: center;“> <a href=„http://1.bp.blogspot.com/-Sltj8Heoe-g/UPrxmP_1smI/AAAAAAAAAAY/LrHLdglSkqc/s1600/dhcp+server+-+general.png“ imageanchor=„1“ style=„margin-left: 1em; margin-right: 1em;“><img border=„0“ src=„http://1.bp.blogspot.com/-Sltj8Heoe-g/UPrxmP_1smI/AAAAAAAAAAY/LrHLdglSkqc/s1600/dhcp+server+-+general.png“/></a></div> <br/><h2> <b>Mail Server</b></h2> Mail Server can be set up for local domain:<br/><div class=„separator“ style=„clear: both; text-align: center;“> <a href=„http://3.bp.blogspot.com/-fhIbBcKoFnM/UPrxpdLmjTI/AAAAAAAAABc/ADsE5YeLcqI/s1600/mail+server+-+smtp.png“ imageanchor=„1“ style=„margin-left: 1em; margin-right: 1em;“><img border=„0“ src=„http://3.bp.blogspot.com/-fhIbBcKoFnM/UPrxpdLmjTI/AAAAAAAAABc/ADsE5YeLcqI/s1600/mail+server+-+smtp.png“/></a></div> <br/> As for Relay, this will allow sending via local SMTP to a public address, and here comes a real limitation using a private domain that you made up yourself, receiver of mail won't be able reply to your address because that domain doesn't exist in public DNS servers. Use public account for such emails (add Mail Station identity and use as sender). Just to be clear, emails using the local domain is strictly for private use within LAN (or via VPN) between DiskStation accounts.<br/><b><br/></b> <br/><h2> <b>Mail Station</b></h2> Mail Station configuration for default SMTP server to use local server:<br/><div class=„separator“ style=„clear: both; text-align: center;“> <a href=„http://1.bp.blogspot.com/-dCwgAmpf5wY/UPrxpmQMl4I/AAAAAAAAABo/rVoZ1rNXMRY/s1600/mail+station+-+admin+settings+-+default+smtp+server.png“ imageanchor=„1“ style=„margin-left: 1em; margin-right: 1em;“><img border=„0“ src=„http://1.bp.blogspot.com/-dCwgAmpf5wY/UPrxpmQMl4I/AAAAAAAAABo/rVoZ1rNXMRY/s1600/mail+station+-+admin+settings+-+default+smtp+server.png“/></a></div> <br/> Mail Station local identity:<br/><div class=„separator“ style=„clear: both; text-align: center;“> <a href=„http://1.bp.blogspot.com/-9p_XJe_8OVY/UPrxp_mx0sI/AAAAAAAAABg/76252Dp-OUA/s1600/mail+station+-+settings+-+identity.png“ imageanchor=„1“ style=„margin-left: 1em; margin-right: 1em;“><img border=„0“ src=„http://1.bp.blogspot.com/-9p_XJe_8OVY/UPrxp_mx0sI/AAAAAAAAABg/76252Dp-OUA/s1600/mail+station+-+settings+-+identity.png“/></a></div> <p>Mail Station SMTP server (inherited from default admin settings) :<br/></p><div class=„separator“ style=„clear: both; text-align: center;“> <a href=„http://3.bp.blogspot.com/-xgSWlQgwjQM/UPrxqvyR0cI/AAAAAAAAAB0/MiU7agkAxgw/s1600/mail+station+-+settings+-+smtp+server.png“ imageanchor=„1“ style=„margin-left: 1em; margin-right: 1em;“><img border=„0“ src=„http://3.bp.blogspot.com/-xgSWlQgwjQM/UPrxqvyR0cI/AAAAAAAAAB0/MiU7agkAxgw/s1600/mail+station+-+settings+-+smtp+server.png“/></a></div> <p/><h2> <b>VPN Server</b></h2> I use VPN Server and have configured OpenVPN with default IP range 10.8.0.0. Address 0 is the network identifier and DiskStation takes first available address 10.8.0.1.<br/><div class=„separator“ style=„clear: both; text-align: center;“> <a href=„http://1.bp.blogspot.com/-uH7AdYAvj2Q/UPr5vgg8abI/AAAAAAAAACY/LdYHdt7yp7k/s1600/vpn+server+-+ip.png“ imageanchor=„1“ style=„margin-left: 1em; margin-right: 1em;“><img border=„0“ src=„http://1.bp.blogspot.com/-uH7AdYAvj2Q/UPr5vgg8abI/AAAAAAAAACY/LdYHdt7yp7k/s1600/vpn+server+-+ip.png“/></a></div> <br/> In the .ovpn client configuration file (export configuration) there is option to set DNS for client:<br/><div class=„separator“ style=„clear: both; text-align: center;“> <a href=„http://4.bp.blogspot.com/-gST5npaWwII/UPrxqxA-NFI/AAAAAAAAAB8/IU2pErsfWRk/s1600/vpn+server+-+ovpn+-+dns.png“ imageanchor=„1“ style=„margin-left: 1em; margin-right: 1em;“><img border=„0“ src=„http://4.bp.blogspot.com/-gST5npaWwII/UPrxqxA-NFI/AAAAAAAAAB8/IU2pErsfWRk/s1600/vpn+server+-+ovpn+-+dns.png“/></a></div> <br/> When I connect the VPN client I then get the DNS for DiskStation via VPN and can use the local names defined there in Windows Explorer, web browser and the likes. Remember though, the names translates to internal IP range, for example name <u>norcat.lan</u> would mean IP <u>192.168.1.2</u> as defined in DNS Server, and that is the address that is used in requests. No problem with this as long there is no conflict with local client IP range, just beware.<p/><h2> HTTPS</h2> Another benefit with DNS is for Https certificates where FQDN is important. I have created a self-signed certificate with multiple domains (subjectAltName) for both my DDNS name and the private norcat.lan domain, so I get the 'green light' when browsing Diskstation with Https both locally, remote using DDNS name and remote over VPN. Here are two articles I used when doing this:<br/><a href=„http://www.clintharris.net/2009/self-signed-certificates/“ target=„_blank“>Adding “https://” to Your Site for Free and Misconceptions About the Security of Self-Signed Certificates</a><br/><a href=„http://quanterium.blogspot.no/2012/01/creating-self-signed-ssl-certificate.html“ target=„_blank“>Creating a Self-Signed SSL Certificate for Multiple Domains</a><p/><div style=„text-align: center;“> *</div> <div style=„text-align: center;“> <br/></div> This was my first experience setting up a DNS Server myself, but everything does seem to work properly :) </html>