Raspberry Pi Minecraft PE Server: Your Personal Pocket Edition Server
<html> <p><img src=„https://pimylifeup.com/wp-content/uploads/2017/04/Raspberry-Pi-Minecraft-PE-Server.jpg“ alt=„Raspberry Pi Minecraft PE Server“ width=„757“ height=„504“ class=„aligncenter size-full wp-image-13506“ data-lazy-srcset=„https://pimylifeup.com/wp-content/uploads/2017/04/Raspberry-Pi-Minecraft-PE-Server.jpg 757w, https://pimylifeup.com/wp-content/uploads/2017/04/Raspberry-Pi-Minecraft-PE-Server-300x200.jpg 300w, https://pimylifeup.com/wp-content/uploads/2017/04/Raspberry-Pi-Minecraft-PE-Server-610x406.jpg 610w“ data-lazy-sizes=„(max-width: 757px) 100vw, 757px“/></p><noscript><img src=„https://pimylifeup.com/wp-content/uploads/2017/04/Raspberry-Pi-Minecraft-PE-Server.jpg“ alt=„Raspberry Pi Minecraft PE Server“ width=„757“ height=„504“ class=„aligncenter size-full wp-image-13506“ srcset=„https://pimylifeup.com/wp-content/uploads/2017/04/Raspberry-Pi-Minecraft-PE-Server.jpg 757w, https://pimylifeup.com/wp-content/uploads/2017/04/Raspberry-Pi-Minecraft-PE-Server-300x200.jpg 300w, https://pimylifeup.com/wp-content/uploads/2017/04/Raspberry-Pi-Minecraft-PE-Server-610x406.jpg 610w“ sizes=„(max-width: 757px) 100vw, 757px“/></noscript><br/> In this tutorial we will be showing you how to setup your very own Raspberry Pi Minecraft PE server. This is a cheap way of providing you with an always on, Pocket Edition capable server.<p>This stops you from having to leave your phone or computer online if you want others to be able to always access your world. The Pi is also pretty good on power usage so you can save on your power bill too.</p><div class=„easy_lbb_code_1“> <ins class=„adsbygoogle“ style=„display:block“ data-ad-client=„ca-pub-1652468991810118“ data-ad-slot=„3156589192“ data-ad-format=„auto“/> </div><p>For this tutorial we will be making use of the Nukkit software. We decided to utilize Nukkit since we found that it was one of the most stable Minecraft Pocket Edition servers currently available.</p><p>Please keep in mind the Pi is quite limited in resources so you may have some issues when it comes to performance. Tweaking the server properties is a great way to get more performance and maybe some room for more people. I wouldn’t recommend having more than 5 people joining the server, however you may want to experiment to see how much it will be able to handle.</p><p>If you’re after a server for the Java version of Minecraft then you should check out our previous tutorial that shows you how to <a href=„https://pimylifeup.com/raspberry-pi-minecraft-server/“>setup a spigot Minecraft server</a>.</p><p>If you would like to know more about the server software then you can find out more about it at <a href=„https://nukkit.io“ target=„_blank“>the Nukkit website</a>.</p><h2><i class=„fa fa-list“ aria-hidden=„true“/> Equipment List</h2><p>The following pieces of equipment are what I recommend when it comes to completing this Raspberry Pi minecraft pocket edition server.</p><h3>Recommended:</h3><p><i class=„fa fa-microchip“ aria-hidden=„true“/> <a href=„https://pimylifeup.com/out/amazon/raspberrypi“ target=„_blank“ rel=„nofollow“>Raspberry Pi 3</a></p><p><i class=„fa fa-hdd-o“ aria-hidden=„true“/> <a href=„https://pimylifeup.com/out/amazon/microsdcard8gb“ target=„_blank“ rel=„nofollow“>Micro SD Card</a></p><p><i class=„fa fa-wifi“ aria-hidden=„true“/> <a href=„https://pimylifeup.com/out/amazon/ethernetcord“ target=„_blank“ rel=„nofollow“>Ethernet Cord</a> or <a href=„https://pimylifeup.com/out/amazon/wifidongle“ target=„_blank“ rel=„nofollow“>WiFi dongle</a> (Use a ethernet cord for the best performance)</p><p><i class=„fa fa-plug“ aria-hidden=„true“/> <a href=„https://pimylifeup.com/out/amazon/pipowersupply“ target=„_blank“ rel=„nofollow“>Power Supply</a></p><h3>Optional:</h3><p><i class=„fa fa-square-o“ aria-hidden=„true“/> <a href=„https://pimylifeup.com/raspberry-pi-cases/“ target=„_blank“>Raspberry Pi Case</a></p><p><strong><i class=„fa fa-exclamation-triangle“ aria-hidden=„true“/> Note:</strong> Don’t forget that if you’re using a Pi 3 then this has WiFi inbuilt and you won’t need a dongle.</p><h2><i class=„fa fa-wrench“ aria-hidden=„true“/> Setting up your Raspberry Pi Minecraft PE Server</h2><p>In this tutorial, we will work completely within the terminal. In fact, it is best to change the boot mode of the Raspberry Pi so it boots directly into the terminal for the Minecraft Pocket Edition server. You can also install Raspbian lite so you don’t install any of the additional packages that comes with the full version of Raspbian, just make sure you install java as we will need that.</p><p>Minecraft PE servers are hugely demanding on <a href=„https://pimylifeup.com/what-is-raspberry-pi/“>the Raspberry Pi’s hardware</a>, so every extra bit of resources made available to it, the more it can handle. It’s important to keep this in mind before installing any additional software packages that may drag the performance down.</p><p><strong class=„step_numbering“>1.</strong> First let’s make sure everything on the Raspberry Pi is up to date by running the following two commands.</p><pre>
sudo apt-get update
sudo apt-get upgrade
</pre><p><strong class=„step_numbering“>2.</strong> Now we will need to make a couple of changes in the raspberry pi config tool. Let’s open the tool by entering the following command:</p><pre>
sudo raspi-config
</pre><p><strong class=„step_numbering“>3.</strong> First, let’s go to <em>Advanced Options->Memory Split</em> and update this to <em>16</em>. (This will allow for more memory to be free for the server)</p><p><strong class=„step_numbering“>4.</strong> Secondly, now is a good time to change the “boot up” option so that it boots straight into the terminal. Go to Boot <em>Options->Desktop/CLI</em>, Press <em>Enter</em> with Console selected to enable booting to console.</p><p><strong><i class=„fa fa-exclamation-triangle“ aria-hidden=„true“/> Note:</strong> This does not need to be done if you’re running on Raspbian lite.</p><p><strong class=„step_numbering“>5.</strong> To truly make the most of the Minecraft Pocket Edition server, you will need to overclock your Raspberry Pi.</p><p>The following steps only work with the <a href=„https://pimylifeup.com/what-is-raspberry-pi/“>Raspberry Pi 1 and 2</a> as the raspi-config tool does not currently support the Raspberry Pi 3 for overclocking.</p><p>While you’re still in the raspi-config tool, go to <em>Overclock</em>, here pick the “<em>High</em>” overclocking option. This will give the Raspberry Pi a good overclock, though make sure you have a decent, stable power supply, most USB chargers will not cut it.</p><p><strong class=„step_numbering“>6.</strong> If you haven’t activated SSH before, make sure you go to <em>Advanced Options->SSH</em> and select “Enable”. You will need this for easy access to your Raspberry Pi.</p><p><strong class=„step_numbering“>7.</strong> Now go to “Finish” and reboot your Raspberry Pi using the following command.</p><pre>
sudo reboot
</pre><p><strong class=„step_numbering“>8.</strong> Before we get to ahead of ourselves, now is a great chance to grab the IP address of the Raspberry Pi. You will need to write down the value from the next command, we will need to use this later.</p><p>In the terminal, enter the following command:</p><pre>
sudo hostname -I
</pre><p><strong class=„step_numbering“>9.</strong> With that now setup, we will now proceed with downloading and setting up the Nukkit server software. Before we get too far ahead of ourselves, let’s first make a directory to keep this in, run the following commands to make the directory in the pi user’s root directory.</p><pre>
mkdir ~/nukkit
cd ~/nukkit
</pre><div class=„easy_lbb_code_8“><a href=„https://pimylifeup.com/out/vprvpn3“ rel=„nofollow“ target=„_blank“><img class=„responsive_small aligncenter“ src=„https://pimylifeup.com/wp-content/uploads/2017/03/vpn-square.jpg“ alt=„Vyprvpn Square“/> <img class=„responsive_large aligncenter“ src=„https://pimylifeup.com/wp-content/uploads/2017/04/vpn-long.jpg“ alt=„Vyprvpn Long“/></a> <img class=„imp“ src=„https://powerhouse.go2cloud.org/aff_i?offer_id=174&aff_id=3567&aff_sub=midbanner“ width=„1“ height=„1“/></div><p><strong class=„step_numbering“>10.</strong> Finally, let’s download Nukkit, normally we will have to compile the software which can take a while due to the Raspberry Pi’s low processing power, thankfully some nice users have provided their CI (Continuous Integration) servers to the public.</p><p>Run the following command to download the latest build of Nukkit to your Raspberry Pi.</p><pre>
wget -O nukkit.jar https://pimylifeup.com/out/nukkit
</pre><p><strong class=„step_numbering“>11.</strong> With Nukkit now downloaded to our Raspberry Pi we can now run it, this will generate all the files we need to be able to configure the server further.</p><p>Running Nukkit is incredibly easy, we can run it with the following simple command.</p><pre>
sudo java -jar nukkit.jar
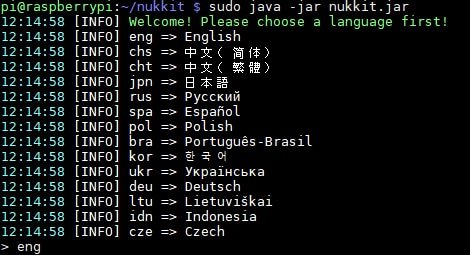
</pre><p>Upon running the server for the first time you will be asked to choose a language, for this tutorial we will be using English. Therefore we typed <em>eng</em> into the console and pressed enter.<br/><img src=„https://pimylifeup.com/wp-content/uploads/2017/04/select-language.jpg“ alt=„select language“ width=„470“ height=„255“ class=„aligncenter size-full wp-image-13544“ data-lazy-srcset=„https://pimylifeup.com/wp-content/uploads/2017/04/select-language.jpg 470w, https://pimylifeup.com/wp-content/uploads/2017/04/select-language-300x163.jpg 300w“ data-lazy-sizes=„(max-width: 470px) 100vw, 470px“/></p><noscript><img src=„https://pimylifeup.com/wp-content/uploads/2017/04/select-language.jpg“ alt=„select language“ width=„470“ height=„255“ class=„aligncenter size-full wp-image-13544“ srcset=„https://pimylifeup.com/wp-content/uploads/2017/04/select-language.jpg 470w, https://pimylifeup.com/wp-content/uploads/2017/04/select-language-300x163.jpg 300w“ sizes=„(max-width: 470px) 100vw, 470px“/></noscript><br/> The server should immediately begin to boot up, the server should display the following text when it is ready to be connected to.<pre>
[INFO] Preparing level "world"
[INFO] Starting GS4 status listener
[INFO] Setting query port to 19132
[INFO] Query is running on 0.0.0.0:19132
[INFO] Default game type: Survival Mode
[INFO] Done (3.109s)! For help, type "help" or "?"
</pre><p>While you can now begin to play on your server you might want to first configure it so it is setup more to your liking. To do this, first kill the process by pressing <em>Ctrl + C</em>.</p><p><strong class=„step_numbering“>12.</strong> There are two configuration files that come with Nukkit, one controls Nukkit’s own options such as being able to change the number of chunks it loads in, the other controls the actual Minecraft options such as what game mode you want the server to be using.</p><p>You can read up on the <em>server.properties</em> file and see what changes you can make to it by going to the <a href=„http://minecraft.gamepedia.com/Server.properties“ target=„_blank“>Minecraft server properties page</a>.</p><p>Run the following command to edit Nukkit’s configuration file.</p><pre>
sudo nano nukkit.yml
</pre><p>Alternatively, run the following command to edit the Minecraft server configuration.</p><pre>
sudo nano server.properties
</pre><p>Once you have finished making your changes to the configuration files, make sure you save them by pressing <em>Ctrl + X</em> then pressing <em>Y</em> and then <em>Enter</em>.</p><p>Afterwards you can immediately proceed to start up Nukkit again by typing in the following command:</p><pre>
sudo java -jar nukkit.jar
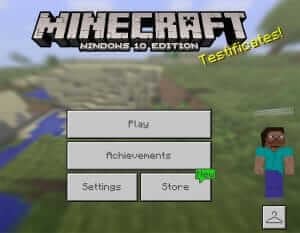
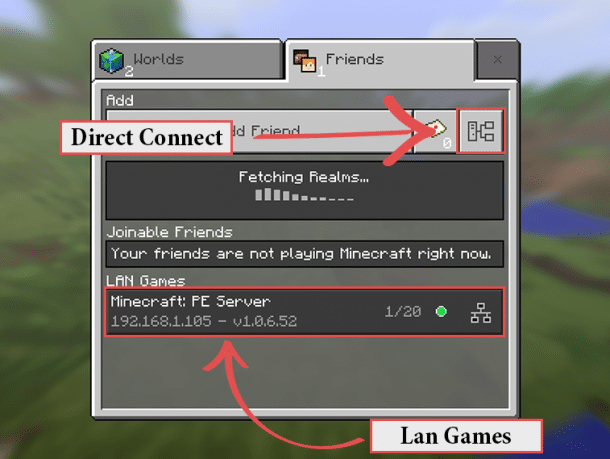
</pre><h2><i class=„fa fa-wrench“ aria-hidden=„true“/> Connecting to your Raspberry Pi Minecraft PE Server</h2><p>If you’re on a local network, then it will be easy to connect to the Raspberry Pi Minecraft PE server. To test out our recently setup server we will need to do the following.</p><p>Now load up Minecraft on a Mobile Phone or a Windows 10 PC (Minecraft Windows 10 Edition) that is located on the <em>same local network</em> as the Raspberry Pi.<br/><img src=„https://pimylifeup.com/wp-content/uploads/2017/04/minecraft-pocket-edition-main-menu.jpg“ alt=„minecraft pocket edition main menu“ width=„757“ height=„588“ class=„aligncenter size-full wp-image-13547“ data-lazy-srcset=„https://pimylifeup.com/wp-content/uploads/2017/04/minecraft-pocket-edition-main-menu.jpg 757w, https://pimylifeup.com/wp-content/uploads/2017/04/minecraft-pocket-edition-main-menu-300x233.jpg 300w, https://pimylifeup.com/wp-content/uploads/2017/04/minecraft-pocket-edition-main-menu-610x474.jpg 610w“ data-lazy-sizes=„(max-width: 757px) 100vw, 757px“/></p><noscript><img src=„https://pimylifeup.com/wp-content/uploads/2017/04/minecraft-pocket-edition-main-menu.jpg“ alt=„minecraft pocket edition main menu“ width=„757“ height=„588“ class=„aligncenter size-full wp-image-13547“ srcset=„https://pimylifeup.com/wp-content/uploads/2017/04/minecraft-pocket-edition-main-menu.jpg 757w, https://pimylifeup.com/wp-content/uploads/2017/04/minecraft-pocket-edition-main-menu-300x233.jpg 300w, https://pimylifeup.com/wp-content/uploads/2017/04/minecraft-pocket-edition-main-menu-610x474.jpg 610w“ sizes=„(max-width: 757px) 100vw, 757px“/></noscript><br/> Go to the friends tab and then your server should pop up at the bottom under LAN Games. If it doesn’t simply go to direct connect and enter the IP we got earlier on the Pi using the command <em>hostname -I</em>. We have highlighted the direct connect button in our screenshot below.<br/><img src=„https://pimylifeup.com/wp-content/uploads/2017/04/Minecraft-PE-LAN-server.png“ alt=„Raspberry Pi Minecraft PE Server Connect Buttons“ width=„757“ height=„569“ class=„aligncenter size-full wp-image-13084“ srcset=„https://pimylifeup.com/wp-content/uploads/2017/04/Minecraft-PE-LAN-server.png 757w, https://pimylifeup.com/wp-content/uploads/2017/04/Minecraft-PE-LAN-server-300x225.png 300w, https://pimylifeup.com/wp-content/uploads/2017/04/Minecraft-PE-LAN-server-610x459.png 610w, https://pimylifeup.com/wp-content/uploads/2017/04/Minecraft-PE-LAN-server-510x382.png 510w“ sizes=„(max-width: 757px) 100vw, 757px“/><br/> If you want to allow access to the Minecraft Pocket Edition server via the internet, then you will need to setup port forwarding. You will need to port forward the port <em>19132</em> (Unless you change it in the server properties) to the local IP address of your Raspberry Pi. Keep in mind opening ports always increases the security risk from outside sources.<p>For more information check out our <a href=„https://pimylifeup.com/raspberry-pi-port-forwarding/“>port forwarding guide for the Raspberry Pi.</a> You can also find this in our <a href=„https://pimylifeup.com/ultimate-book-of-pi/“>Raspberry Pi project ebook</a> along with a ton of other projects & guides.</p><p>Hopefully by now you should have a fully operational Raspberry Pi Minecraft PE Server. If you come across any issues or have some feedback related to this tutorial, then please don’t hesitate to leave a comment below.<br/></p><div class=„easy_lbb_code_2“> <ins class=„adsbygoogle“ style=„display:block“ data-ad-client=„ca-pub-1652468991810118“ data-ad-slot=„7586788790“ data-ad-format=„auto“/> </div><div id=„crestashareiconincontent“ class=„cresta-share-icon fourth_style“><h3 class=„social-header“><i class=„fa fa-share-square-o“ aria-hidden=„true“/> Share This!</h3><div class=„sbutton crestaShadow facebook-cresta-share“ id=„facebook-cresta-c“><a rel=„nofollow“ href=„https://www.facebook.com/sharer.php?u=https%3A%2F%2Fpimylifeup.com%2Fraspberry-pi-minecraft-pe-server%2F&t=Raspberry+Pi+Minecraft+PE+Server%3A+Your+Personal+Pocket+Edition+Server“ title=„Share to Facebook“ onclick=„window.open(this.href,'targetWindow','toolbar=no,location=no,status=no,menubar=no,scrollbars=yes,resizable=yes,width=700,height=450'); return false;“><i class=„cs c-icon-cresta-facebook“/></a></div><div class=„sbutton crestaShadow twitter-cresta-share“ id=„twitter-cresta-c“><a rel=„nofollow“ href=„https://twitter.com/intent/tweet?text=Raspberry+Pi+Minecraft+PE+Server%3A+Your+Personal+Pocket+Edition+Server&url=https%3A%2F%2Fpimylifeup.com%2Fraspberry-pi-minecraft-pe-server%2F&via=pimylifeup“ title=„Share to Twitter“ onclick=„window.open(this.href,'targetWindow','toolbar=no,location=no,status=no,menubar=no,scrollbars=yes,resizable=yes,width=700,height=450'); return false;“><i class=„cs c-icon-cresta-twitter“/></a></div><div class=„sbutton crestaShadow googleplus-cresta-share“ id=„googleplus-cresta-c“><a rel=„nofollow“ href=„https://plus.google.com/share?url=https%3A%2F%2Fpimylifeup.com%2Fraspberry-pi-minecraft-pe-server%2F“ title=„Share to Google Plus“ onclick=„window.open(this.href,'targetWindow','toolbar=no,location=no,status=no,menubar=no,scrollbars=yes,resizable=yes,width=700,height=450'); return false;“><i class=„cs c-icon-cresta-gplus“/></a></div><div class=„sbutton crestaShadow pinterest-cresta-share“ id=„pinterest-cresta-c“><a rel=„nofollow“ href=„https://pinterest.com/pin/create/bookmarklet/?url=https%3A%2F%2Fpimylifeup.com%2Fraspberry-pi-minecraft-pe-server%2F&media=https://pimylifeup.com/wp-content/uploads/2017/04/minecraft-pe-server-long.jpg&description=Raspberry+Pi+Minecraft+PE+Server%3A+Your+Personal+Pocket+Edition+Server“ title=„Share to Pinterest“ onclick=„window.open(this.href,'targetWindow','toolbar=no,location=no,status=no,menubar=no,scrollbars=yes,resizable=yes,width=700,height=450'); return false;“><i class=„cs c-icon-cresta-pinterest“/></a></div><div class=„sbutton crestaShadow mail-cresta-share“ id=„mail-cresta-c“><a rel=„nofollow“ href=„https://pimylifeup.com/cdn-cgi/l/email-protection#89b6fafcebe3eceafdb4dbe8faf9ebecfbfbf0a9d9e0a9c4e0e7eceafbe8effda9d9cca9daecfbffecfbb3a9d0e6fcfba9d9ecfbfae6e7e8e5a9d9e6eae2ecfda9ccede0fde0e6e7a9daecfbffecfbafe8e4f9b2ebe6edf0b4cae1eceae2a9e6fcfda9fde1e0fab3a9e1fdfdf9faacbac8acbbcfacbbcff9e0e4f0e5e0efecfcf9a7eae6e4acbbcffbe8faf9ebecfbfbf0a4f9e0a4e4e0e7eceafbe8effda4f9eca4faecfbffecfbacbbcf“ title=„Email This Page“><i class=„cs c-icon-cresta-mail“/></a></div><div style=„clear: both;“/></div><div style=„clear: both;“/><div class=„et_bloom_below_post“><div class=„et_bloom_inline_form et_bloom_optin et_bloom_make_form_visible et_bloom_optin_1“ style=„display: none;“><div class=„et_bloom_form_container et_bloom_border_solid et_bloom_border_position_top et_bloom_rounded et_bloom_form_text_dark et_bloom_form_bottom et_bloom_inline_1_field“><div class=„et_bloom_form_container_wrapper clearfix“><div class=„et_bloom_header_outer“><div class=„et_bloom_form_header et_bloom_header_text_dark“><div class=„et_bloom_form_text“><h2 style=„text-align: center;“>The FREE Raspberry Pi Crash Course</h2><p style=„text-align: center;“>Enter your email below and get the Raspberry Pi crash course delivered straight to your inbox!</p></div></div></div><div class=„et_bloom_form_content et_bloom_1_field et_bloom_bottom_inline“><form method=„post“ class=„clearfix“><p class=„et_bloom_popup_input et_bloom_subscribe_email“> <input placeholder=„Email“/></p><button data-optin_id=„optin_1“ data-service=„activecampaign“ data-list_id=„2“ data-page_id=„13083“ data-account=„littlebigbyte“ data-disable_dbl_optin=„“ data-tags_list=„pi_crashcourse“ class=„et_bloom_submit_subscription“> Get Access >> </button></form><div class=„et_bloom_success_container“> </div><h2 class=„et_bloom_success_message“>Please check your inbox for a confirmation email.</h2></div></div> </div></div></div><div class=„crp_related “><h3 class=„related-posts-header“><i class=„fa fa-microchip“/> More Projects & Guides!</h3><ul><li><a href=„https://pimylifeup.com/raspberry-pi-minecraft-server/“ rel=„nofollow“><img src=„https://pimylifeup.com/wp-content/uploads/2015/08/Raspberry-Pi-Minecraft-227x125.jpg“ alt=„Dead Easy Raspberry Pi Minecraft Server Tutorial“ title=„Dead Easy Raspberry Pi Minecraft Server Tutorial“ width=„227“ height=„125“ class=„crp_thumb crp_featured“/>Dead Easy Raspberry Pi Minecraft Server Tutorial</a></li><li><a href=„https://pimylifeup.com/raspi-config-tool/“ rel=„nofollow“><img src=„https://pimylifeup.com/wp-content/uploads/2015/02/raspi-config-227x125.jpg“ alt=„The Ultimate Guide to the Raspi Config Tool“ title=„The Ultimate Guide to the Raspi Config Tool“ width=„227“ height=„125“ class=„crp_thumb crp_featured“/>The Ultimate Guide to the Raspi Config Tool</a></li><li><a href=„https://pimylifeup.com/raspberry-pi-gitlab/“ rel=„nofollow“><img src=„https://pimylifeup.com/wp-content/uploads/2017/02/Raspberry-Pi-Gitlab-227x125.jpg“ alt=„Raspberry Pi GITLab Server: Version Control on your Pi“ title=„Raspberry Pi GITLab Server: Version Control on your Pi“ width=„227“ height=„125“ class=„crp_thumb crp_featured“/>Raspberry Pi GITLab Server: Version Control on your Pi</a></li></ul><div class=„crp_clear“/></div> </html>